# Getting Started

#### <span style="color: rgb(0, 180, 144);">2. Create a New Case</span>

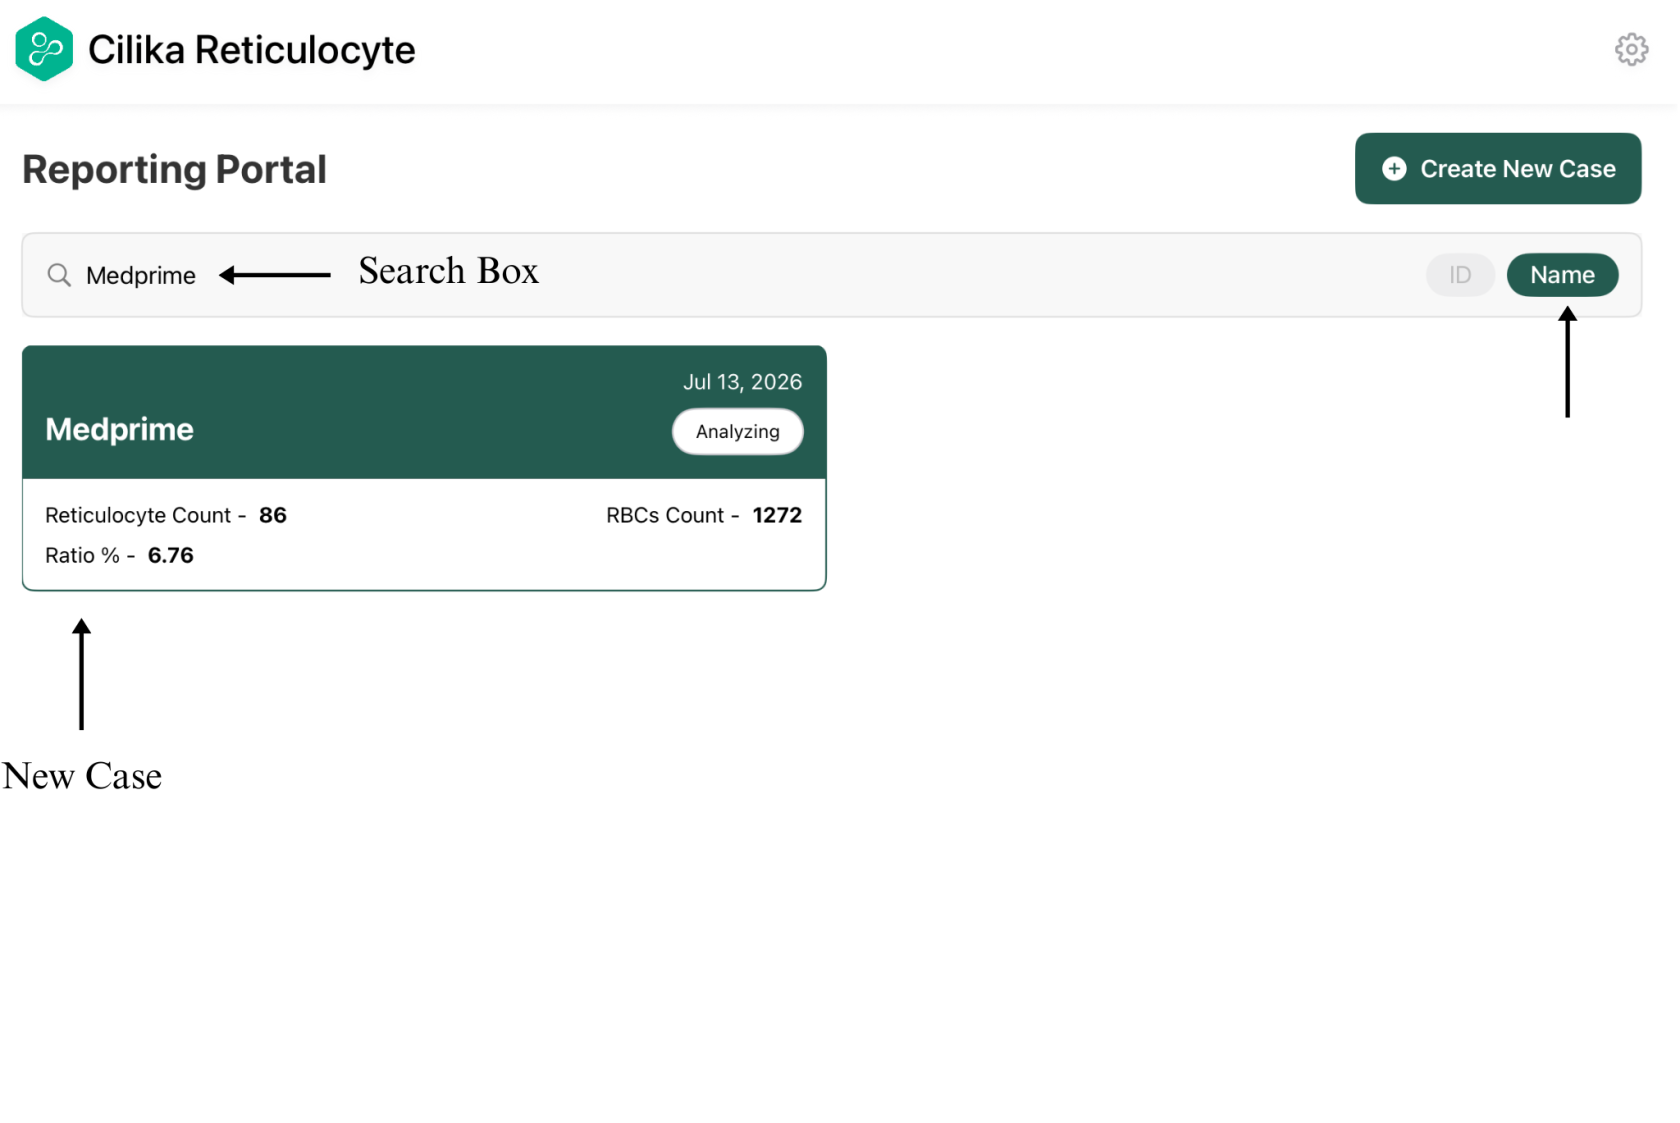
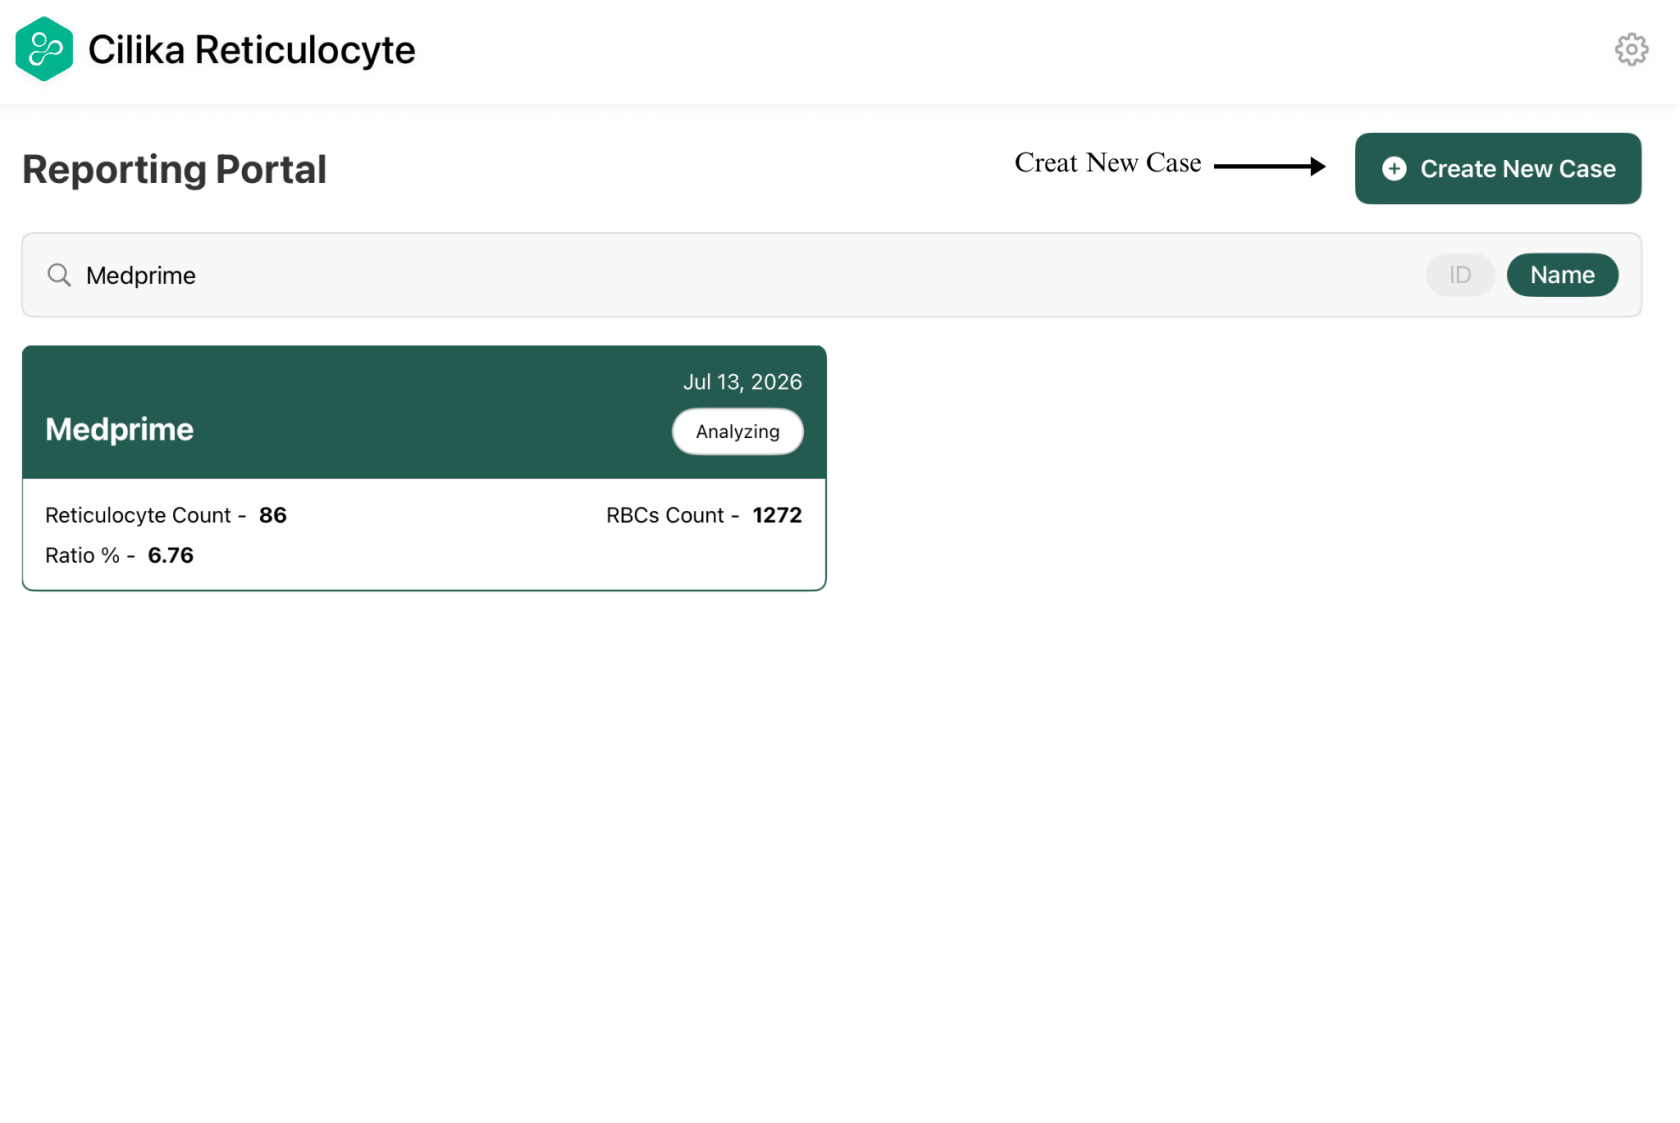
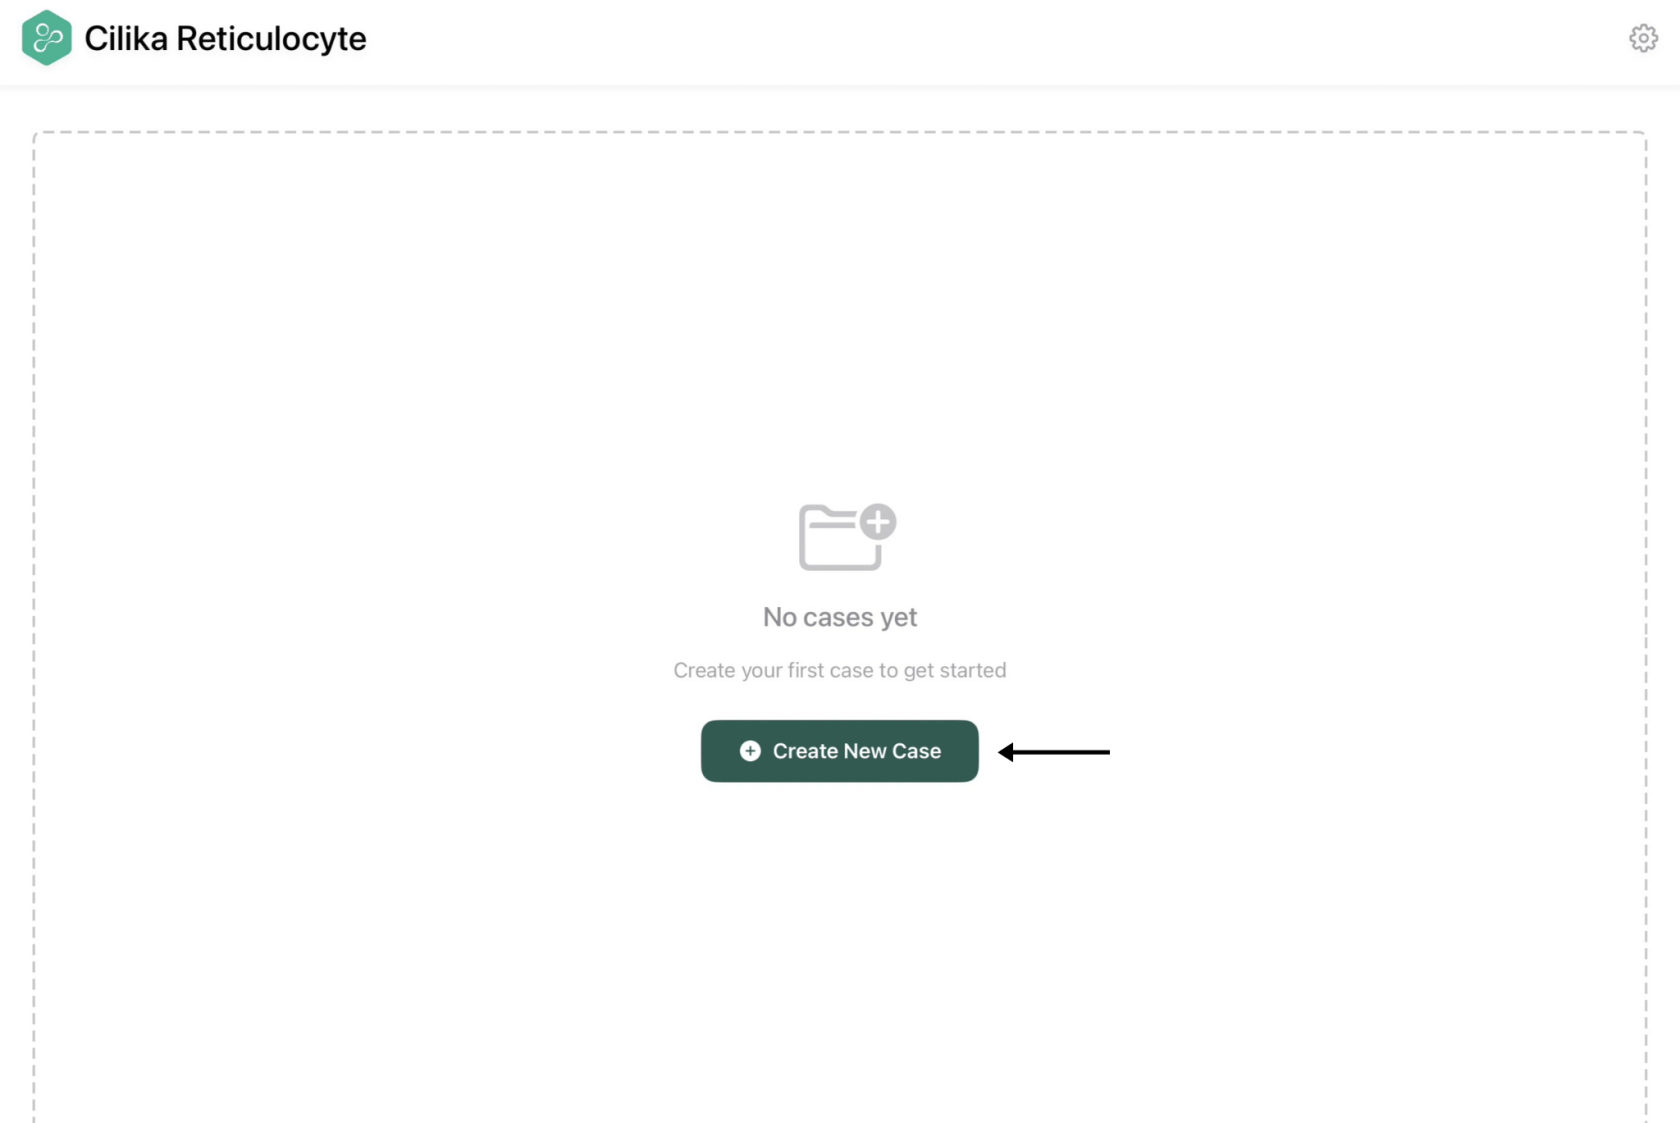
The **Dashboard** is the landing page where all patient cases are displayed. From here, you can create a new case or access an existing one.

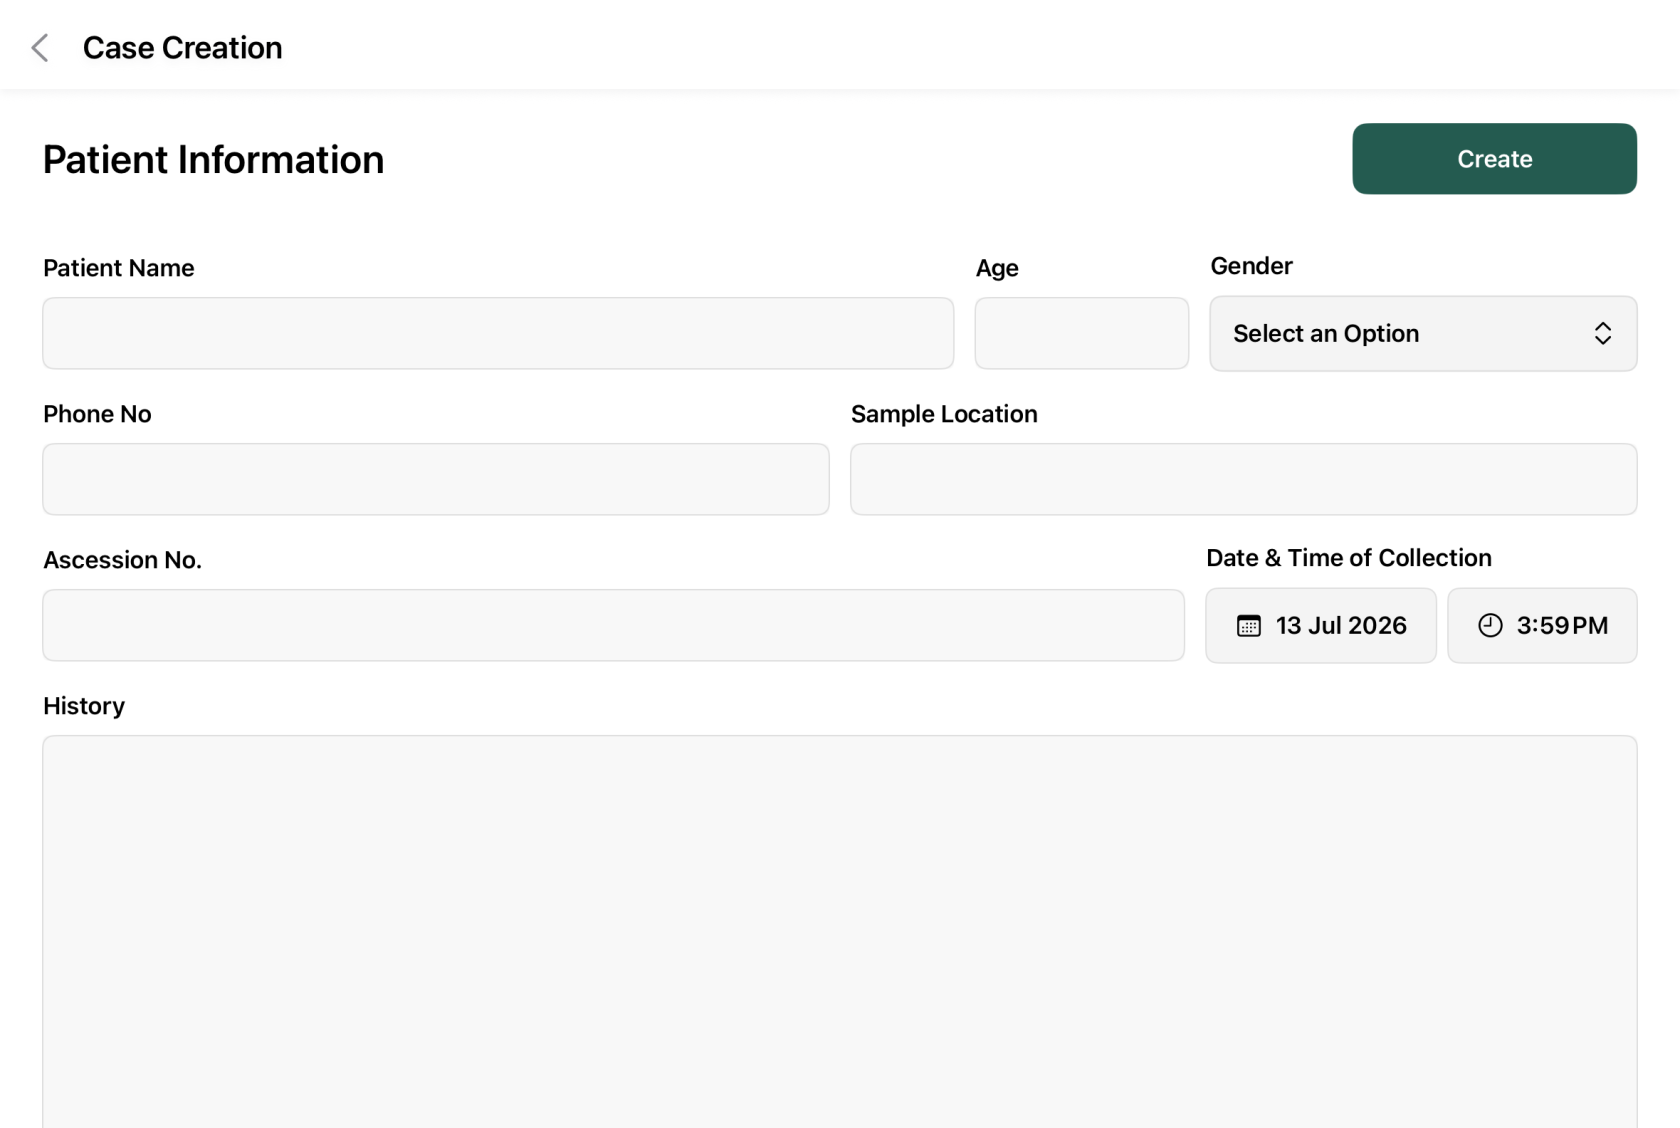
1. Open the Reporting Portal.
2. If no cases exist, the page displays a Create Case button.
3. Once the **Create New Case** option is selected, they will be asked to add in **Patient Information.** The patient Information, if missed can be edited later as well.
4. Once the case is created, it is displayed as card on the dashboard.
5. User can use the Search field to search for a specific case and also has the option to search by the patient’s **NAME** or **ID**.
6. Each case card shows a basic review of information which includes:

- Case identifier or name.
- Date created or last updated.
- Current case status (e.g., Info Completed).

<div id="bkmrk-6.-click-on-a-case-c">7. Click on a case card to open and manage the case.</div><div id="bkmrk-7.-to-create-another">8. To create another case, click Create New Case in the upper-right corner.</div><table border="1" id="bkmrk-" style="border-collapse: collapse; width: 100%;"><colgroup><col style="width: 50.0497%;"></col><col style="width: 50.0497%;"></col></colgroup><tbody><tr><td></td><td>  
</td></tr><tr><td class="align-center">![dashboard arrow.png](https://docs.medprimetech.com/uploads/images/gallery/2026-07/scaled-1680-/UpPdashboard-arrow.png)

*Figure 2*</td><td class="align-center">[![Case Creation.png](https://docs.medprimetech.com/uploads/images/gallery/2026-07/scaled-1680-/case-creation.png)](https://docs.medprimetech.com/uploads/images/gallery/2026-07/case-creation.png)*Figure 2.1*</td></tr></tbody></table>

#### <span style="color: rgb(0, 180, 144);">3. Existing Case</span>

After creating a case, you can reopen it anytime from the **Dashboard**.

1. Open the **Dashboard**.
2. Locate the required case from the list.
3. Use the **Search** bar to search by **ID** or **Name**, if required.
4. Select the desired case to open it. The selected case opens, allowing you to continue image acquisition or review.
5. You can also create a new case.

<table border="1" id="bkmrk--1" style="border-collapse: collapse; width: 100%;"><colgroup><col style="width: 50%;"></col><col style="width: 50%;"></col></colgroup><tbody><tr><td>[![2(1).png](https://docs.medprimetech.com/uploads/images/gallery/2026-07/scaled-1680-/tB221.png)](https://docs.medprimetech.com/uploads/images/gallery/2026-07/tB221.png)

*Figure 3*

</td><td>*[![3.png](https://docs.medprimetech.com/uploads/images/gallery/2026-07/scaled-1680-/OJj3.png)](https://docs.medprimetech.com/uploads/images/gallery/2026-07/OJj3.png)Figure 3.1*

</td></tr></tbody></table>

#### <span style="color: rgb(0, 180, 144);">*4.Capture Images*</span>

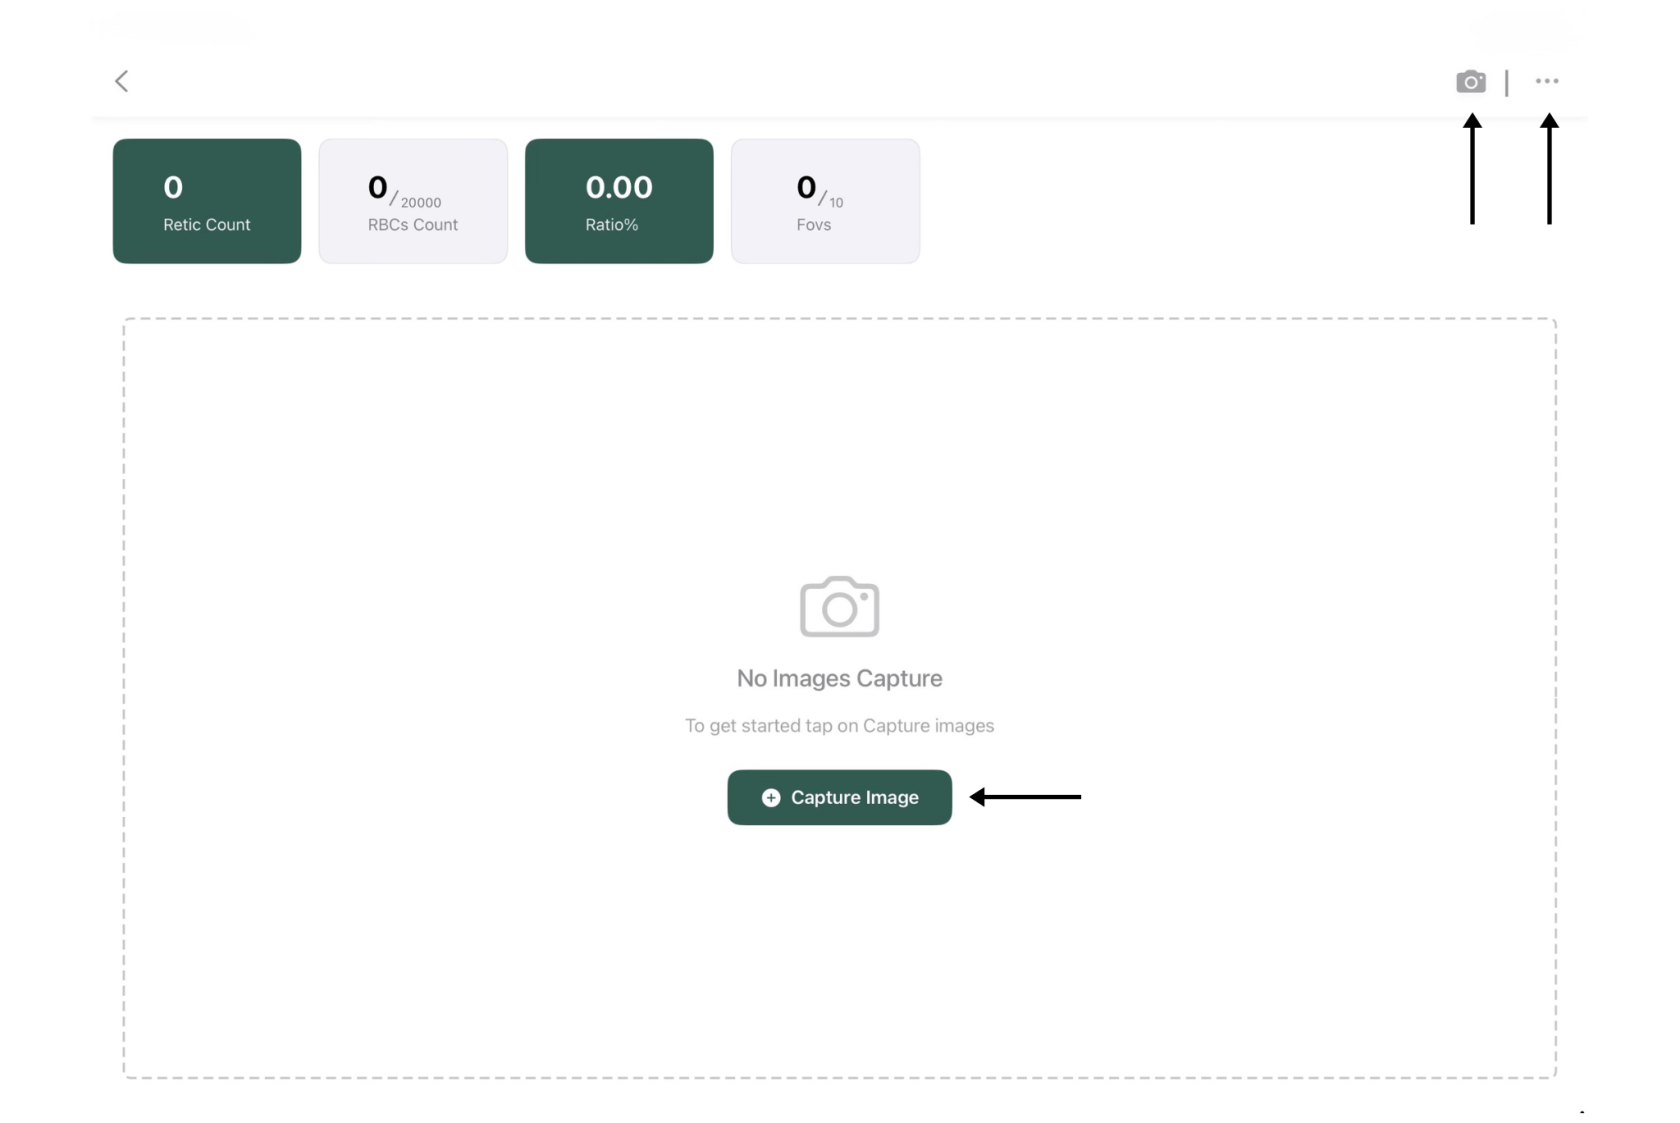
The Image Capture screen is used to acquire microscope images for analysis.

1. Open the required patient case.
2. Review the summary counters displayed at the top of the screen:
    
    
    - Retic Count
    - RBC Count
    - Ratio (%)
    - FOVs
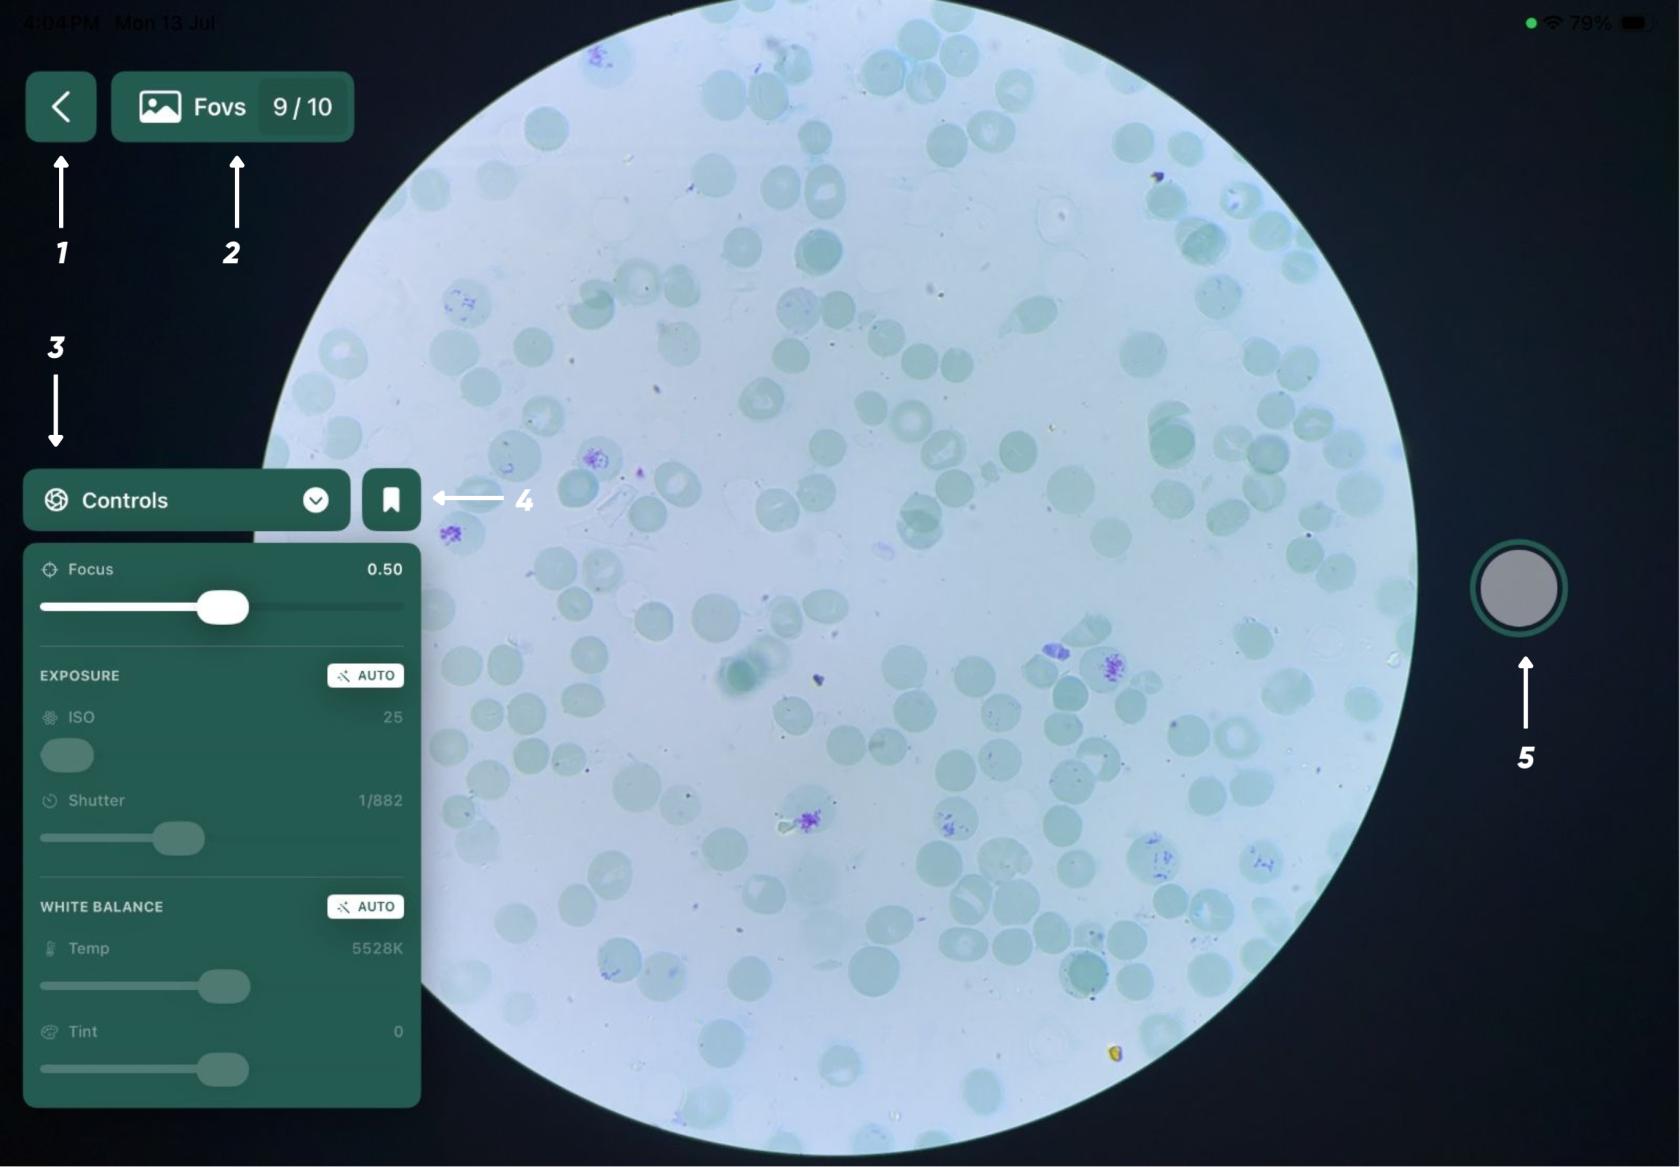
3. If no images have been captured, you will find **Capture Image** option once you open a case.
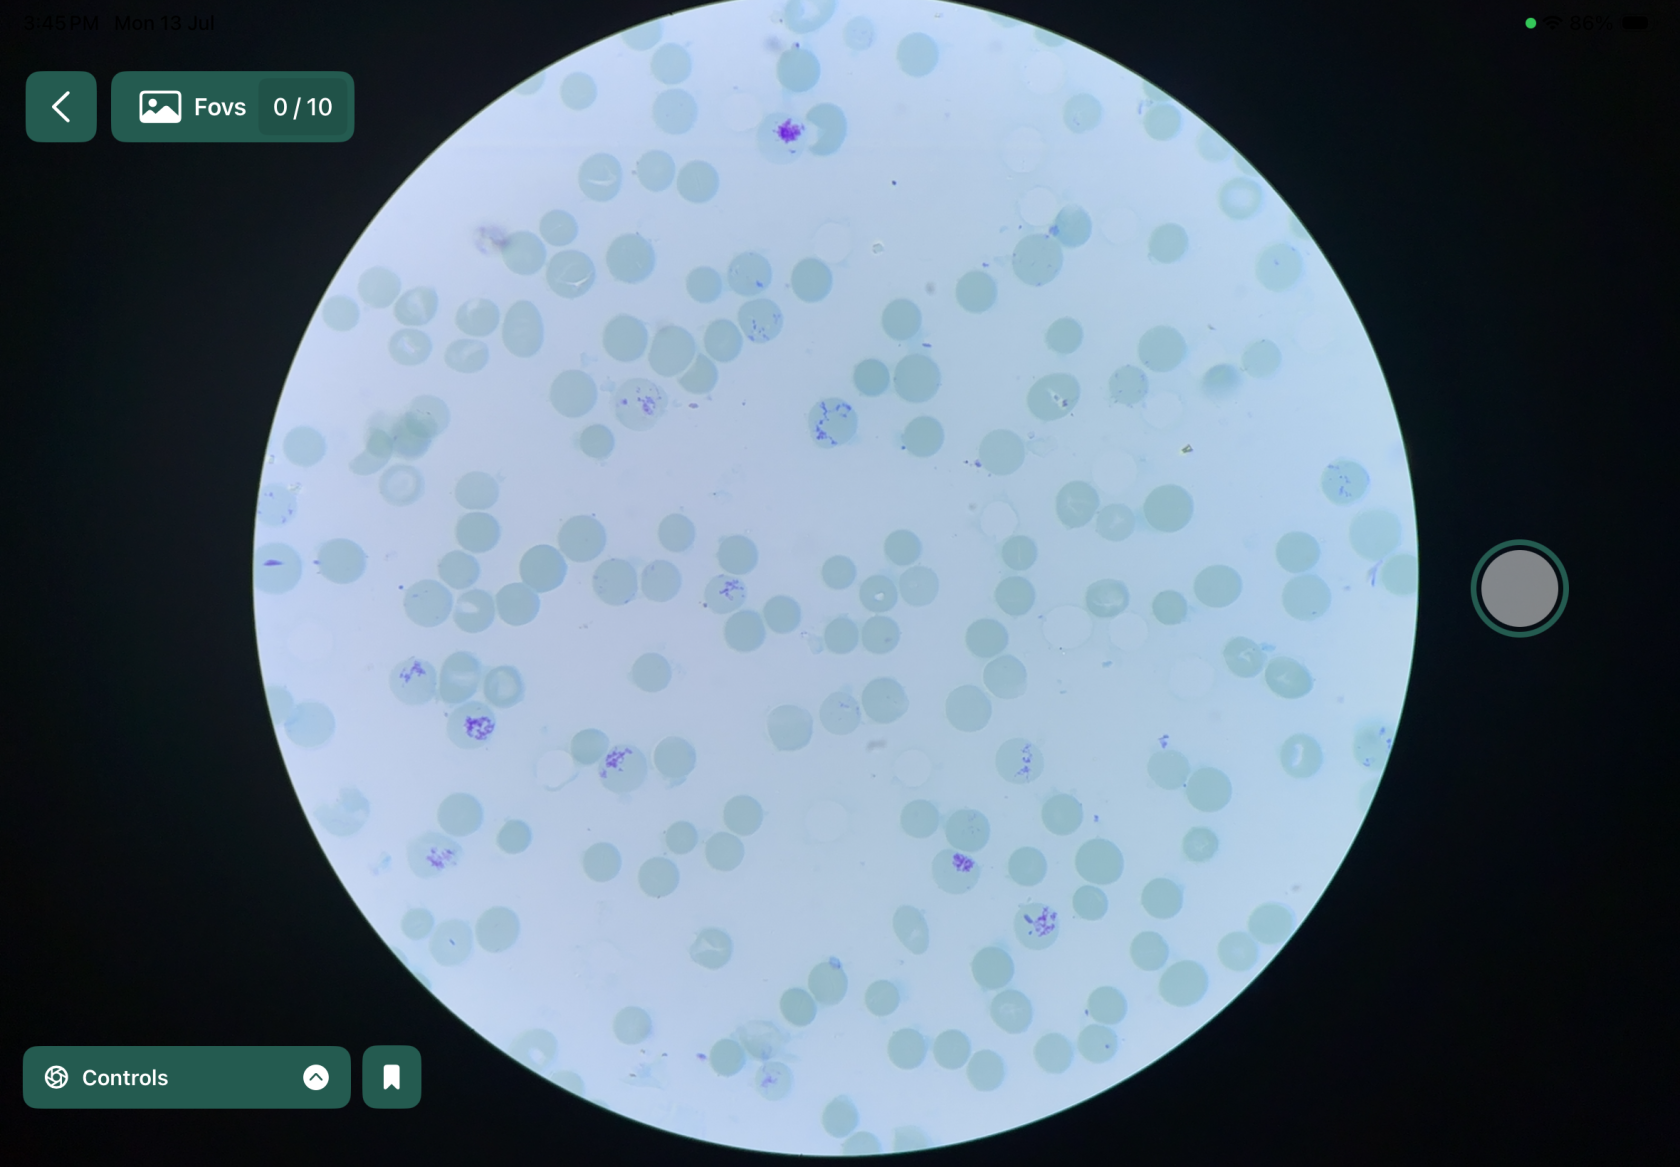
4. Position the microscope field clearly within the camera view.
5. The capture view has camera settings labeled as tools on the left.
6. The tools are set to auto manually but can be adjusted by tapping on the auto button.
7. Tools include:
    
    
    - Focus
    - Exposure
    - White Balance
8. Once the camera settings have been adjusted, tap the **Capture** button to capture an image.
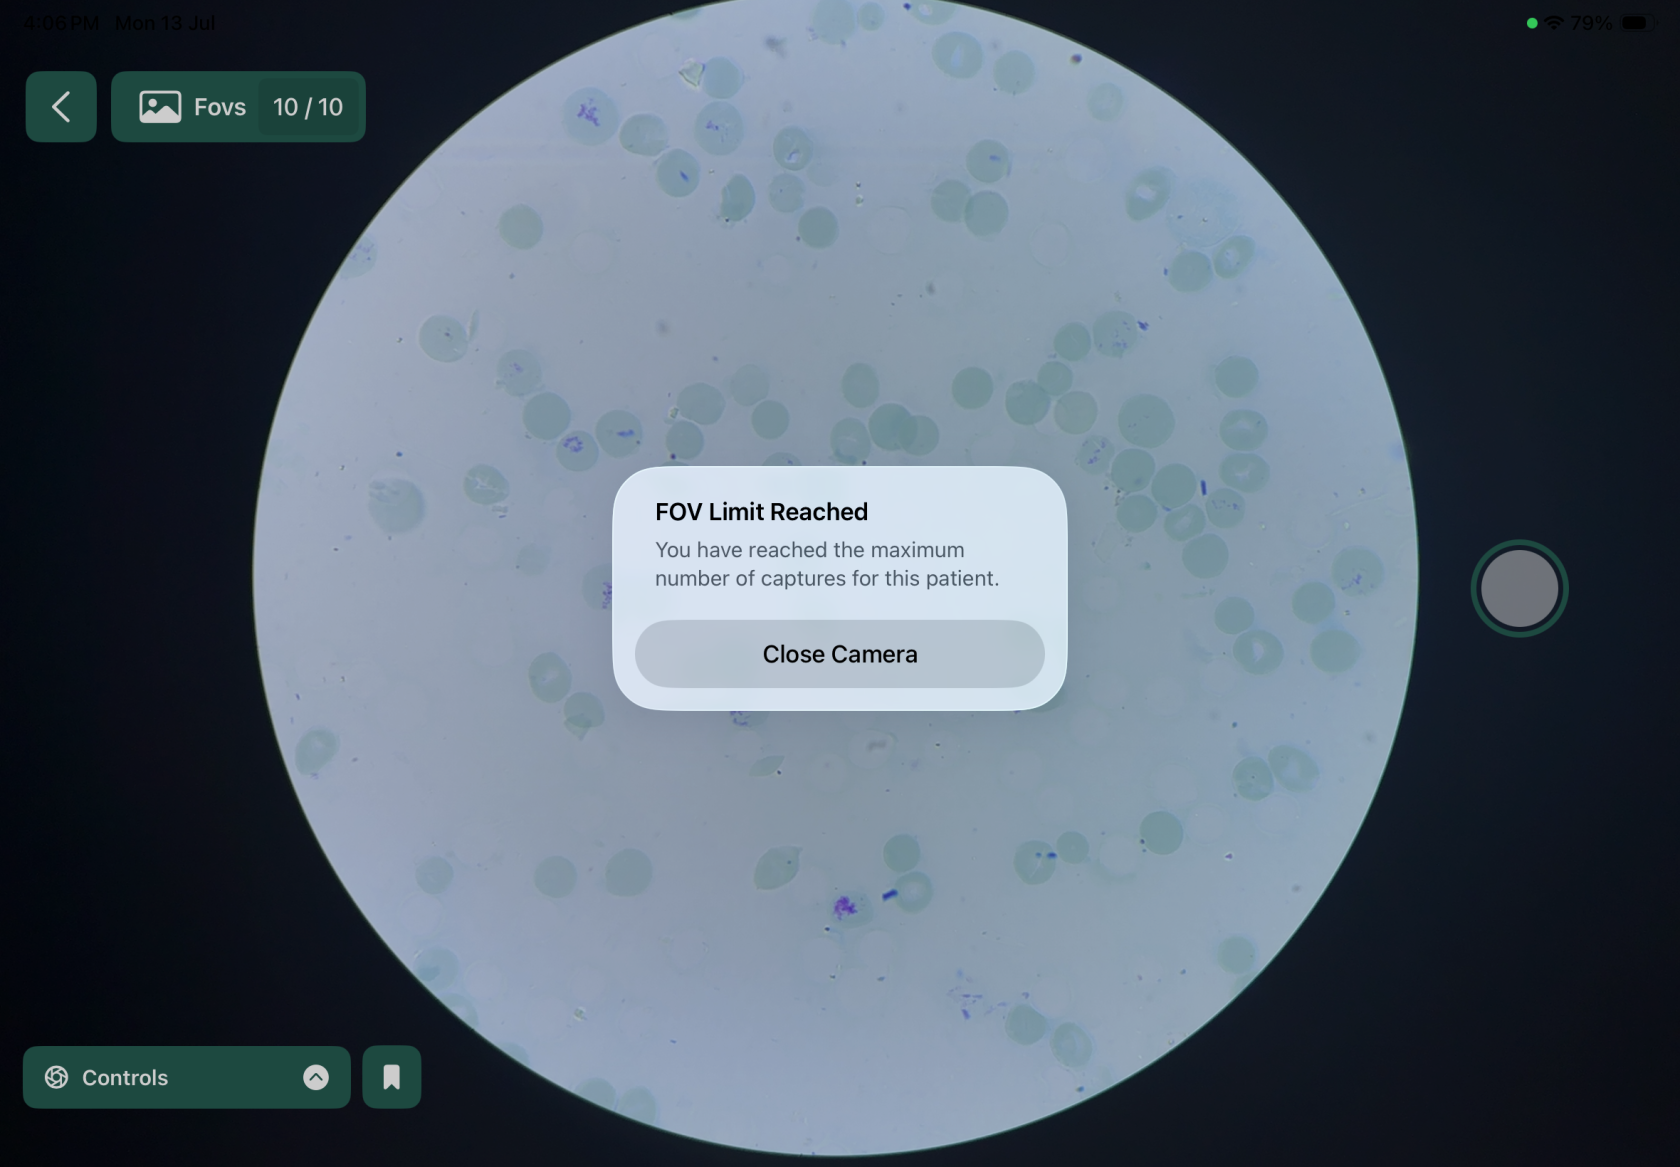
9. Continue capturing images until the required number of **Fields of View (FOVs)** is reached.
10. The **Fields of View (FOVs)** can be set by the user. The minimum FOVs are 10.

<table border="1" id="bkmrk--2" style="border-collapse: collapse; width: 100%;"><colgroup><col style="width: 50%;"></col><col style="width: 50%;"></col></colgroup><tbody><tr><td>  
</td><td>  
</td></tr><tr><td>[![5.png](https://docs.medprimetech.com/uploads/images/gallery/2026-07/scaled-1680-/5.png)](https://docs.medprimetech.com/uploads/images/gallery/2026-07/5.png)

*<span style="color: rgb(0, 180, 144);">Figure 4</span>*

</td><td>[![IMG_9490.PNG](https://docs.medprimetech.com/uploads/images/gallery/2026-07/scaled-1680-/img-9490.PNG)](https://docs.medprimetech.com/uploads/images/gallery/2026-07/img-9490.PNG)

<span style="color: rgb(0, 180, 144);">*Figure 4.1*</span>

</td></tr><tr><td> [![capture page.jpg.jpeg](https://docs.medprimetech.com/uploads/images/gallery/2026-07/scaled-1680-/capture-page-jpg.jpeg)](https://docs.medprimetech.com/uploads/images/gallery/2026-07/capture-page-jpg.jpeg)

<span style="color: rgb(0, 180, 144);">*Figure 4.2*</span>

</td><td>[![IMG_0179.png](https://docs.medprimetech.com/uploads/images/gallery/2026-07/scaled-1680-/DHNimg-0179.png)](https://docs.medprimetech.com/uploads/images/gallery/2026-07/DHNimg-0179.png)

<span style="color: rgb(0, 180, 144);">*Figure 4.3*</span>

</td></tr></tbody></table>


#### <span style="color: rgb(0, 180, 144);">5. Incomplete POV</span>

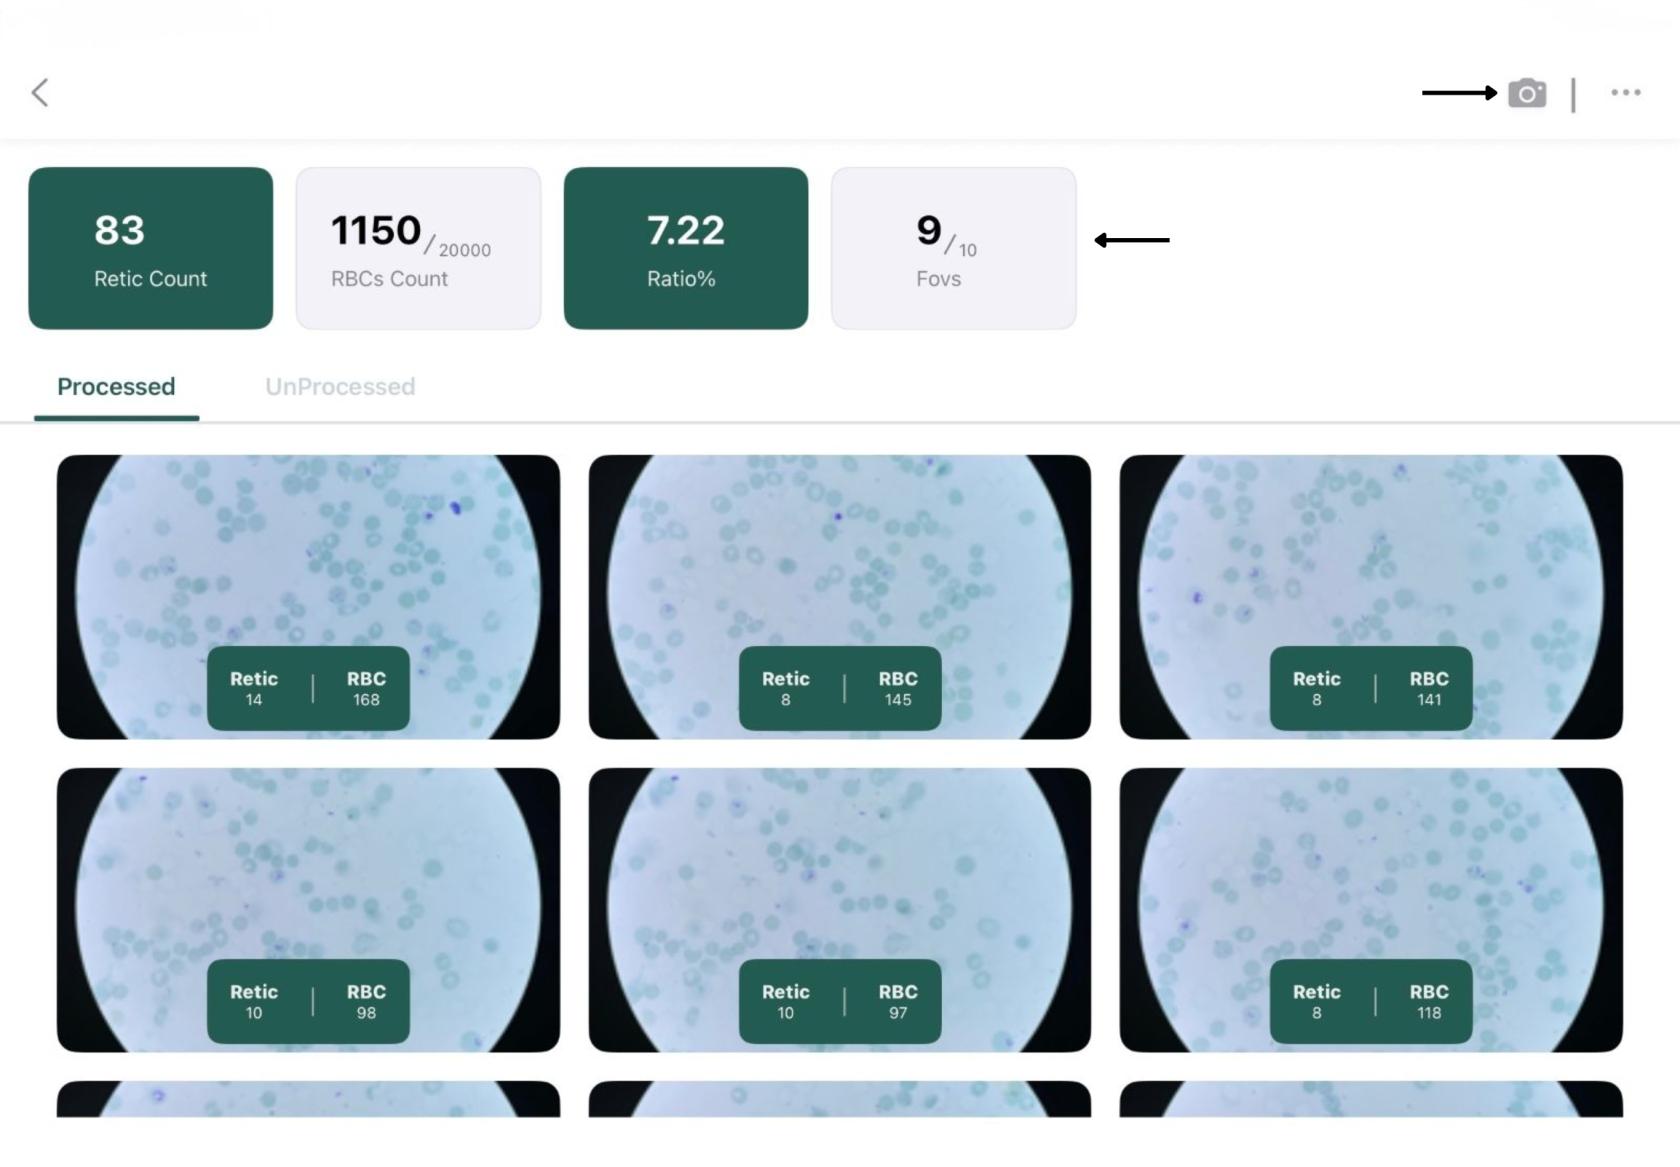
1. If the FOV limit is not full filled, the user can find the the capture image button at the top right corner of the previous page.
2. Once the FOV limit is reached, the button disappears.

<table border="1" id="bkmrk--3" style="border-collapse: collapse; width: 100%;"><colgroup><col style="width: 50.0497%;"></col><col style="width: 50.0497%;"></col></colgroup><tbody><tr><td colspan="2">[![image review arrow.jpg](https://docs.medprimetech.com/uploads/images/gallery/2026-07/scaled-1680-/image-review-arrow.jpg)](https://docs.medprimetech.com/uploads/images/gallery/2026-07/image-review-arrow.jpg)  
</td></tr></tbody></table>

#### <span style="color: rgb(0, 180, 144);">6. Review Captured Images</span>

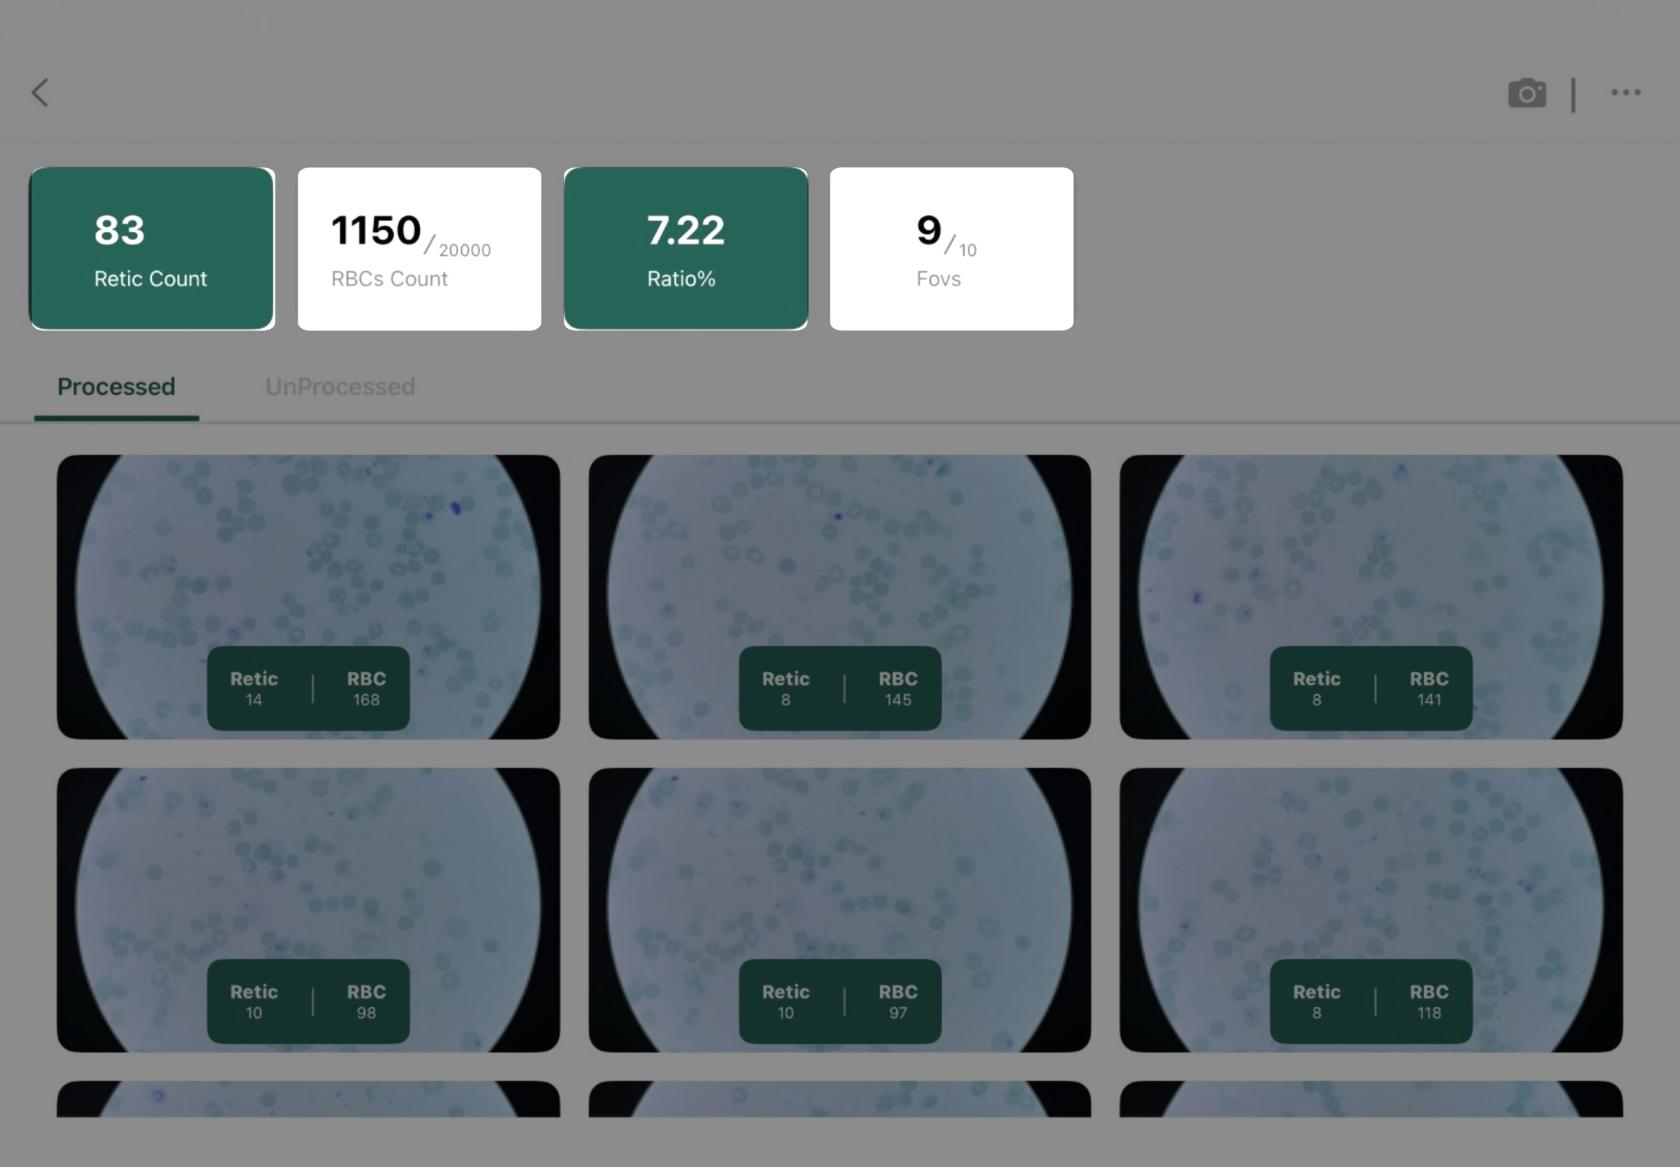
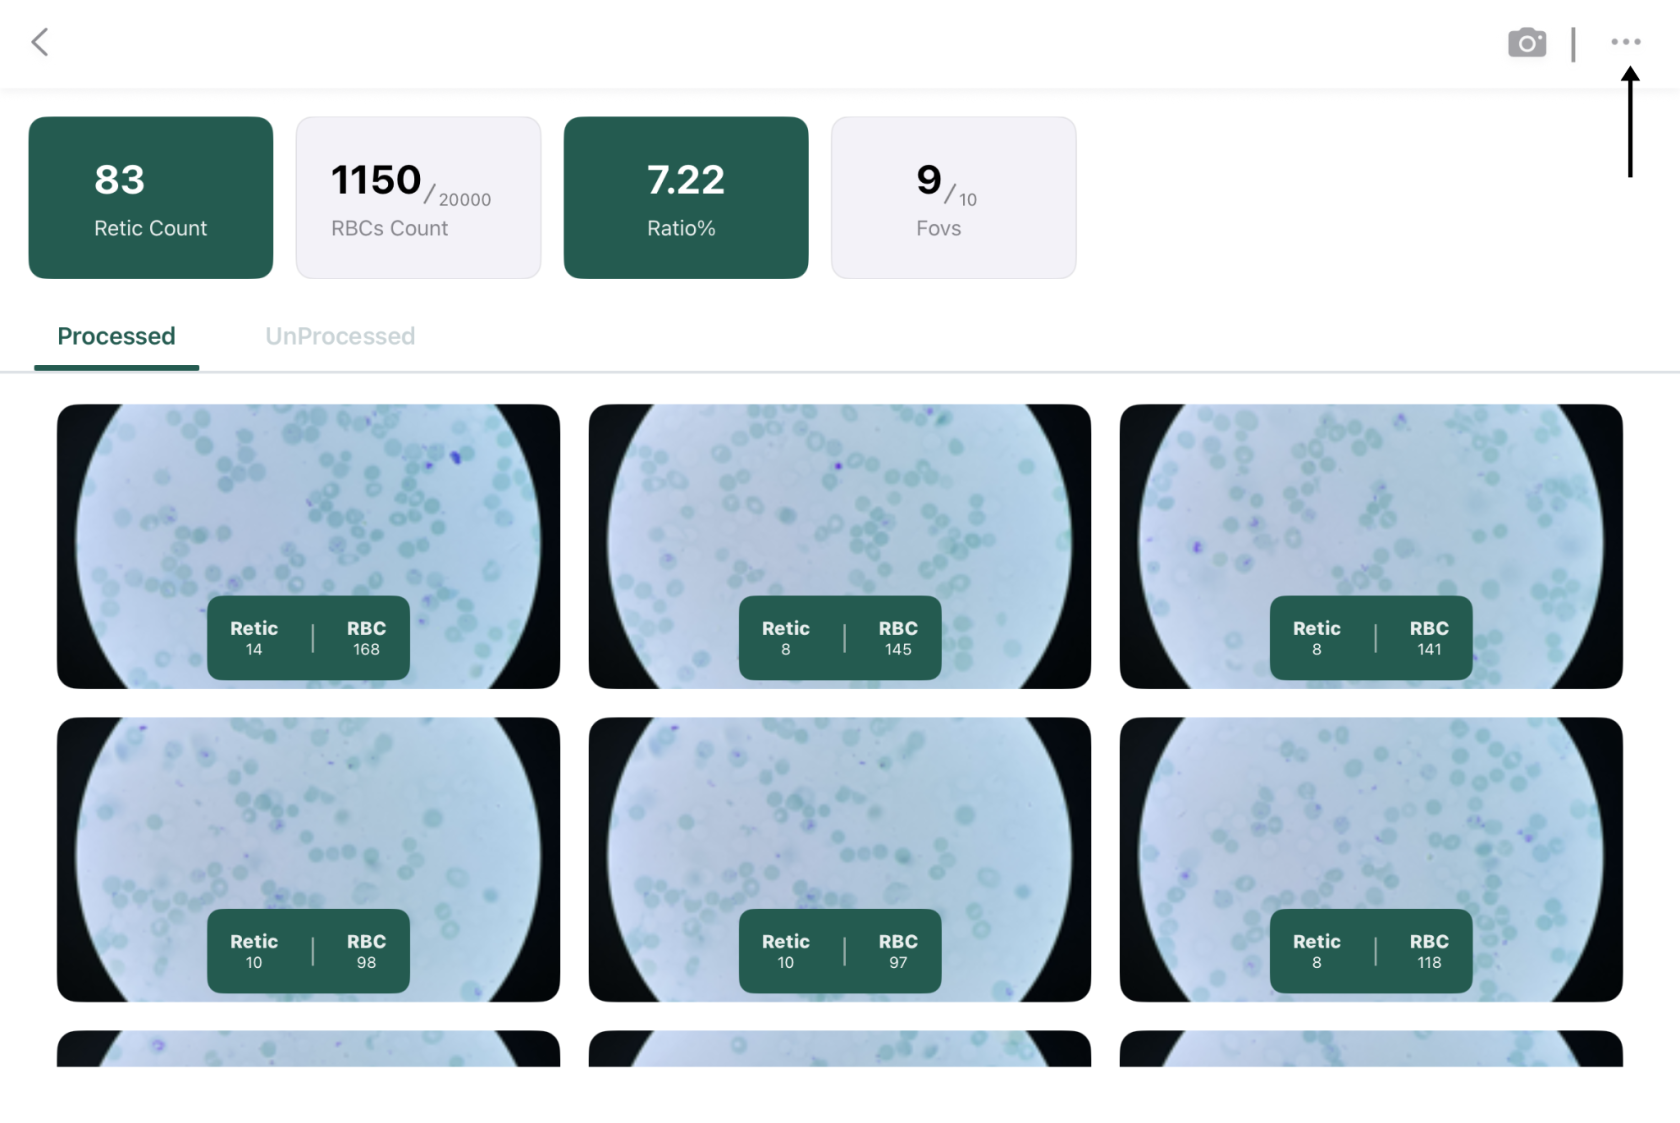
Once image capture is complete, the application processes the images and displays the analysis results.

1. Open the completed case and navigate to the **Processed** tab.
2. Review the summary displayed at the top of the screen:
    
    
    - Retic Count
    - RBC Count
    - Ratio (%)
    - Total FOVs
3. Browse through the processed image thumbnails.
4. Each image displays the corresponding **Retic** and **RBC** counts.

<table border="1" id="bkmrk--4" style="border-collapse: collapse; width: 100.021%;"><colgroup><col style="width: 49.8744%;"></col><col style="width: 49.8744%;"></col></colgroup><tbody><tr><td>[![IMG_9517.PNG](https://docs.medprimetech.com/uploads/images/gallery/2026-07/scaled-1680-/img-9517.PNG)](https://docs.medprimetech.com/uploads/images/gallery/2026-07/img-9517.PNG)

</td><td>[![Highlight image preview.jpg.jpeg](https://docs.medprimetech.com/uploads/images/gallery/2026-07/scaled-1680-/highlight-image-preview-jpg.jpeg)](https://docs.medprimetech.com/uploads/images/gallery/2026-07/highlight-image-preview-jpg.jpeg)

</td></tr></tbody></table>

#### <span style="color: rgb(0, 180, 144);">7. Review AI Detection Results</span>

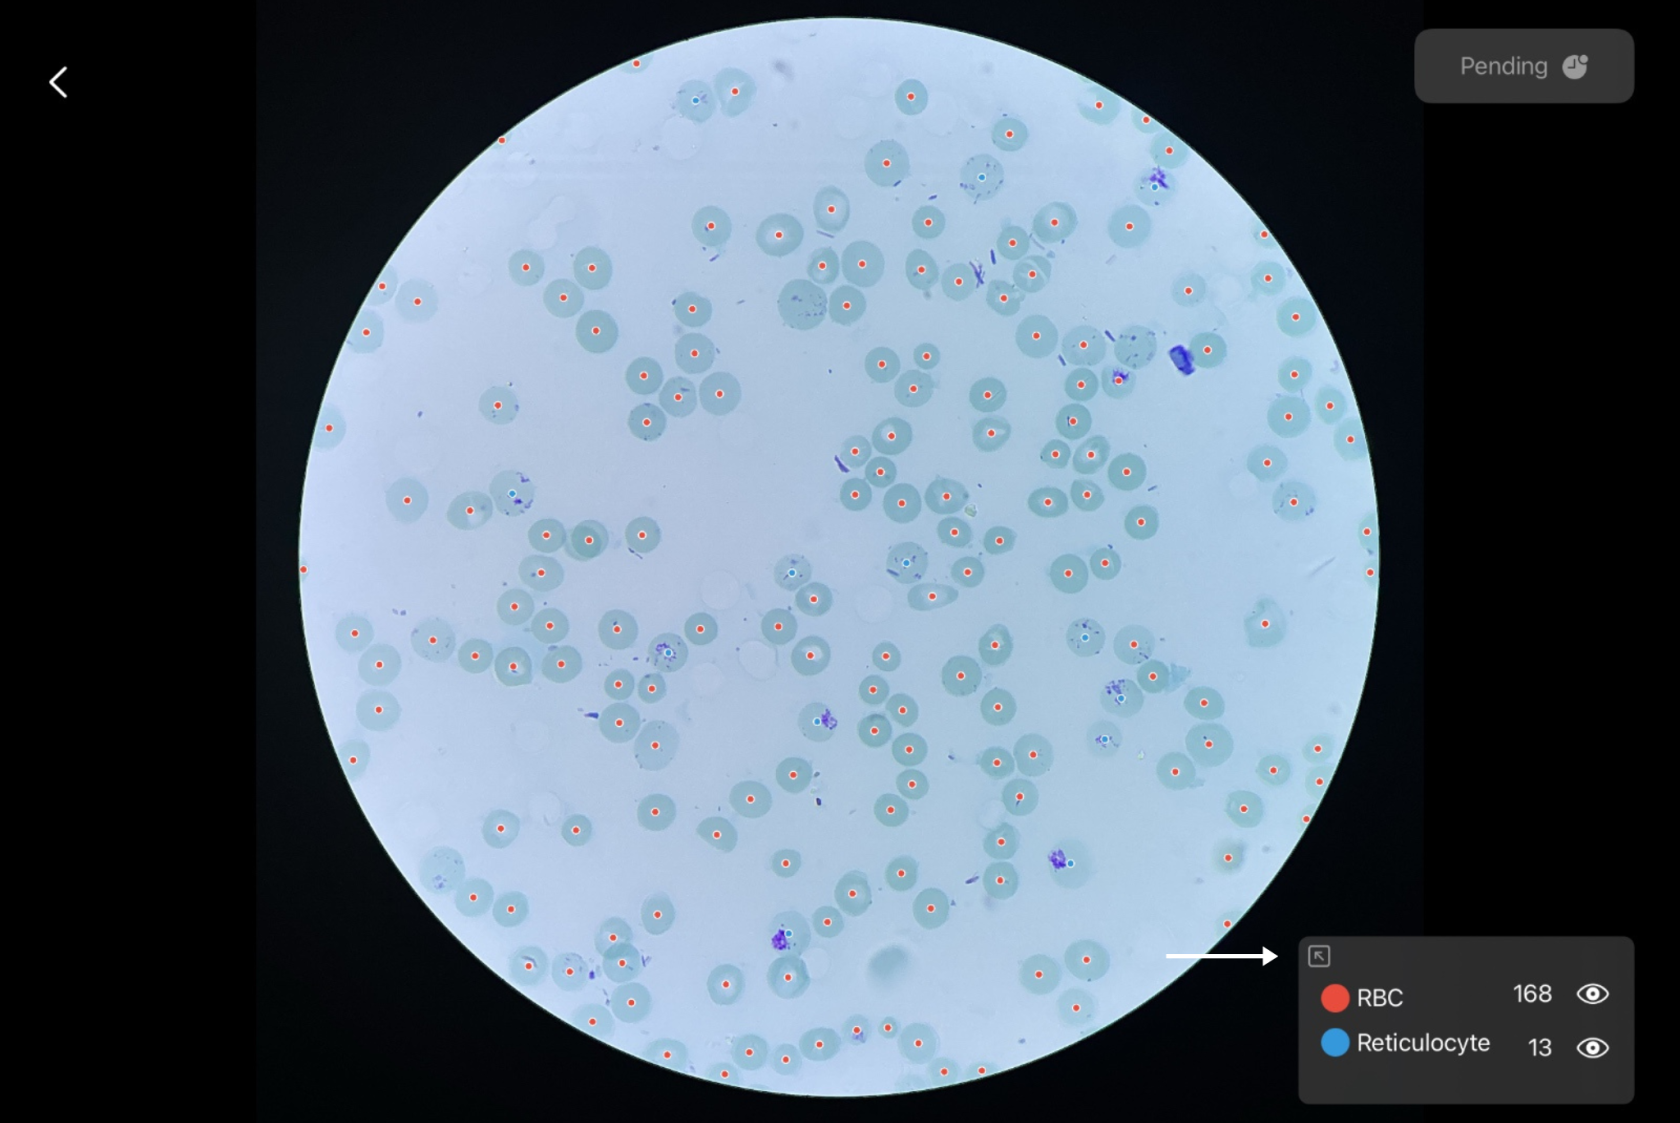
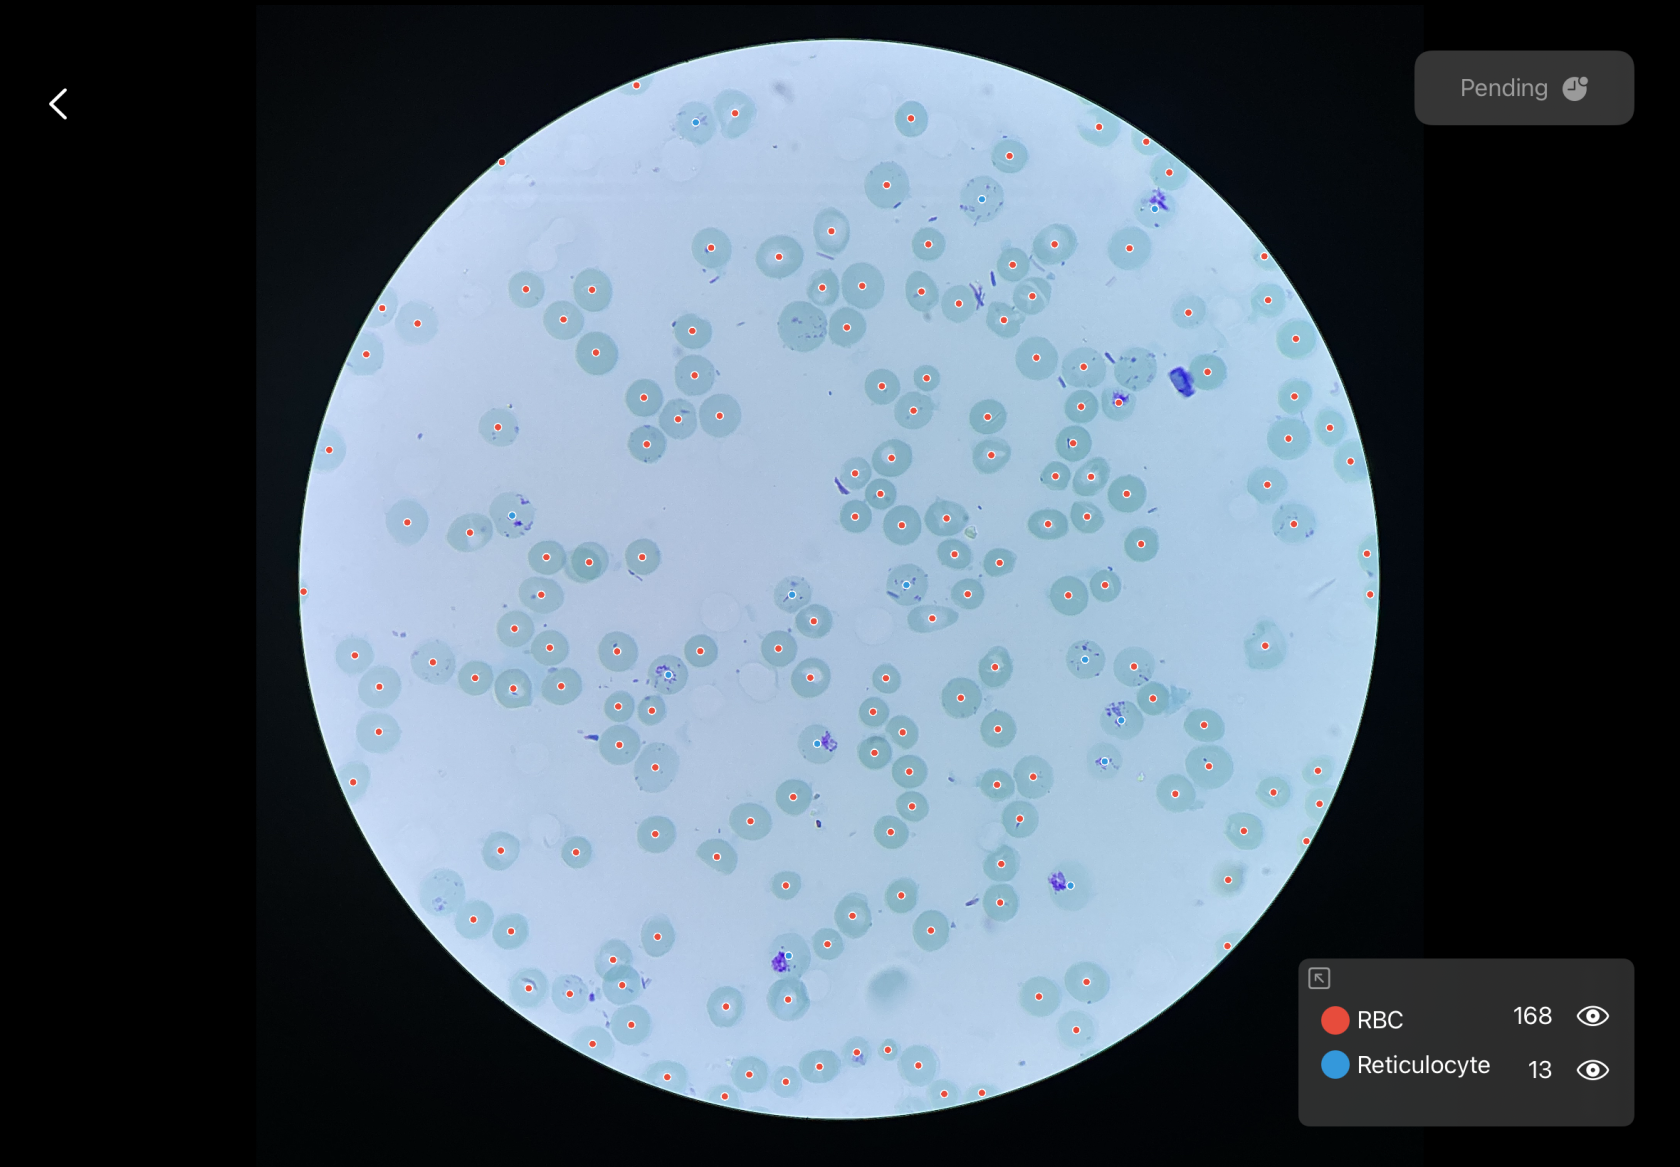
Each processed image can be reviewed to verify the AI-generated detections before generating the final report.

1. Select a processed image from the image list.
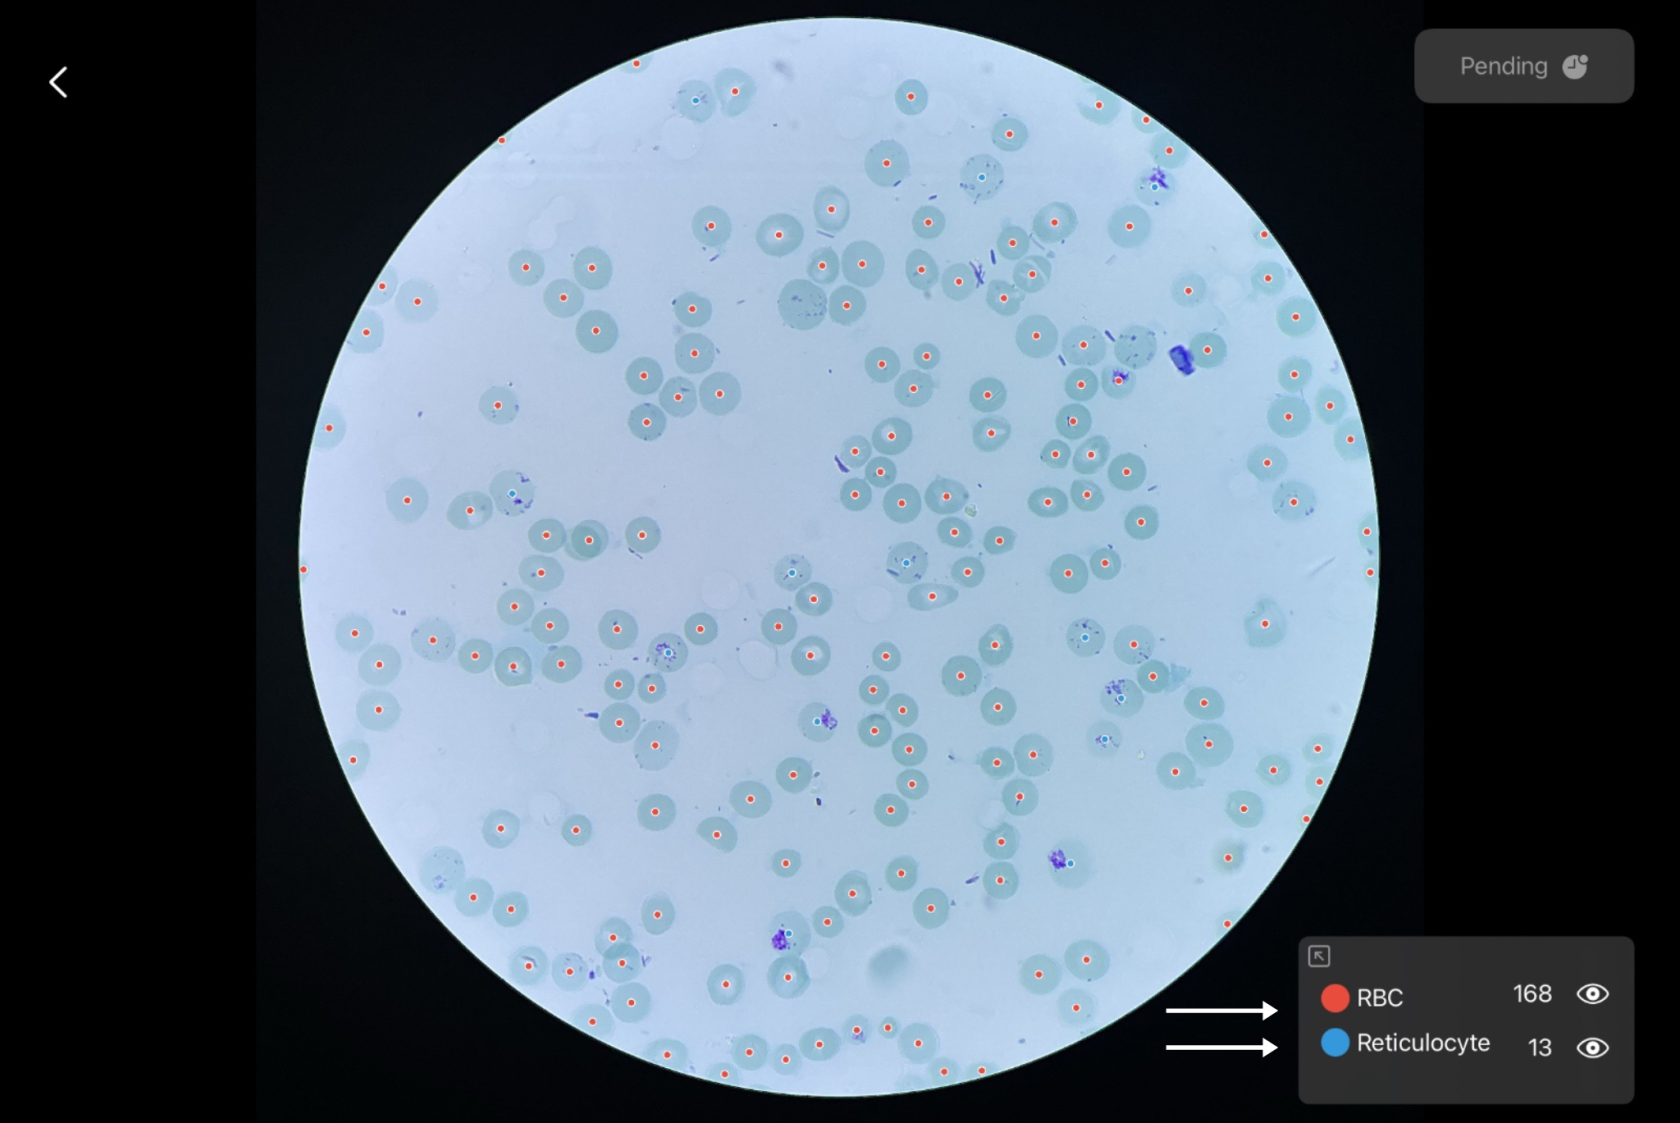
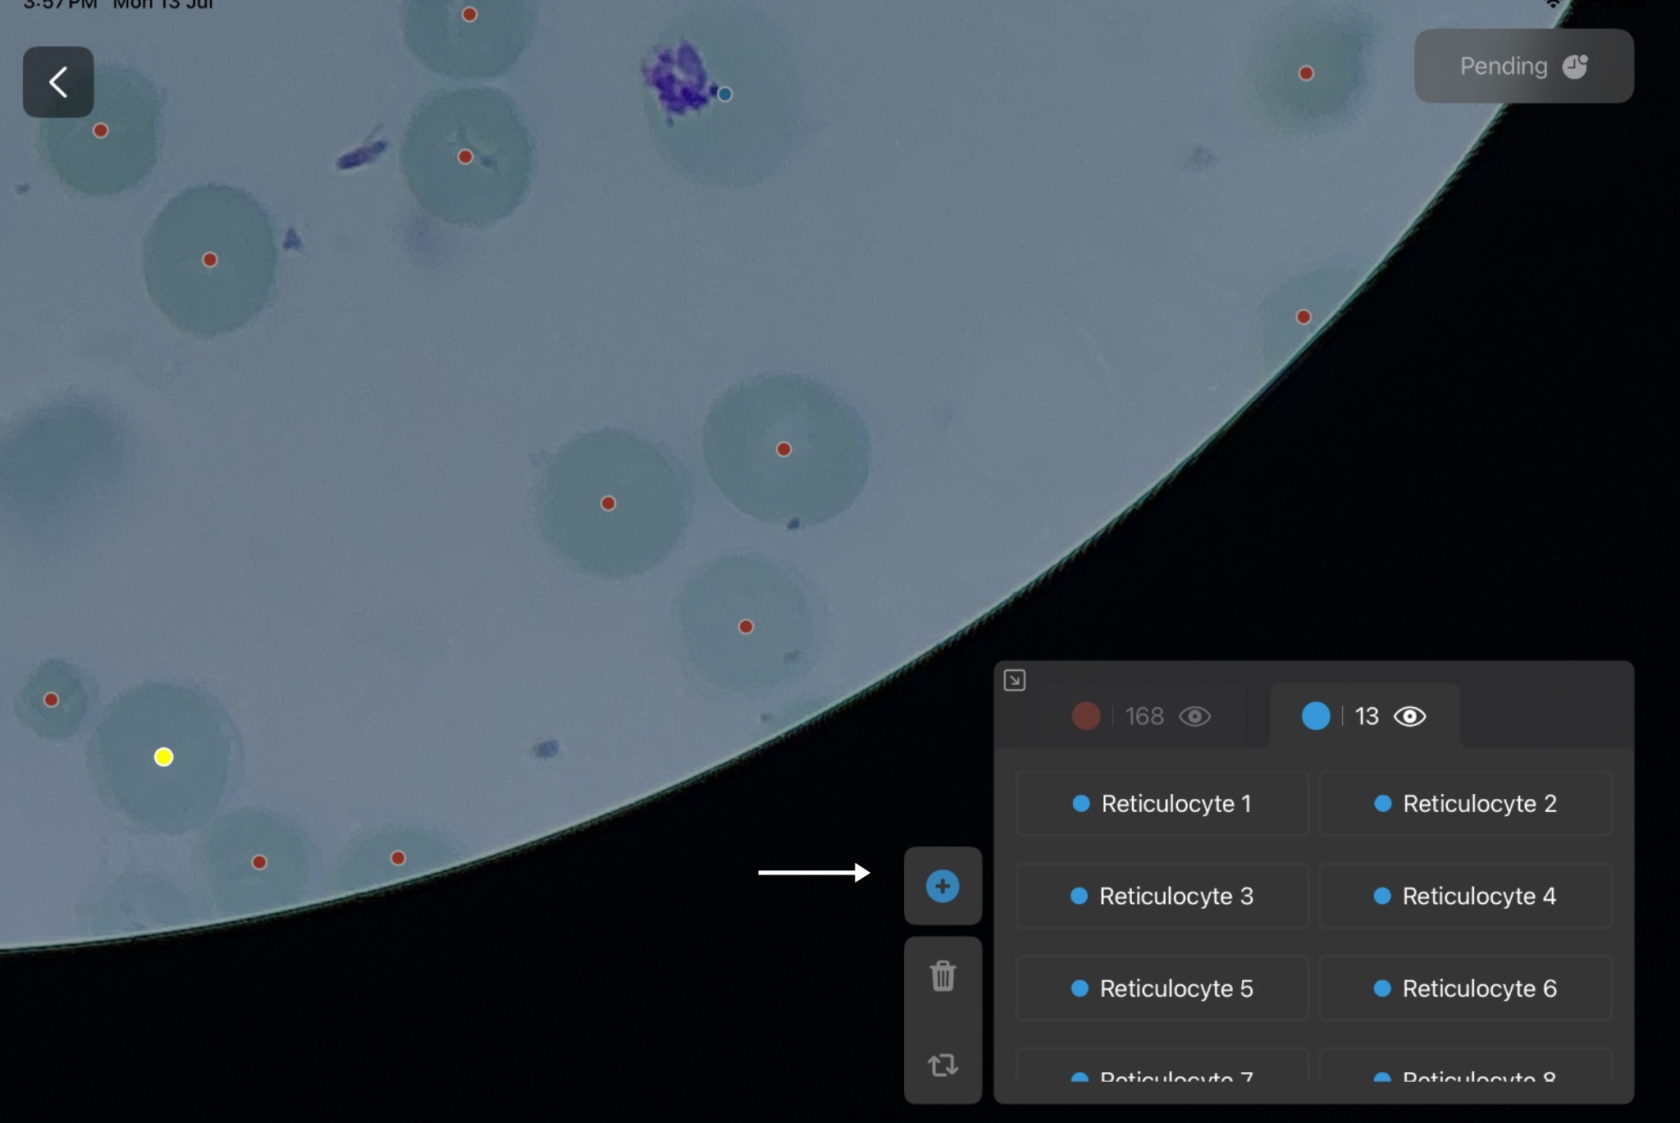
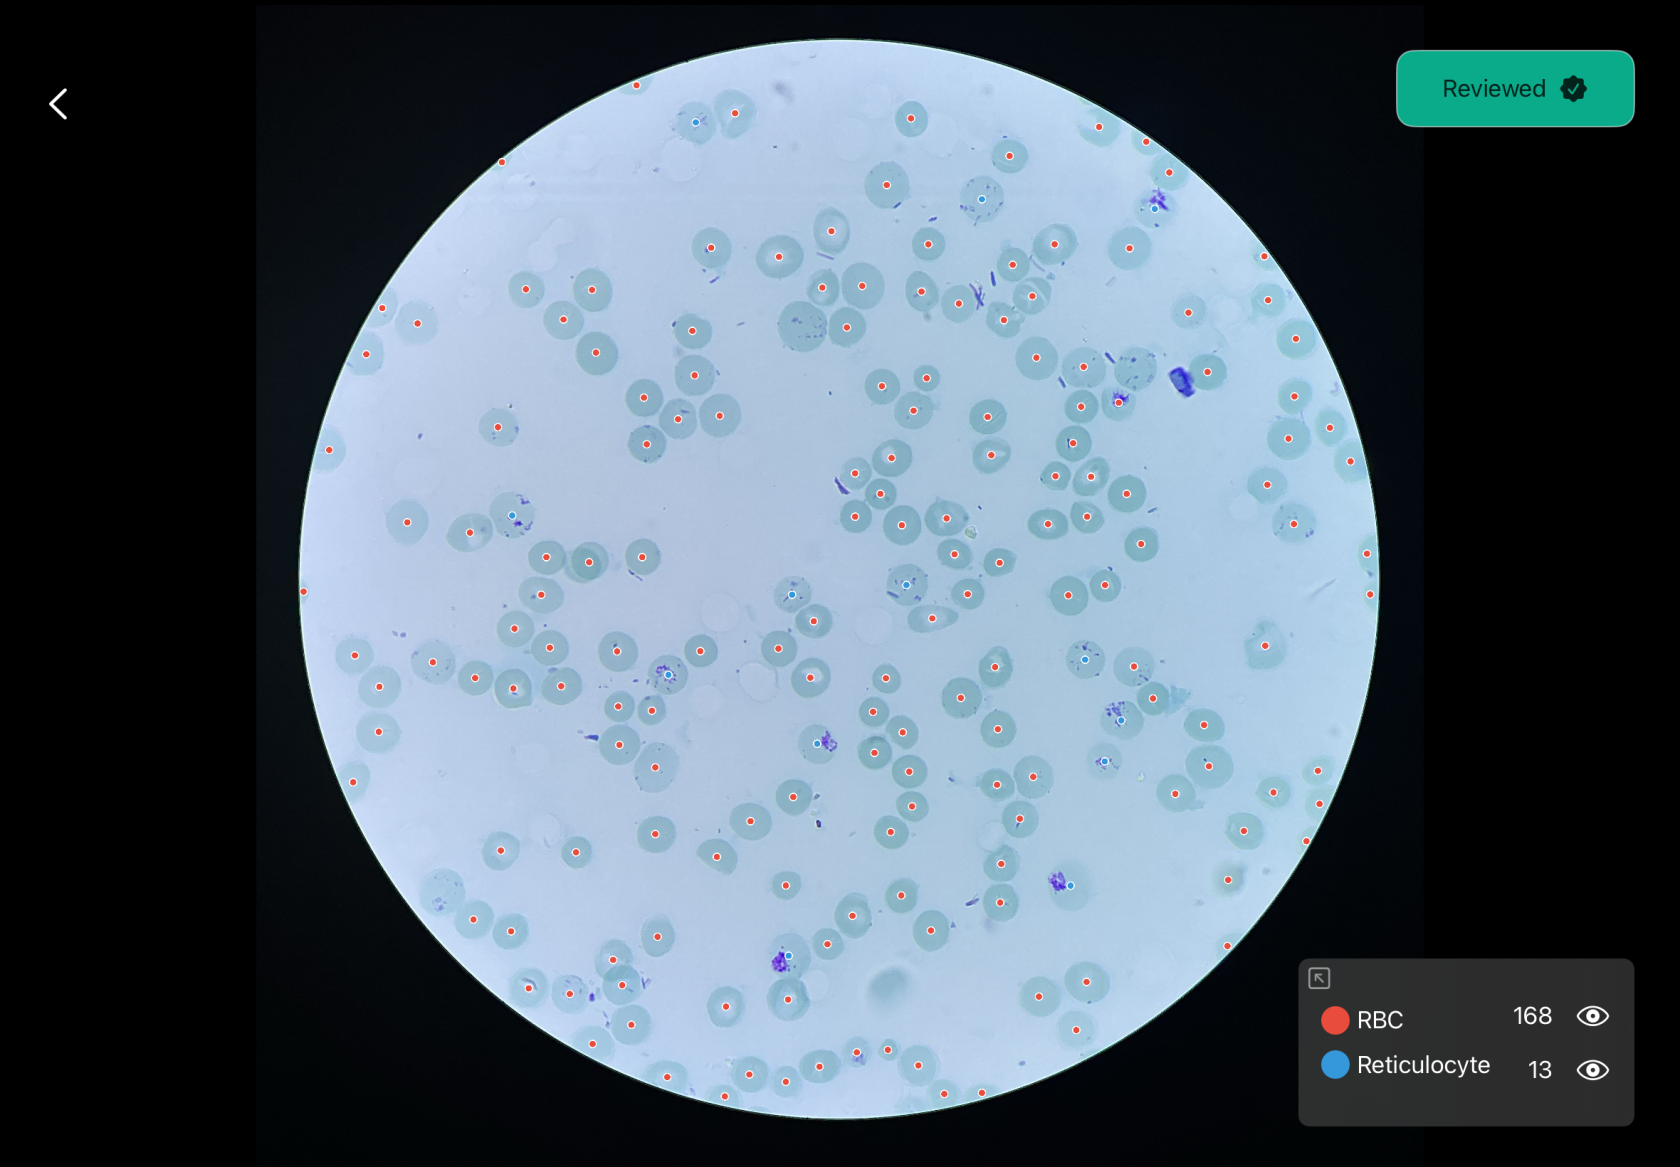
2. Review the highlighted AI detentions displayed on the microscope image.
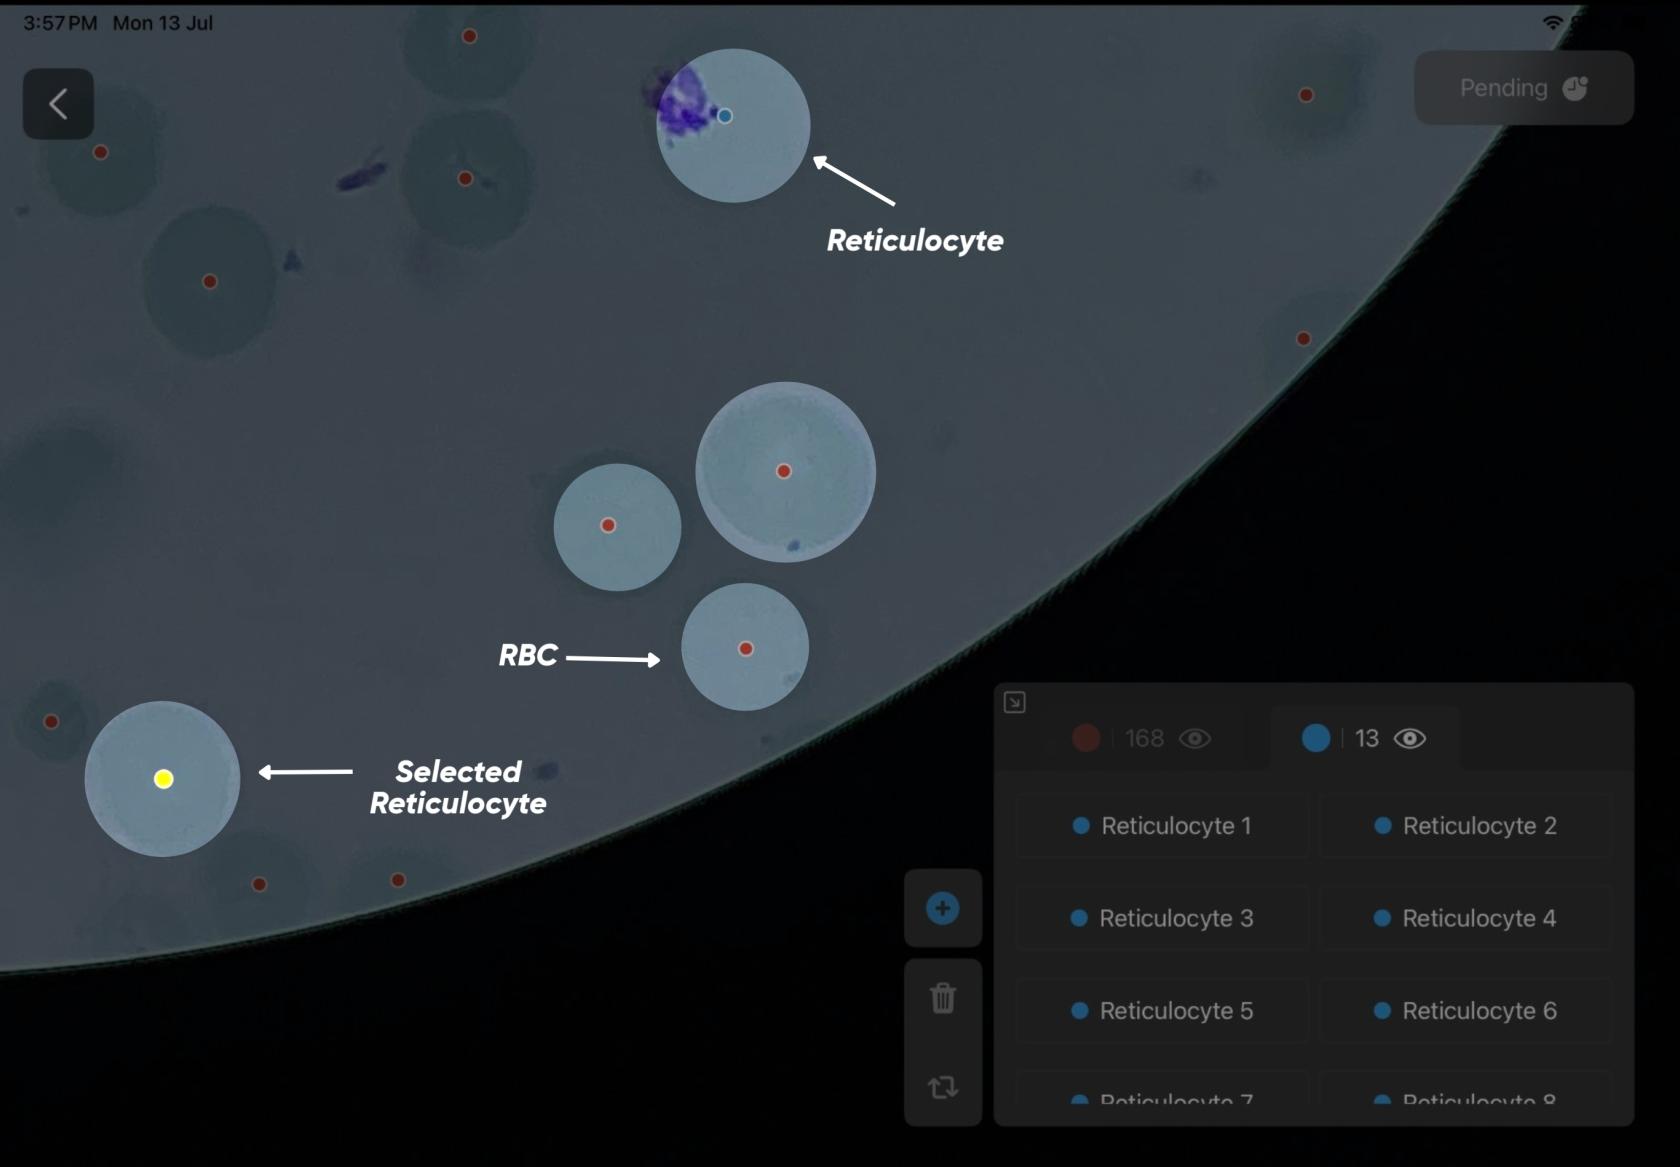
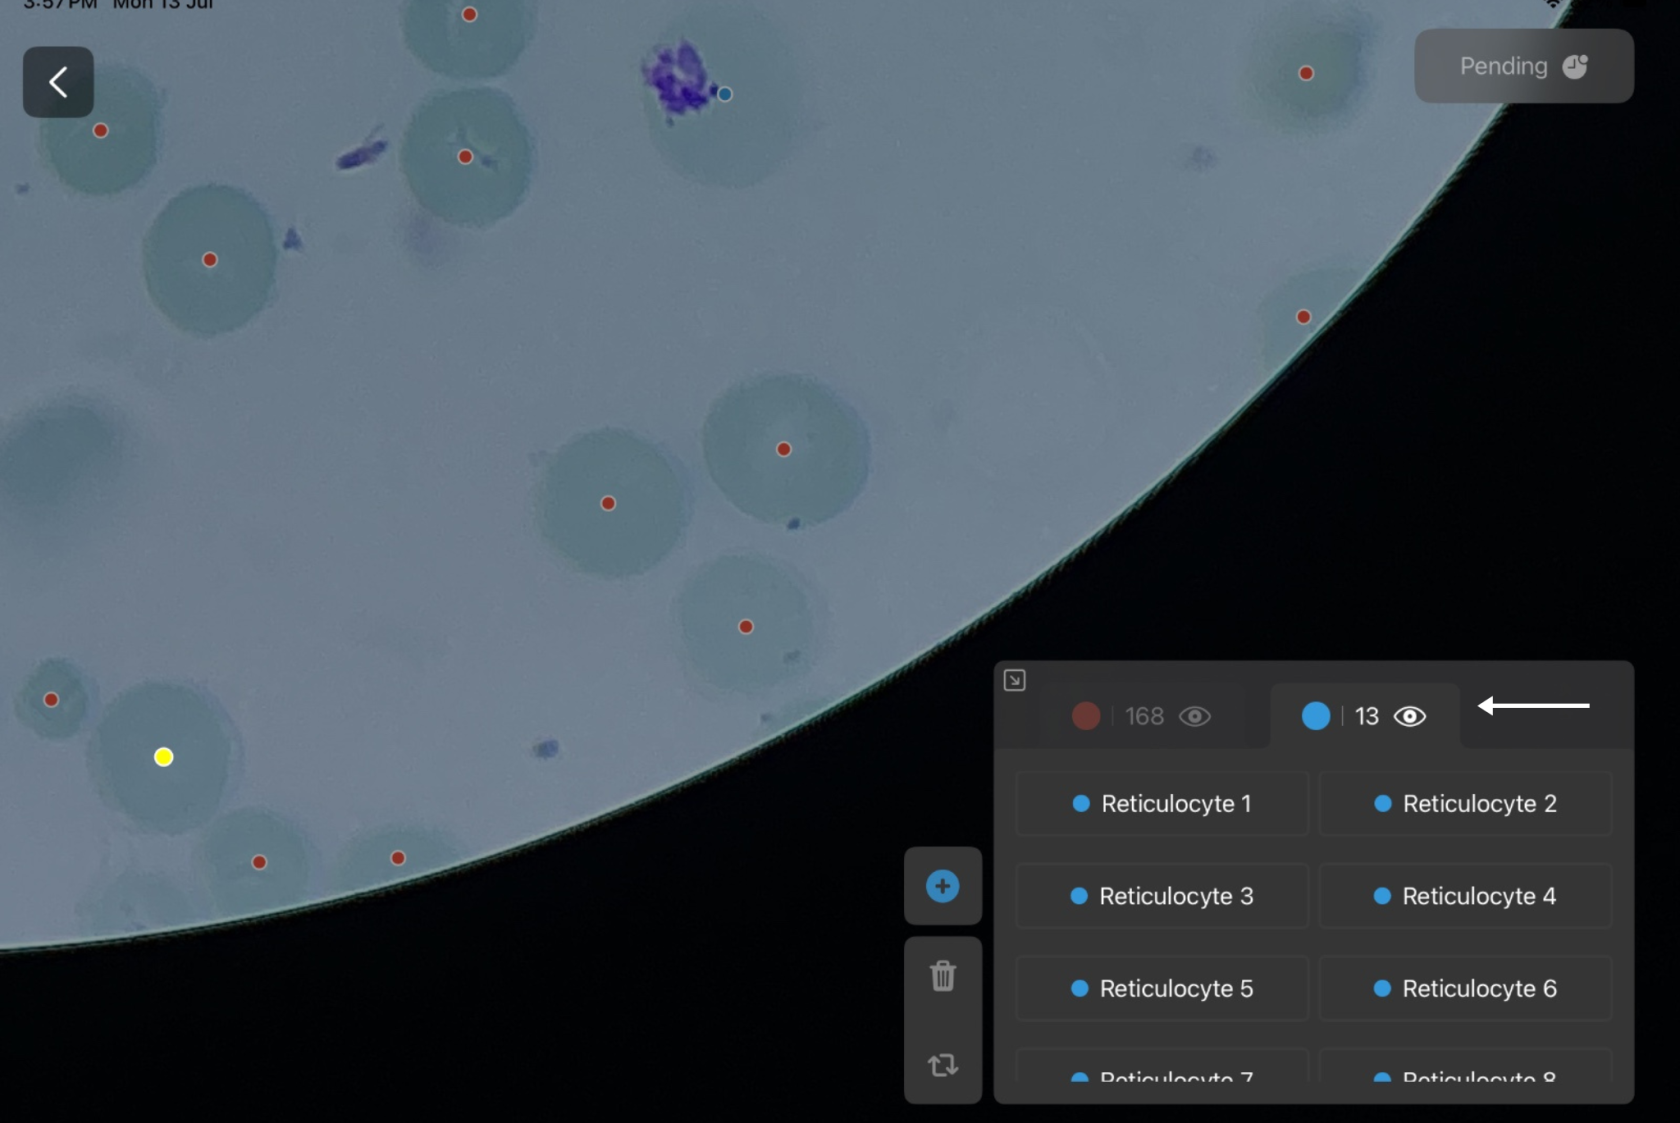
3. View the list of detected reticulocytes.
4. Select any detected reticulocyte to view its position within the image.
5. All the cells are denoted by a certain color:

- RBC - Red
- Reticulocyte - Blue
- Selected Reticulocyte - Yellow

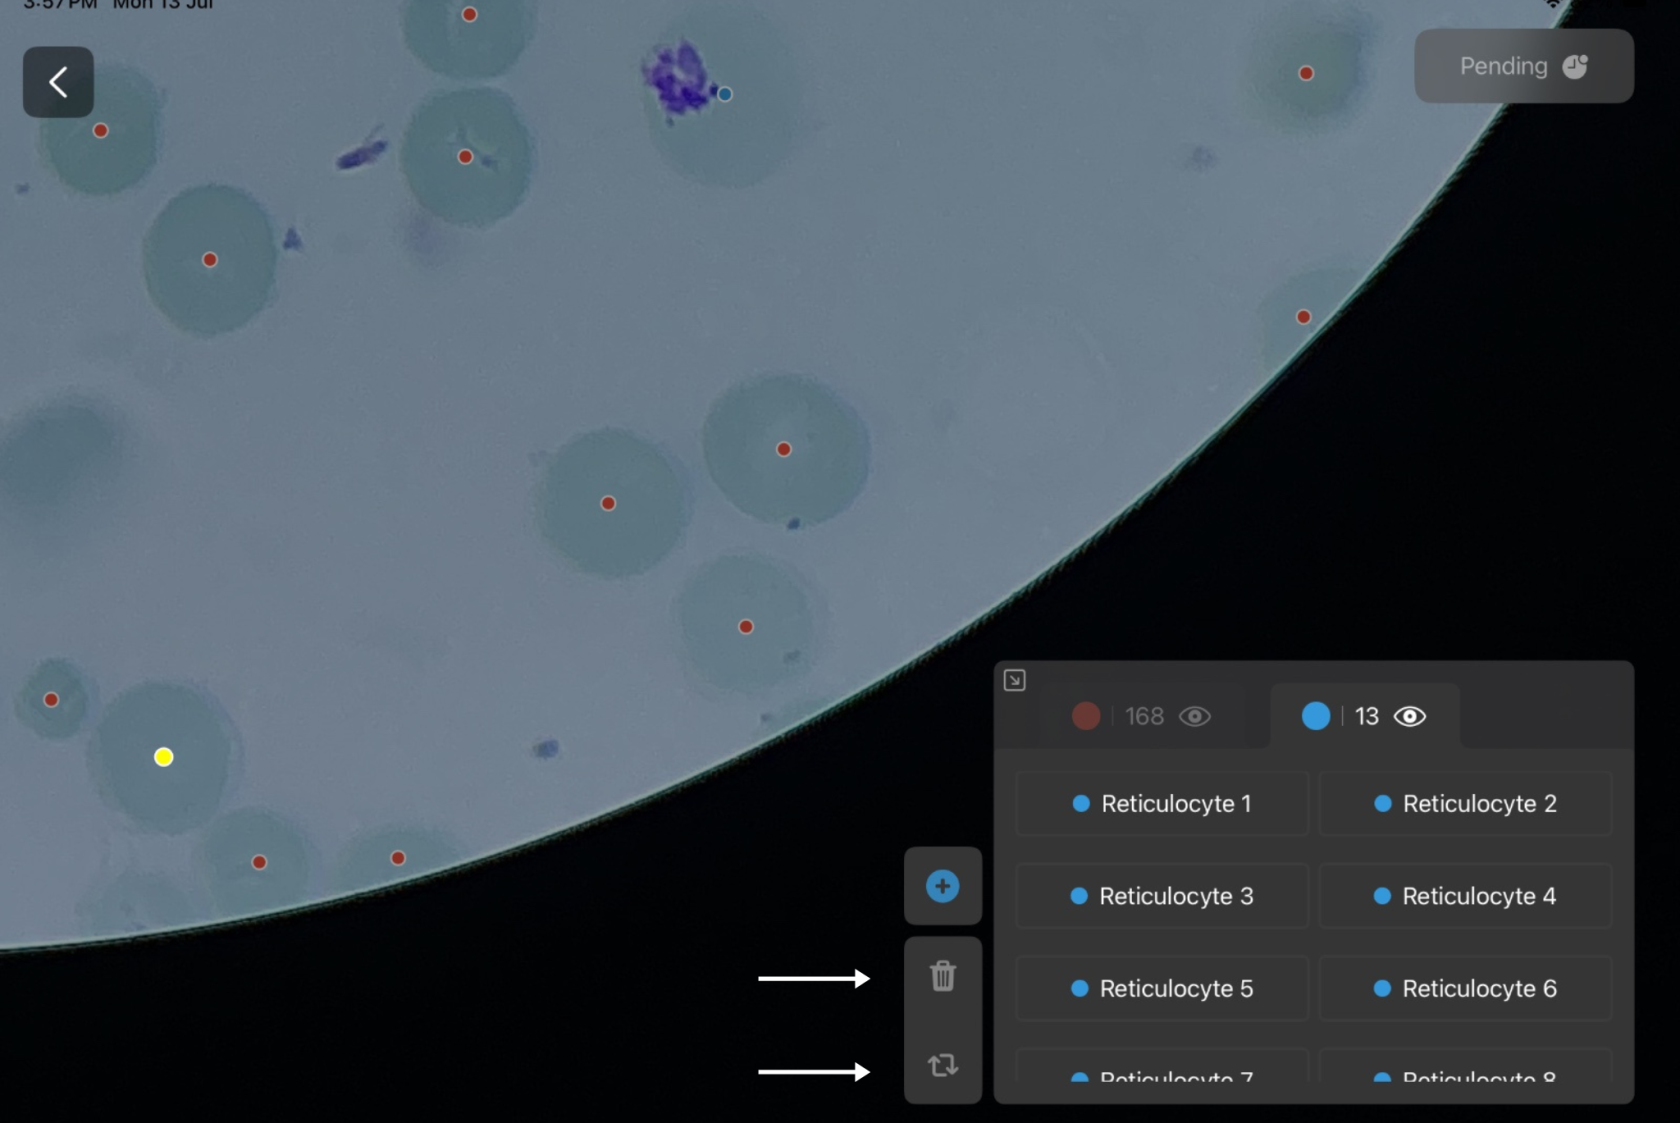
6\. If required, manually:

- Delete a detection.
- Modify an existing detection.

7\. Save the changes and return to the processed image list.

<table border="1" id="bkmrk--5" style="border-collapse: collapse; width: 99.9745%;"><colgroup><col style="width: 50%;"></col><col style="width: 50%;"></col></colgroup><tbody><tr><td class="align-center">*<span style="color: rgb(0, 180, 144);">[![15.png](https://docs.medprimetech.com/uploads/images/gallery/2026-07/scaled-1680-/15.png)](https://docs.medprimetech.com/uploads/images/gallery/2026-07/15.png)</span>*

*<span style="color: rgb(0, 180, 144);">Figure 7</span>*

</td><td class="align-center">*<span style="color: rgb(0, 180, 144);">[![14.png](https://docs.medprimetech.com/uploads/images/gallery/2026-07/scaled-1680-/14.png)](https://docs.medprimetech.com/uploads/images/gallery/2026-07/14.png)Figure 7.1</span>*

</td></tr><tr><td class="align-center">*<span style="color: rgb(0, 180, 144);">[![cell selection.jpg](https://docs.medprimetech.com/uploads/images/gallery/2026-07/scaled-1680-/Widcell-selection.jpg)](https://docs.medprimetech.com/uploads/images/gallery/2026-07/Widcell-selection.jpg)</span>*

*<span style="color: rgb(0, 180, 144);">Figure 7.2</span>*

</td><td class="align-center">*<span style="color: rgb(0, 180, 144);">[![16.png](https://docs.medprimetech.com/uploads/images/gallery/2026-07/scaled-1680-/16.png)](https://docs.medprimetech.com/uploads/images/gallery/2026-07/16.png)Figure 7.3</span>*

</td></tr><tr><td class="align-center">*<span style="color: rgb(0, 180, 144);">[![17.png](https://docs.medprimetech.com/uploads/images/gallery/2026-07/scaled-1680-/17.png)](https://docs.medprimetech.com/uploads/images/gallery/2026-07/17.png)</span>*

*<span style="color: rgb(0, 180, 144);">Figure 7.4</span>*

</td><td class="align-center">*<span style="color: rgb(0, 180, 144);">[![193.png](https://docs.medprimetech.com/uploads/images/gallery/2026-07/scaled-1680-/193.png)](https://docs.medprimetech.com/uploads/images/gallery/2026-07/193.png)Figure 7.5</span>*

</td></tr></tbody></table>

#### <span style="color: rgb(0, 180, 144);">8. Reviewed Images</span>

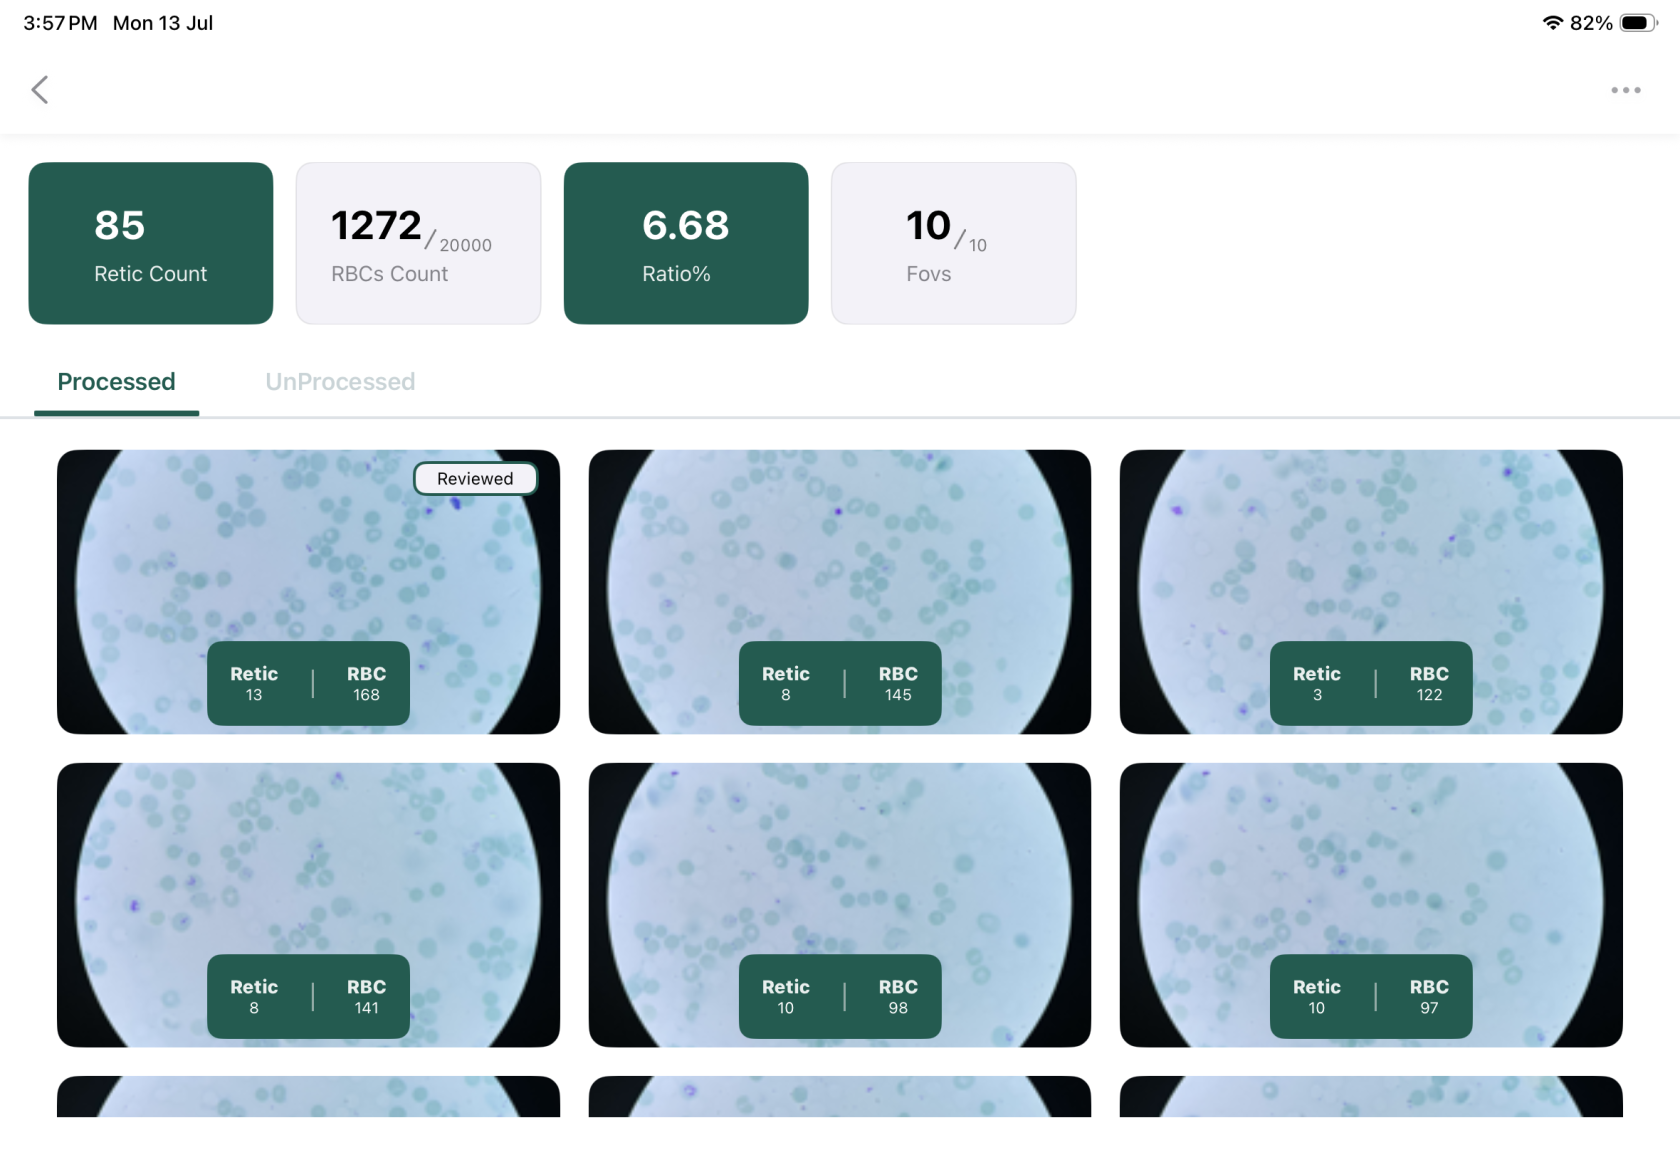
Images that have been reviewed can be marked to help you identify completed reviews.

1. Complete the review of a processed image by tapping on the Pending button.
2. The Pending button is located a the top right.
3. Return to the **Processed** tab.
4. Locate the reviewed image.
5. Verify that the image displays the **Reviewed** badge.

<table border="1" id="bkmrk--6" style="border-collapse: collapse; width: 99.9745%;"><colgroup><col style="width: 49.9437%;"></col><col style="width: 49.9437%;"></col></colgroup><tbody><tr><td class="align-center">***![Image preview first.PNG](https://docs.medprimetech.com/uploads/images/gallery/2026-07/scaled-1680-/image-preview-first.PNG)***

*<span style="color: rgb(0, 180, 144);">Figure 8</span>*

</td><td class="align-center">***![Reviewwd image review.PNG](https://docs.medprimetech.com/uploads/images/gallery/2026-07/scaled-1680-/reviewwd-image-review.PNG)***

*<span style="color: rgb(0, 180, 144);">Figure 8.1</span>*

</td></tr><tr><td class="align-center" colspan="2">***[![IMG_9517.PNG](https://docs.medprimetech.com/uploads/images/gallery/2026-07/scaled-1680-/img-9517.PNG)](https://docs.medprimetech.com/uploads/images/gallery/2026-07/img-9517.PNG)***

***<span style="color: rgb(0, 180, 144);">Figure 8.2</span>***

</td></tr></tbody></table>

#### <span style="color: rgb(0, 180, 144);">9(A). Generate a Report</span>

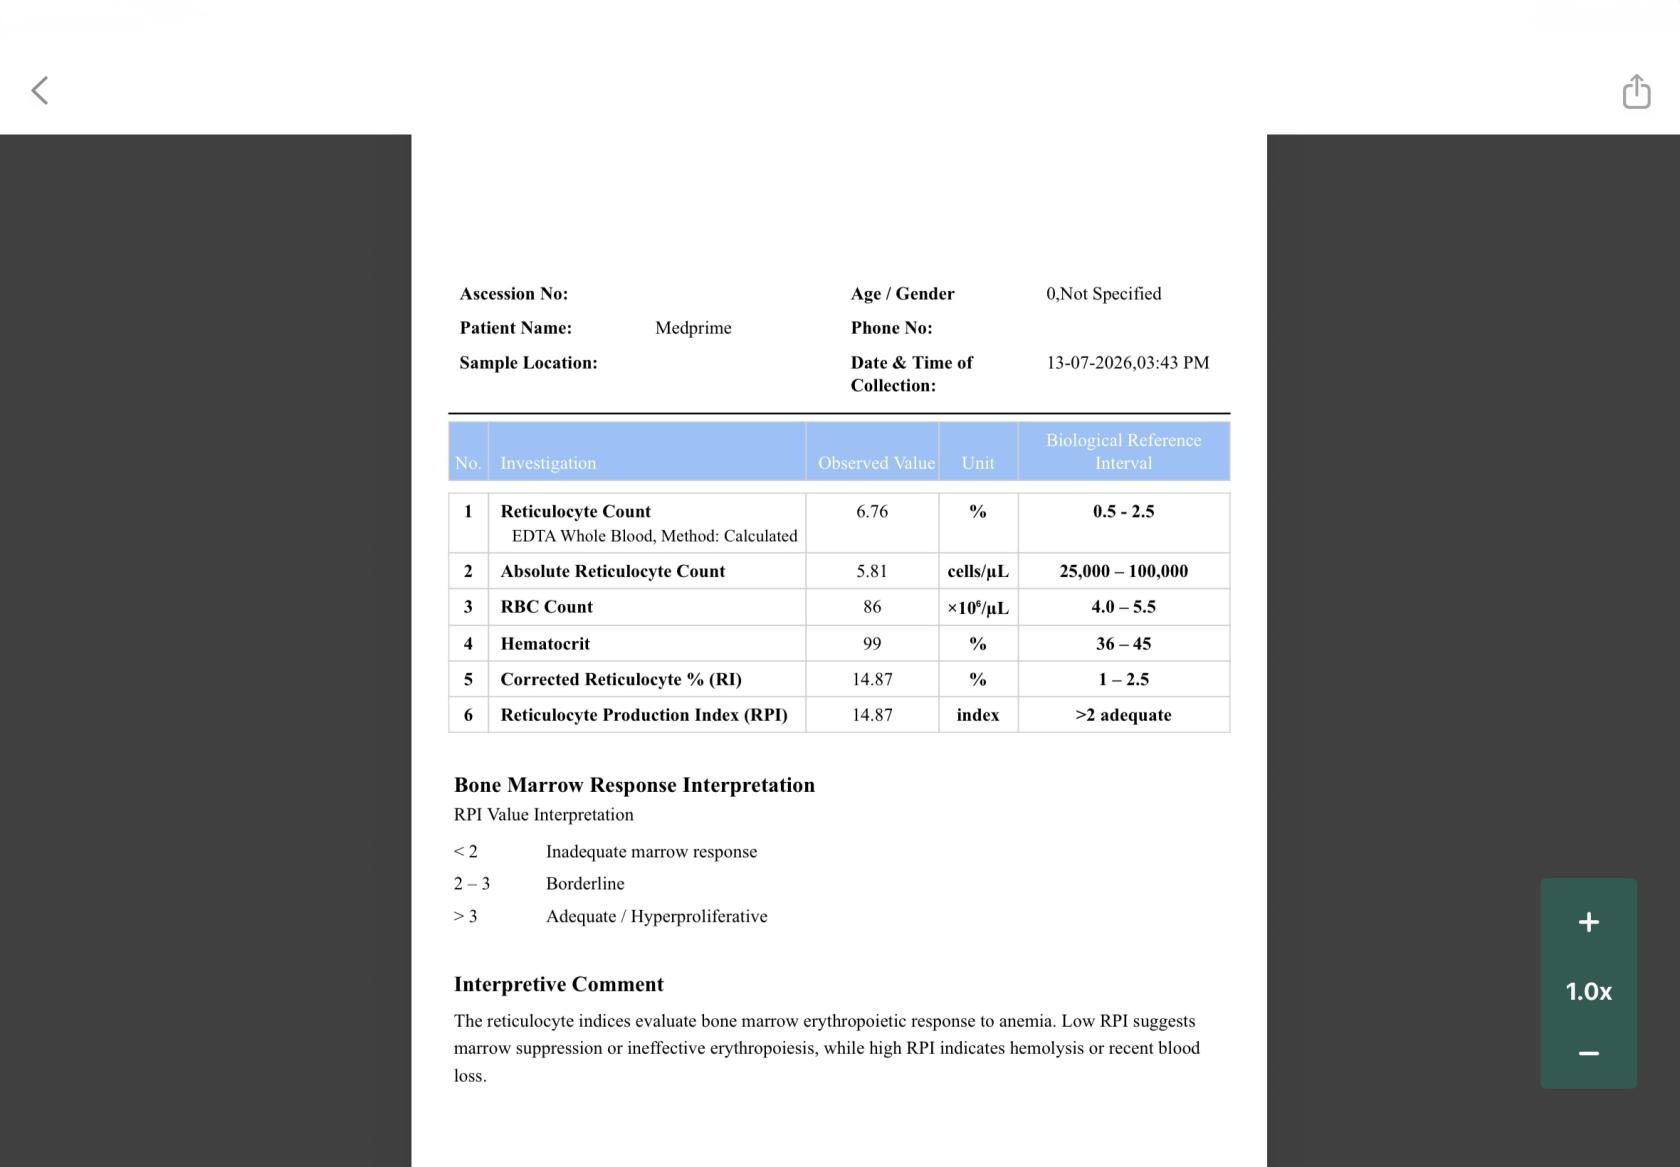
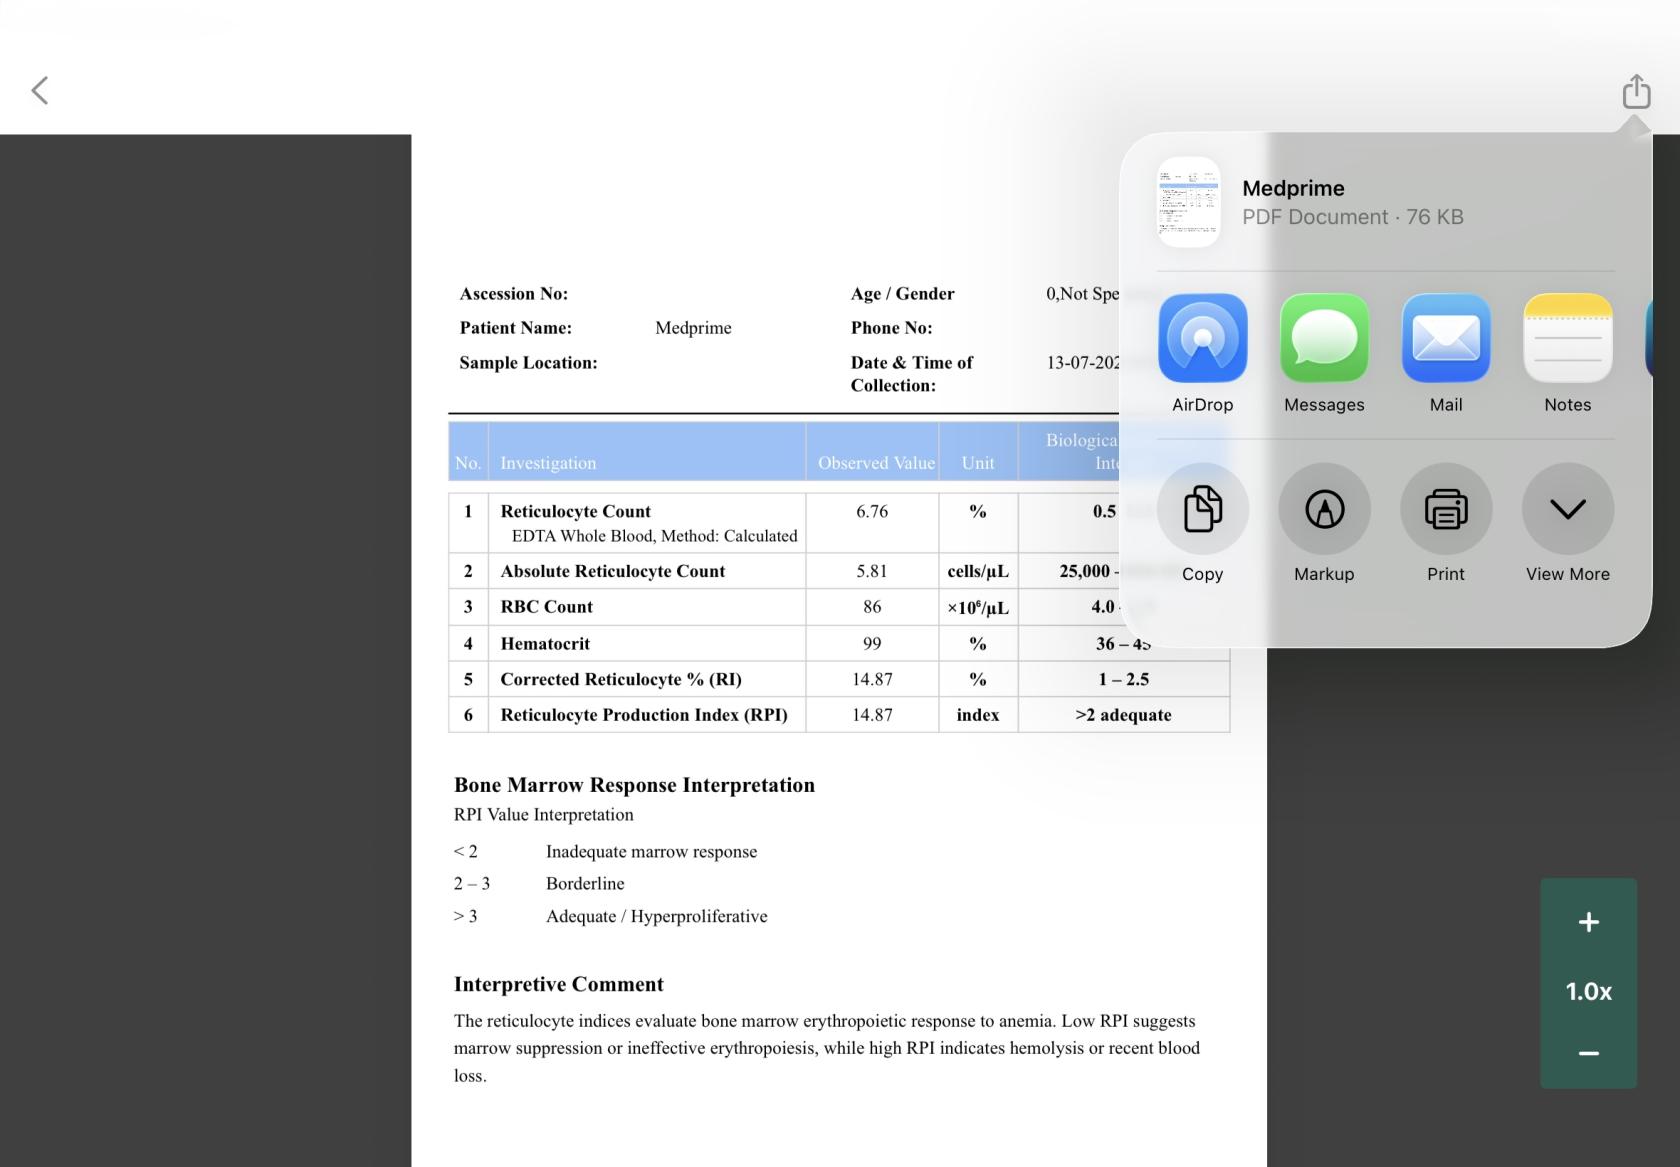
After reviewing all processed images, you can generate a patient report.

1. Open the completed case.
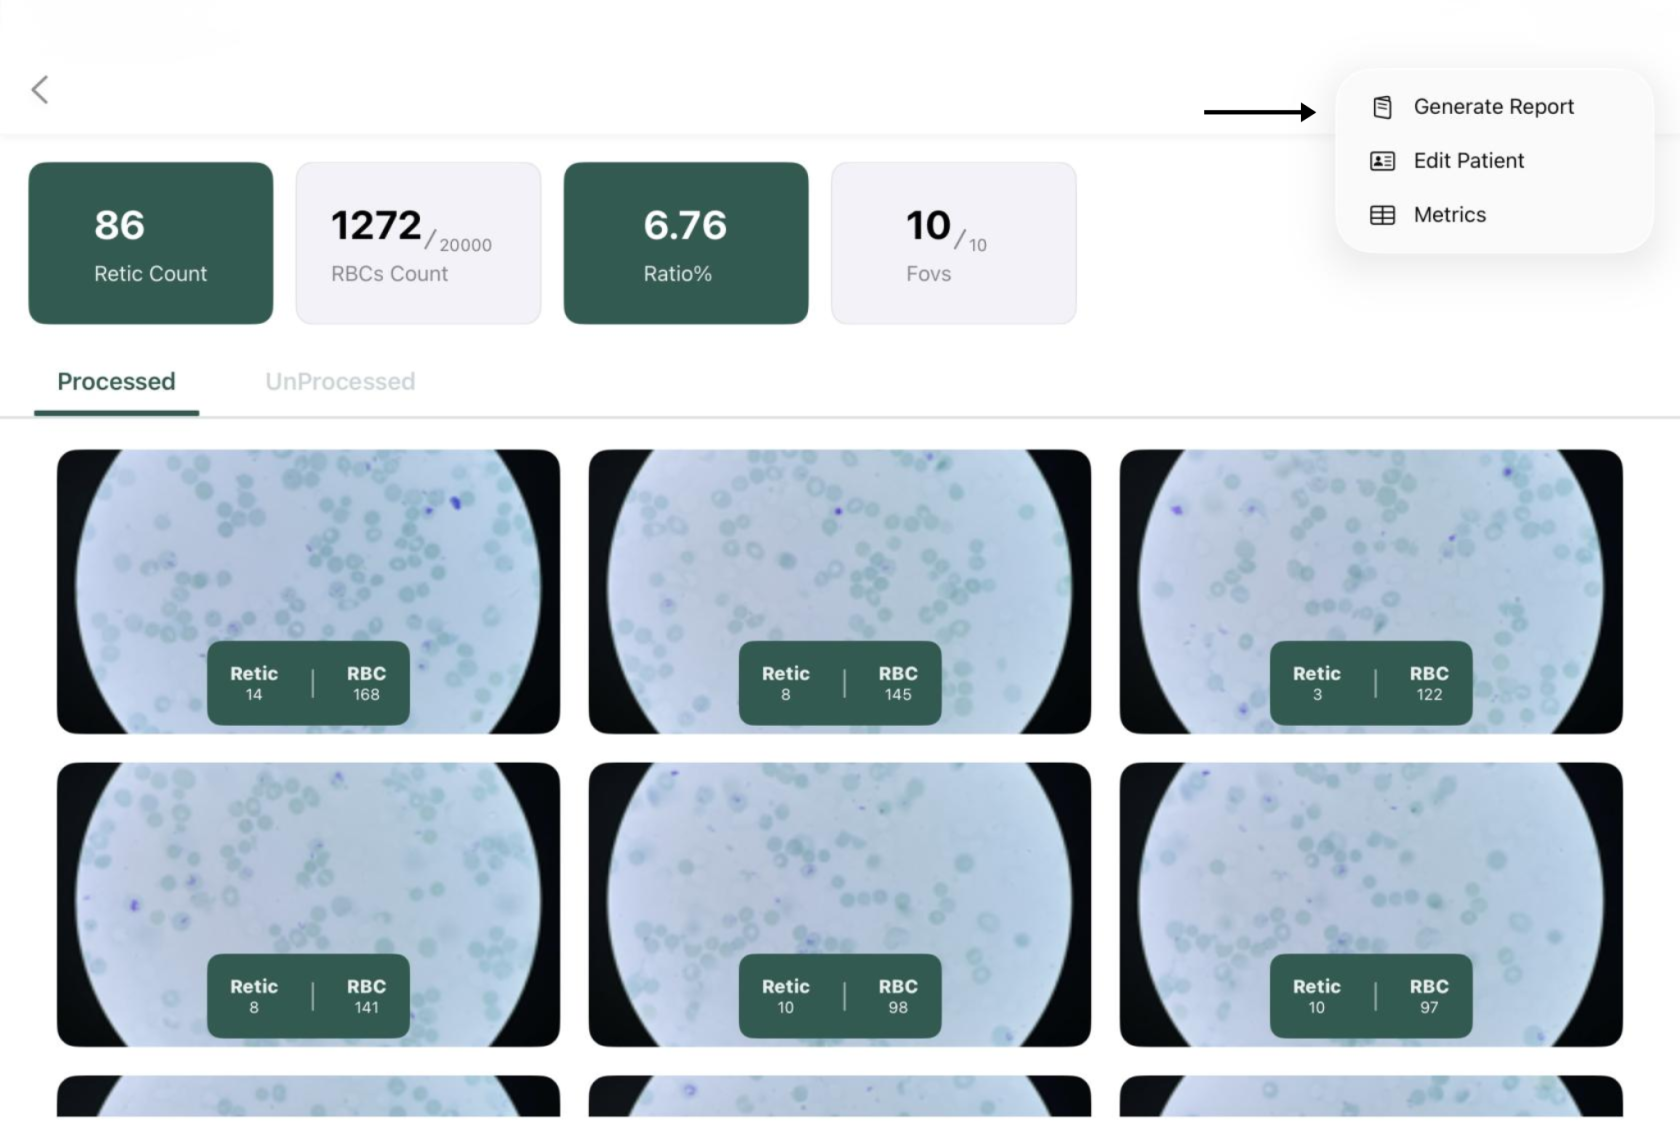
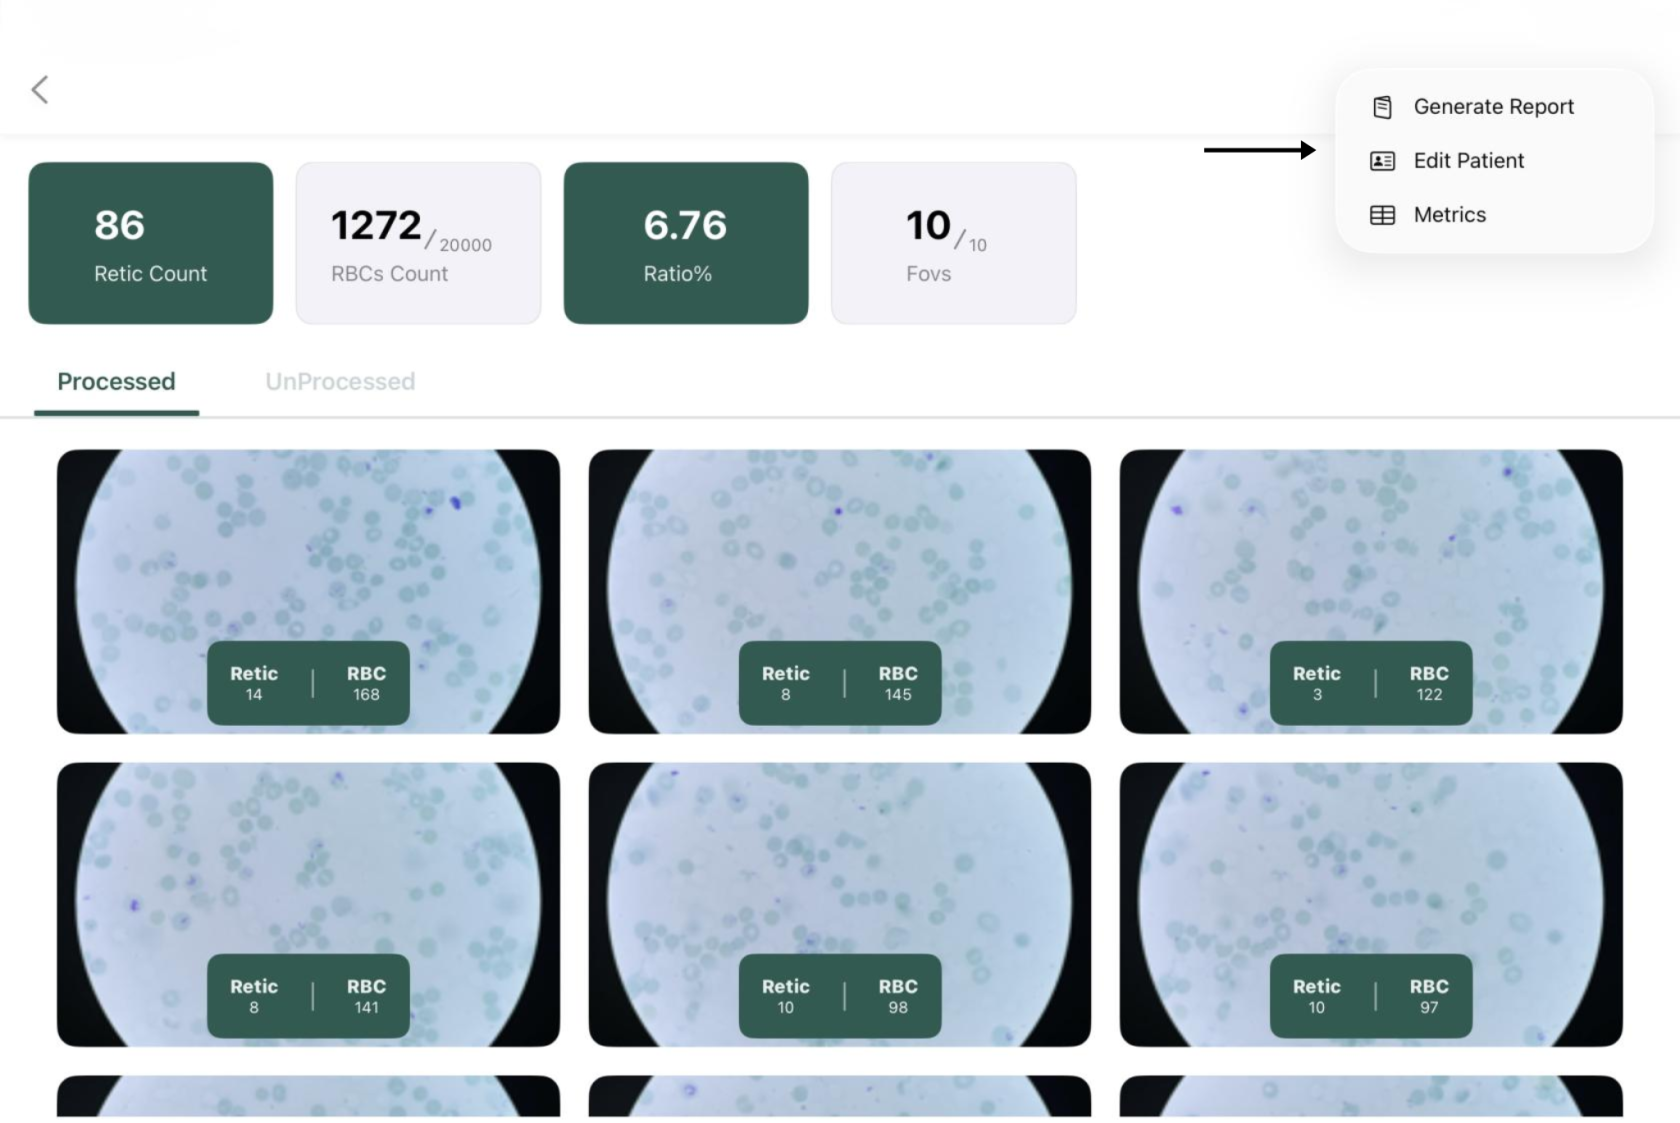
2. Click the **More Options (⋮)** menu.
3. Select **Generate Report**.
4. Review the generated report.
5. Save or share the report as required.

<table border="1" id="bkmrk-%C2%A0-%C2%A0-%C2%A0" style="border-collapse: collapse; width: 100%;"><colgroup><col style="width: 50.0497%;"></col><col style="width: 50.0497%;"></col></colgroup><tbody><tr><td class="align-center" colspan="2">**Generate a Report**</td></tr><tr><td class="align-center">[![8.png](https://docs.medprimetech.com/uploads/images/gallery/2026-07/scaled-1680-/8.png)](https://docs.medprimetech.com/uploads/images/gallery/2026-07/8.png)

<span style="color: rgb(0, 180, 144);">*Figure 9*</span>

</td><td class="align-center"><span style="color: rgb(0, 180, 144);">[![9.png](https://docs.medprimetech.com/uploads/images/gallery/2026-07/scaled-1680-/9.png)](https://docs.medprimetech.com/uploads/images/gallery/2026-07/9.png)*Figure 9.1*</span></td></tr><tr><td class="align-center">[![IMG_0153.jpeg](https://docs.medprimetech.com/uploads/images/gallery/2026-07/scaled-1680-/img-0153.jpeg)](https://docs.medprimetech.com/uploads/images/gallery/2026-07/img-0153.jpeg)

<span style="color: rgb(0, 180, 144);">*Figure 9.2*</span>

</td><td class="align-center">*[![IMG_0139.jpeg](https://docs.medprimetech.com/uploads/images/gallery/2026-07/scaled-1680-/6Y9img-0139.jpeg)](https://docs.medprimetech.com/uploads/images/gallery/2026-07/6Y9img-0139.jpeg)<span style="color: rgb(0, 180, 144);">Figure 9.3</span>*

</td></tr></tbody></table>

#### <span style="color: rgb(0, 180, 144);">9(B). Edit Patient Information</span>

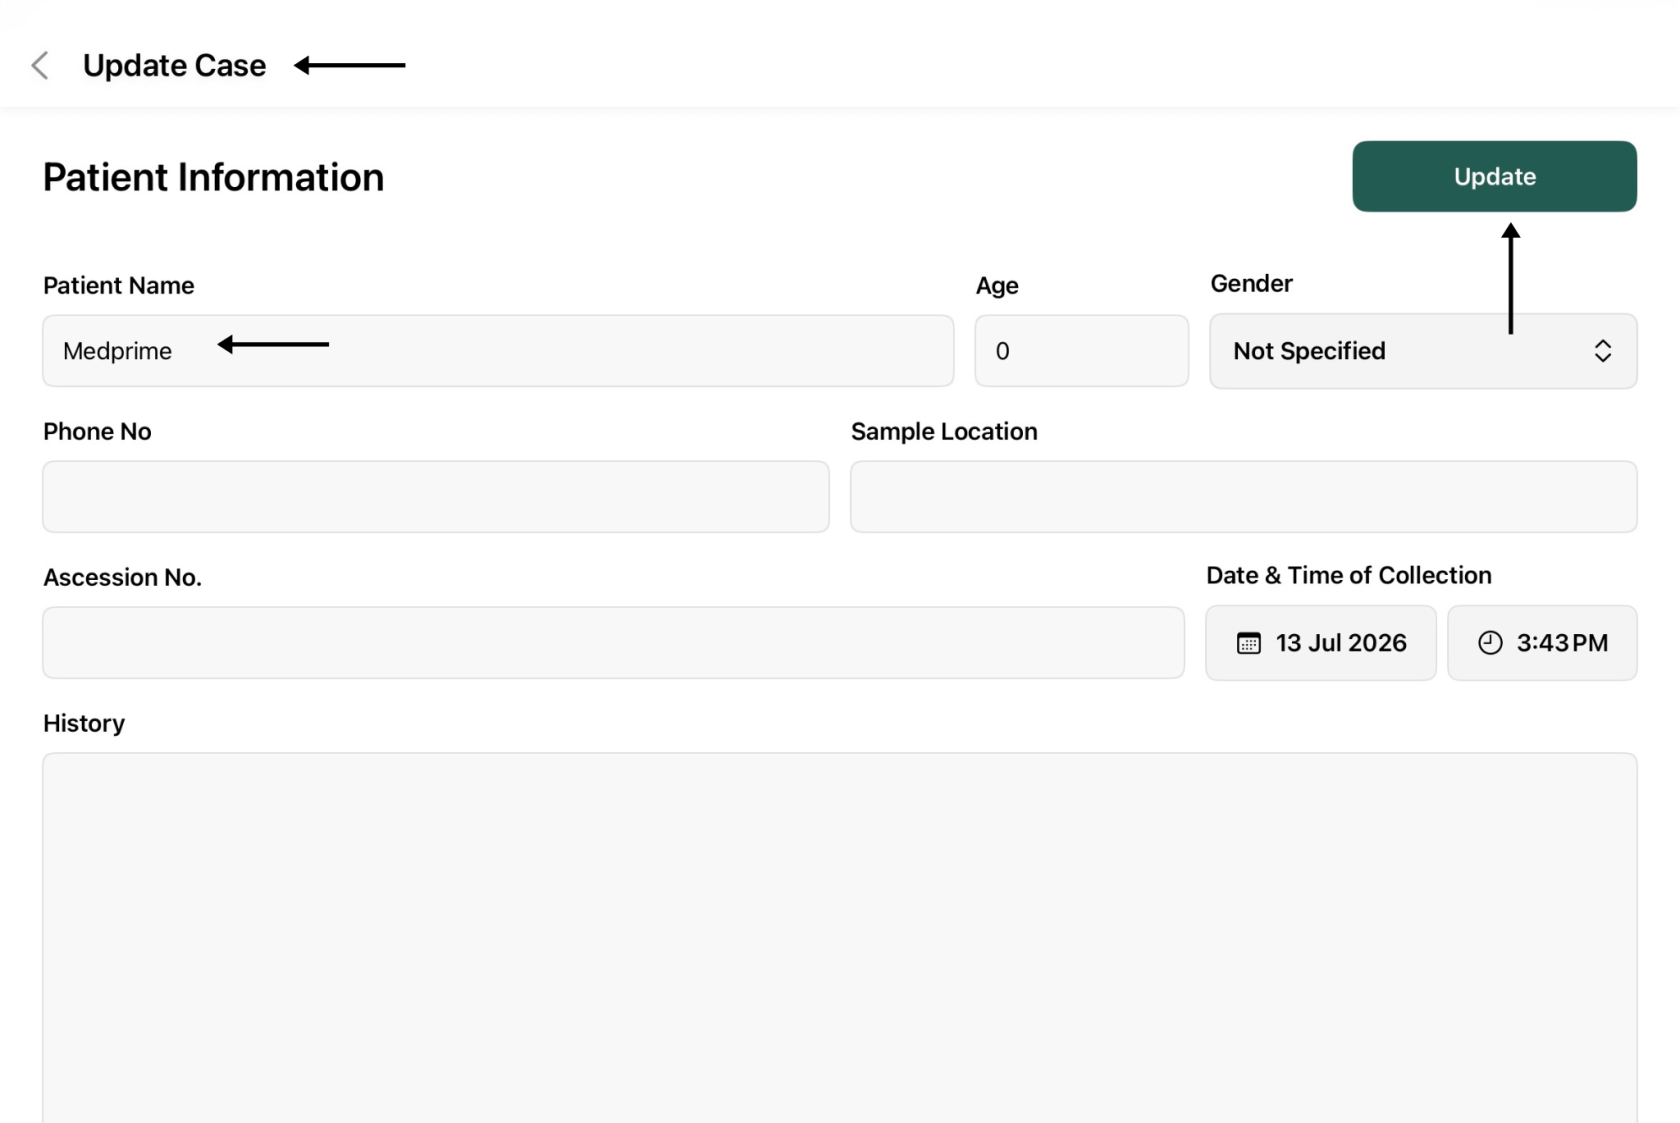
Patient details can be updated at any time before generating the final report.

1. Open the required patient case.
2. Click the **More Options (⋮)** menu.
3. Select **Edit Patient**.
4. Update the required patient information.
5. Save the changes by tapping on **Update**

<table border="1" id="bkmrk--7" style="border-collapse: collapse; width: 100%;"><colgroup><col style="width: 50%;"></col><col style="width: 50%;"></col></colgroup><tbody><tr><td>  
</td><td>  
</td></tr><tr><td>[![10.png](https://docs.medprimetech.com/uploads/images/gallery/2026-07/scaled-1680-/10.png)](https://docs.medprimetech.com/uploads/images/gallery/2026-07/10.png)

<span style="color: rgb(0, 180, 144);">*Figure 9(B)*</span>

</td><td>*[![6.png](https://docs.medprimetech.com/uploads/images/gallery/2026-07/scaled-1680-/6.png)](https://docs.medprimetech.com/uploads/images/gallery/2026-07/6.png)Figure 9(B).1*

</td></tr></tbody></table>

#### 9(C). View Case Metrics

The application provides a summary of the analysis performed for the selected case.

1. Open the required case.
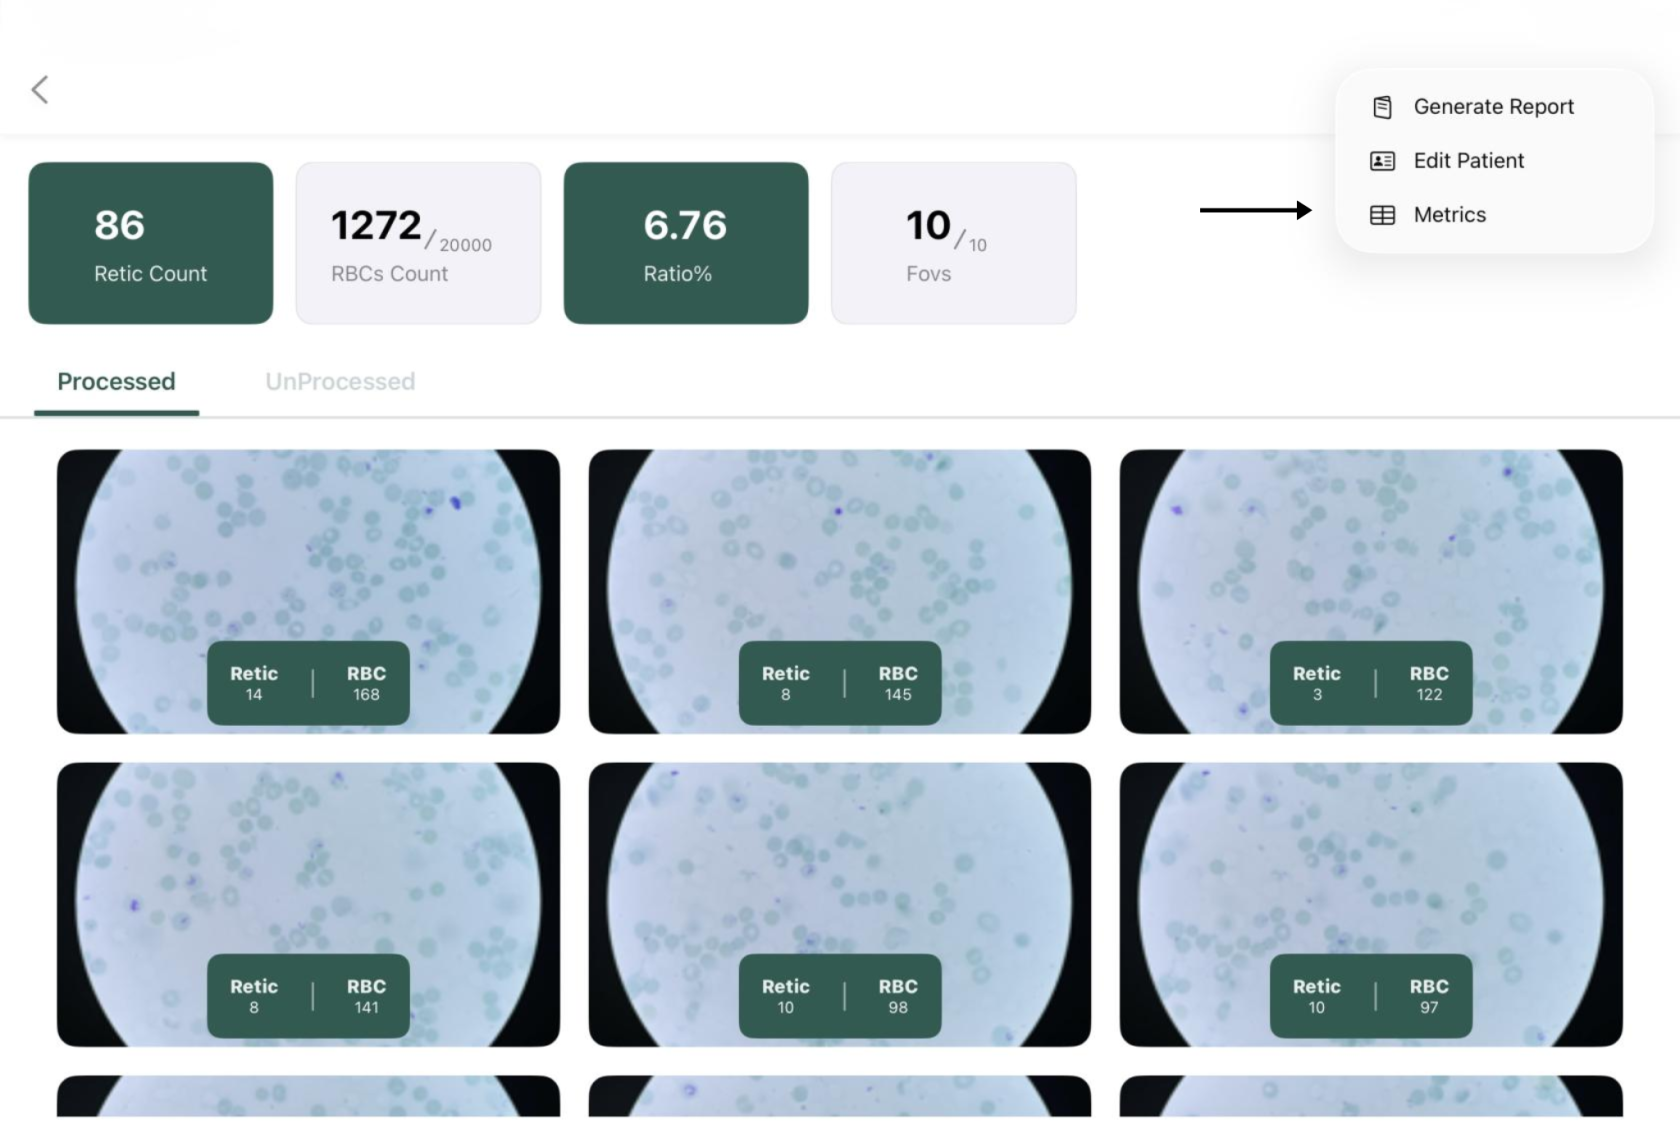
2. Click the **More Options (⋮)** menu.
3. Select **Metrics**.
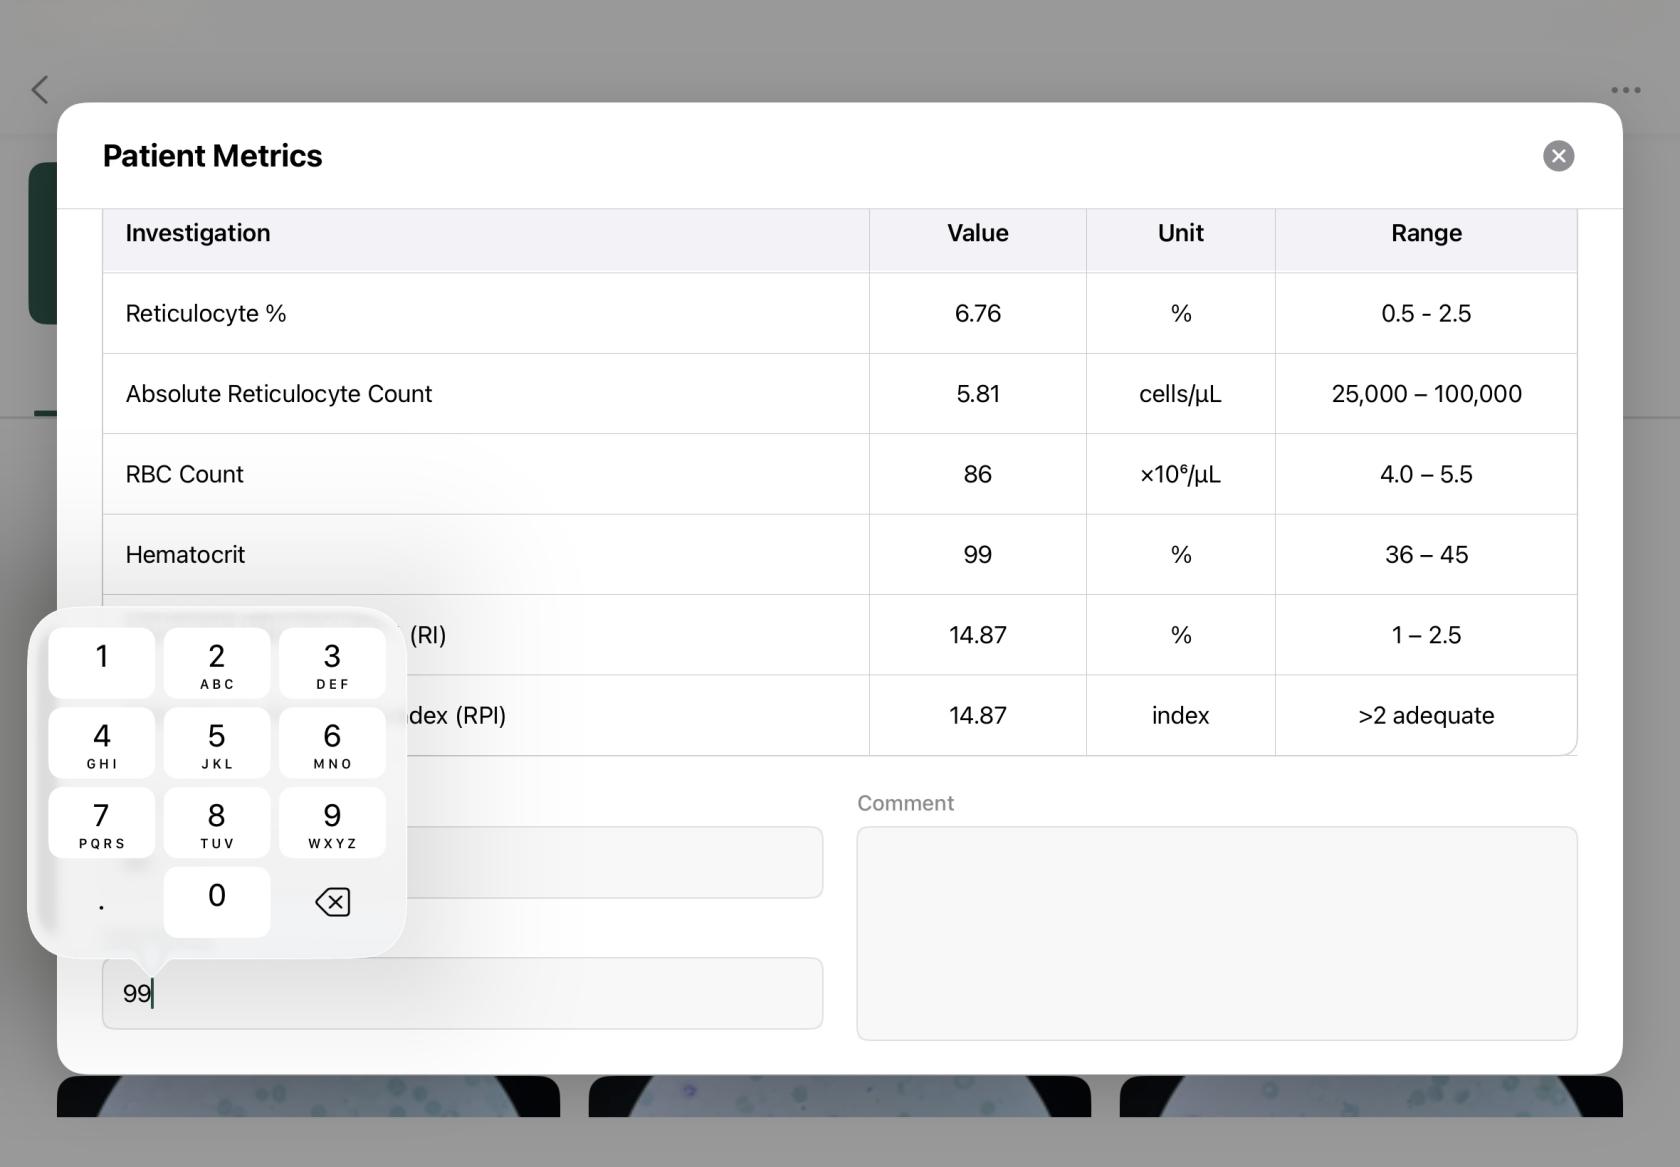
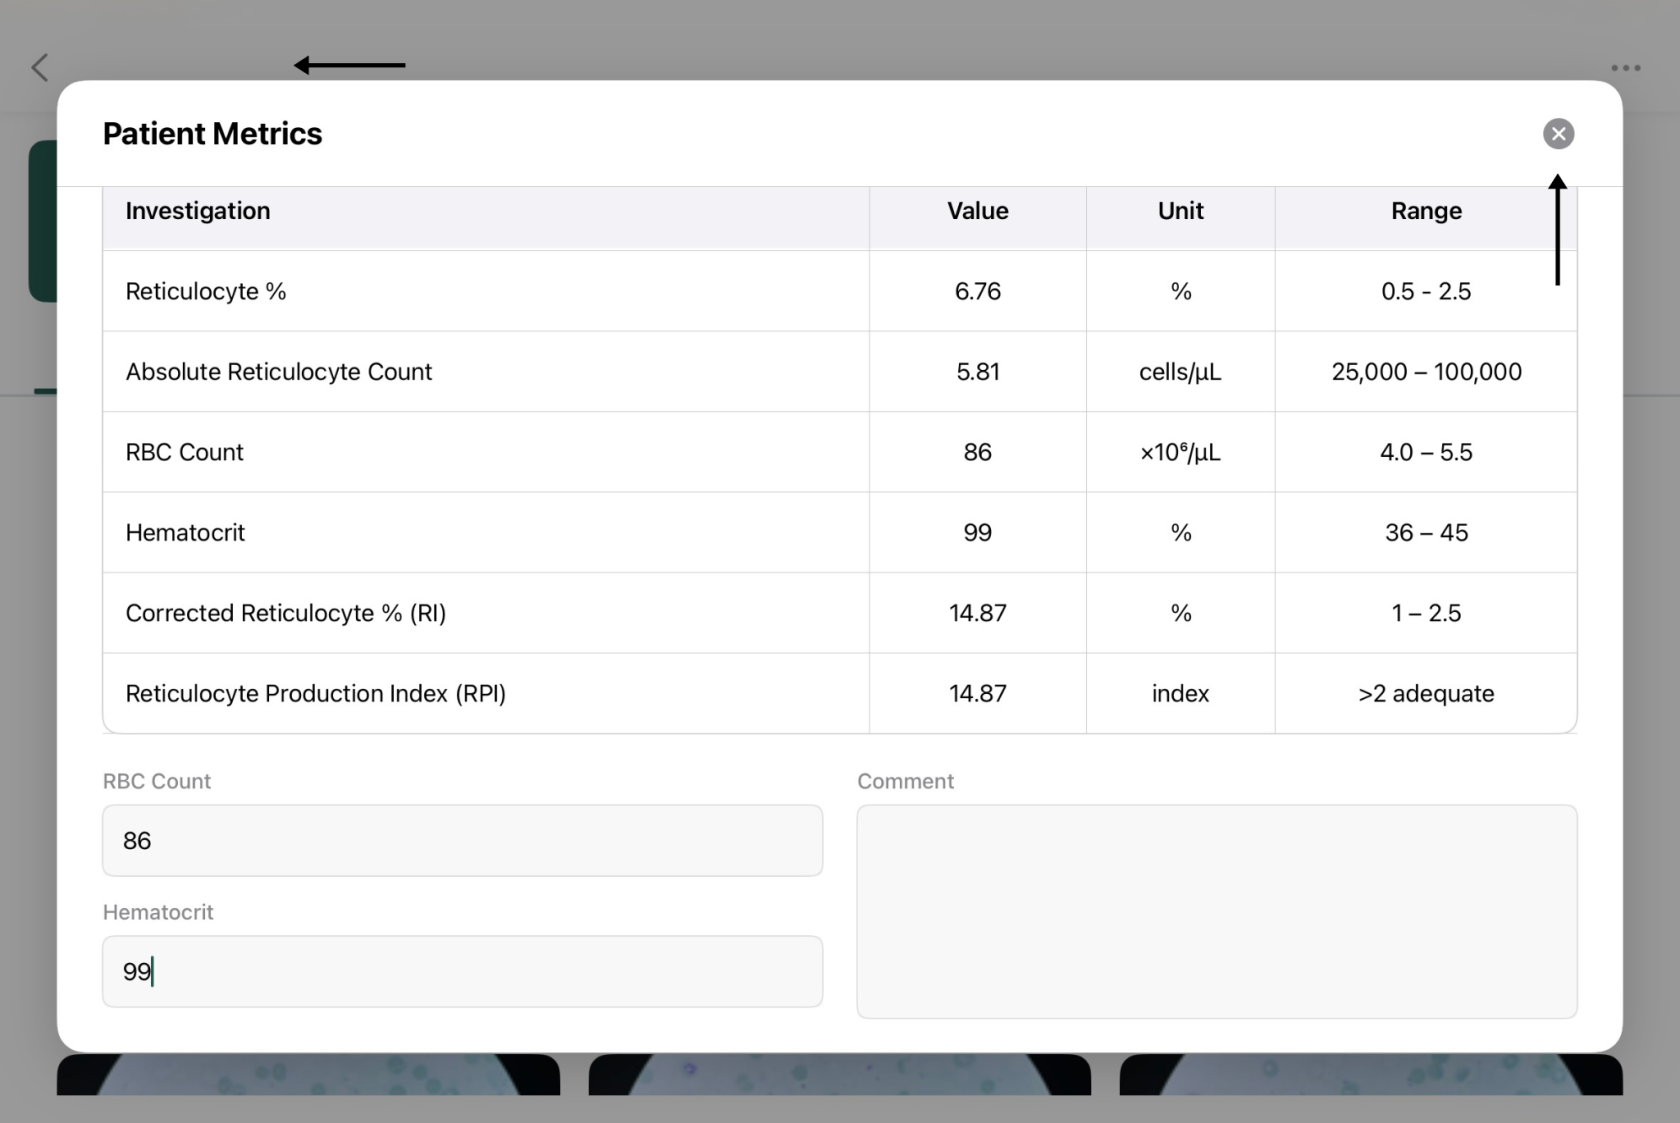
4. Review the displayed case metrics.
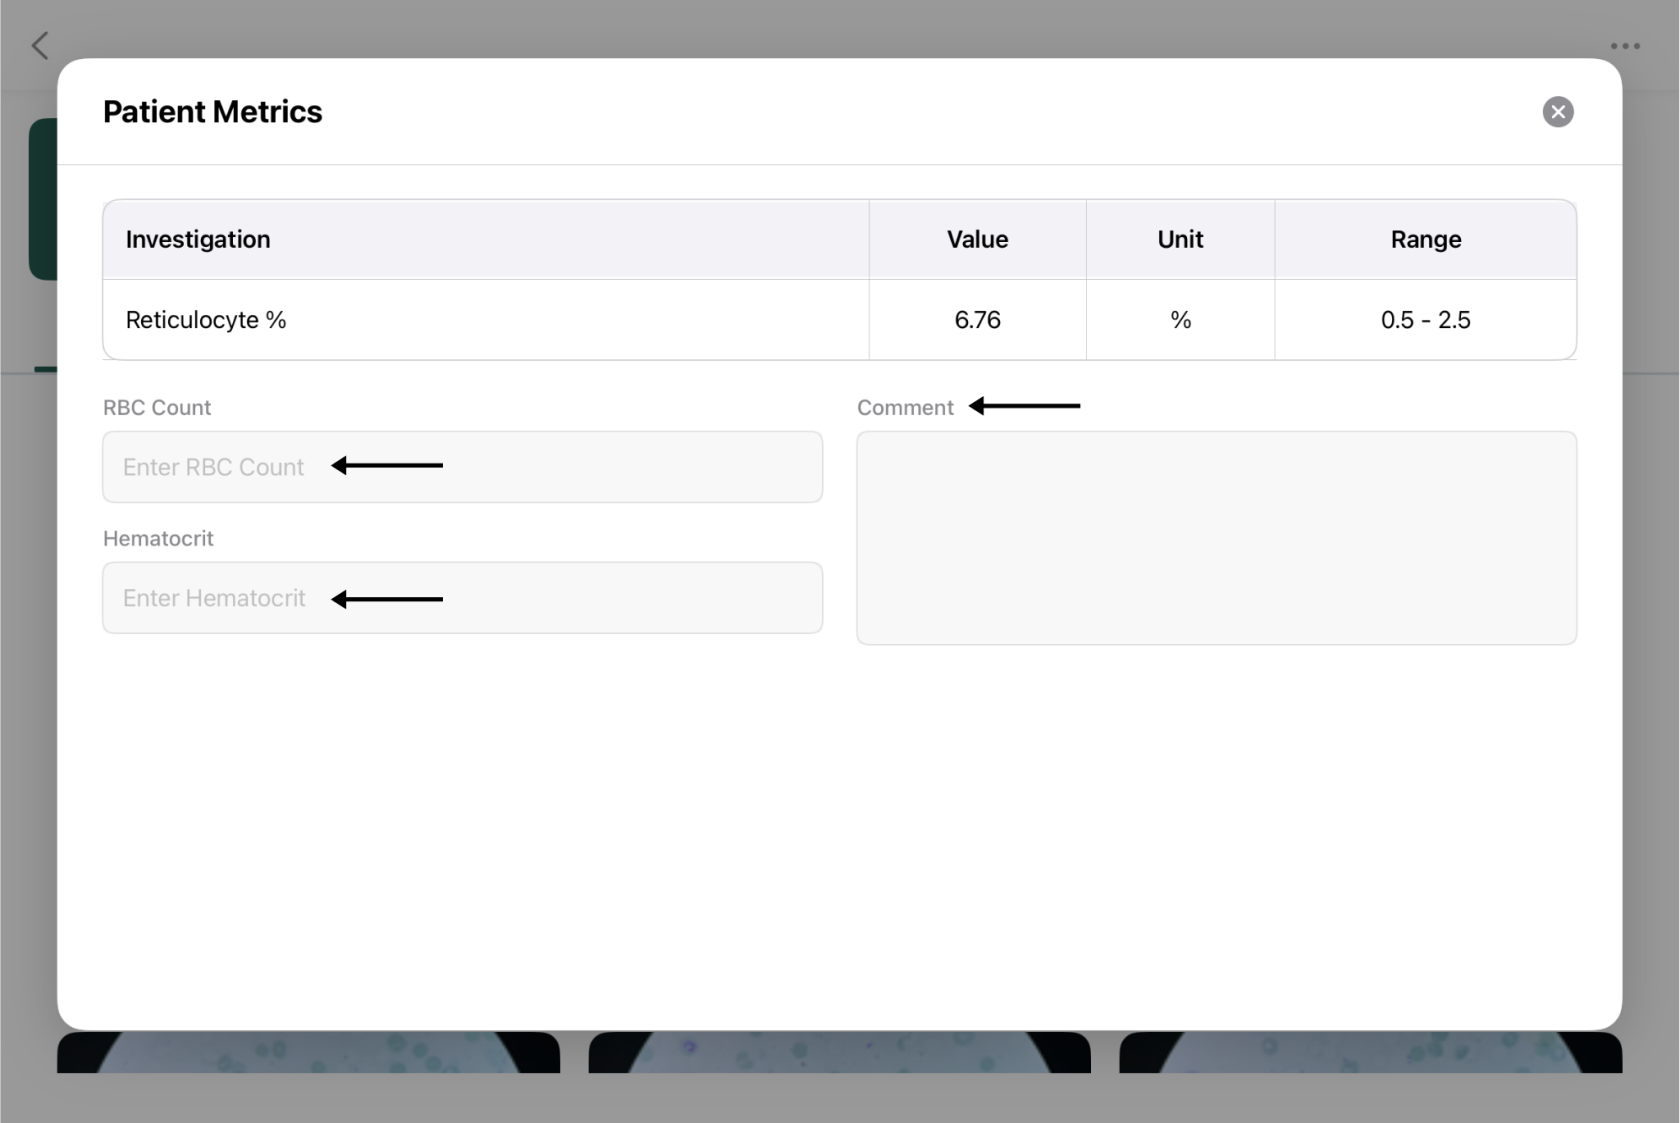
5. User can add in **RBC Count** and **Hematocrit** to get a more in-depth report.
6. Reopen the Patient Matrix to update changes.

<table border="1" id="bkmrk-%C2%A0-1" style="border-collapse: collapse; width: 99.998%;"><colgroup><col style="width: 50%;"></col><col style="width: 50%;"></col></colgroup><tbody><tr><td>[![11.png](https://docs.medprimetech.com/uploads/images/gallery/2026-07/scaled-1680-/11.png)](https://docs.medprimetech.com/uploads/images/gallery/2026-07/11.png)

*<span style="color: rgb(0, 180, 144);">Figure 9(C)</span>*

</td><td class="align-center">[![1.png](https://docs.medprimetech.com/uploads/images/gallery/2026-07/scaled-1680-/1.png)](https://docs.medprimetech.com/uploads/images/gallery/2026-07/1.png)

*<span style="color: rgb(0, 180, 144);">Figure 9(C).1</span>*</td></tr><tr><td>[![IMG_0108.jpeg](https://docs.medprimetech.com/uploads/images/gallery/2026-07/scaled-1680-/img-0108.jpeg)](https://docs.medprimetech.com/uploads/images/gallery/2026-07/img-0108.jpeg)

*<span style="color: rgb(0, 180, 144);">Figure 9(C).2</span>*

</td><td>[![7.png](https://docs.medprimetech.com/uploads/images/gallery/2026-07/scaled-1680-/7.png)](https://docs.medprimetech.com/uploads/images/gallery/2026-07/7.png)

*<span style="color: rgb(0, 180, 144);">Figure 9(C).3</span>*

</td></tr></tbody></table>