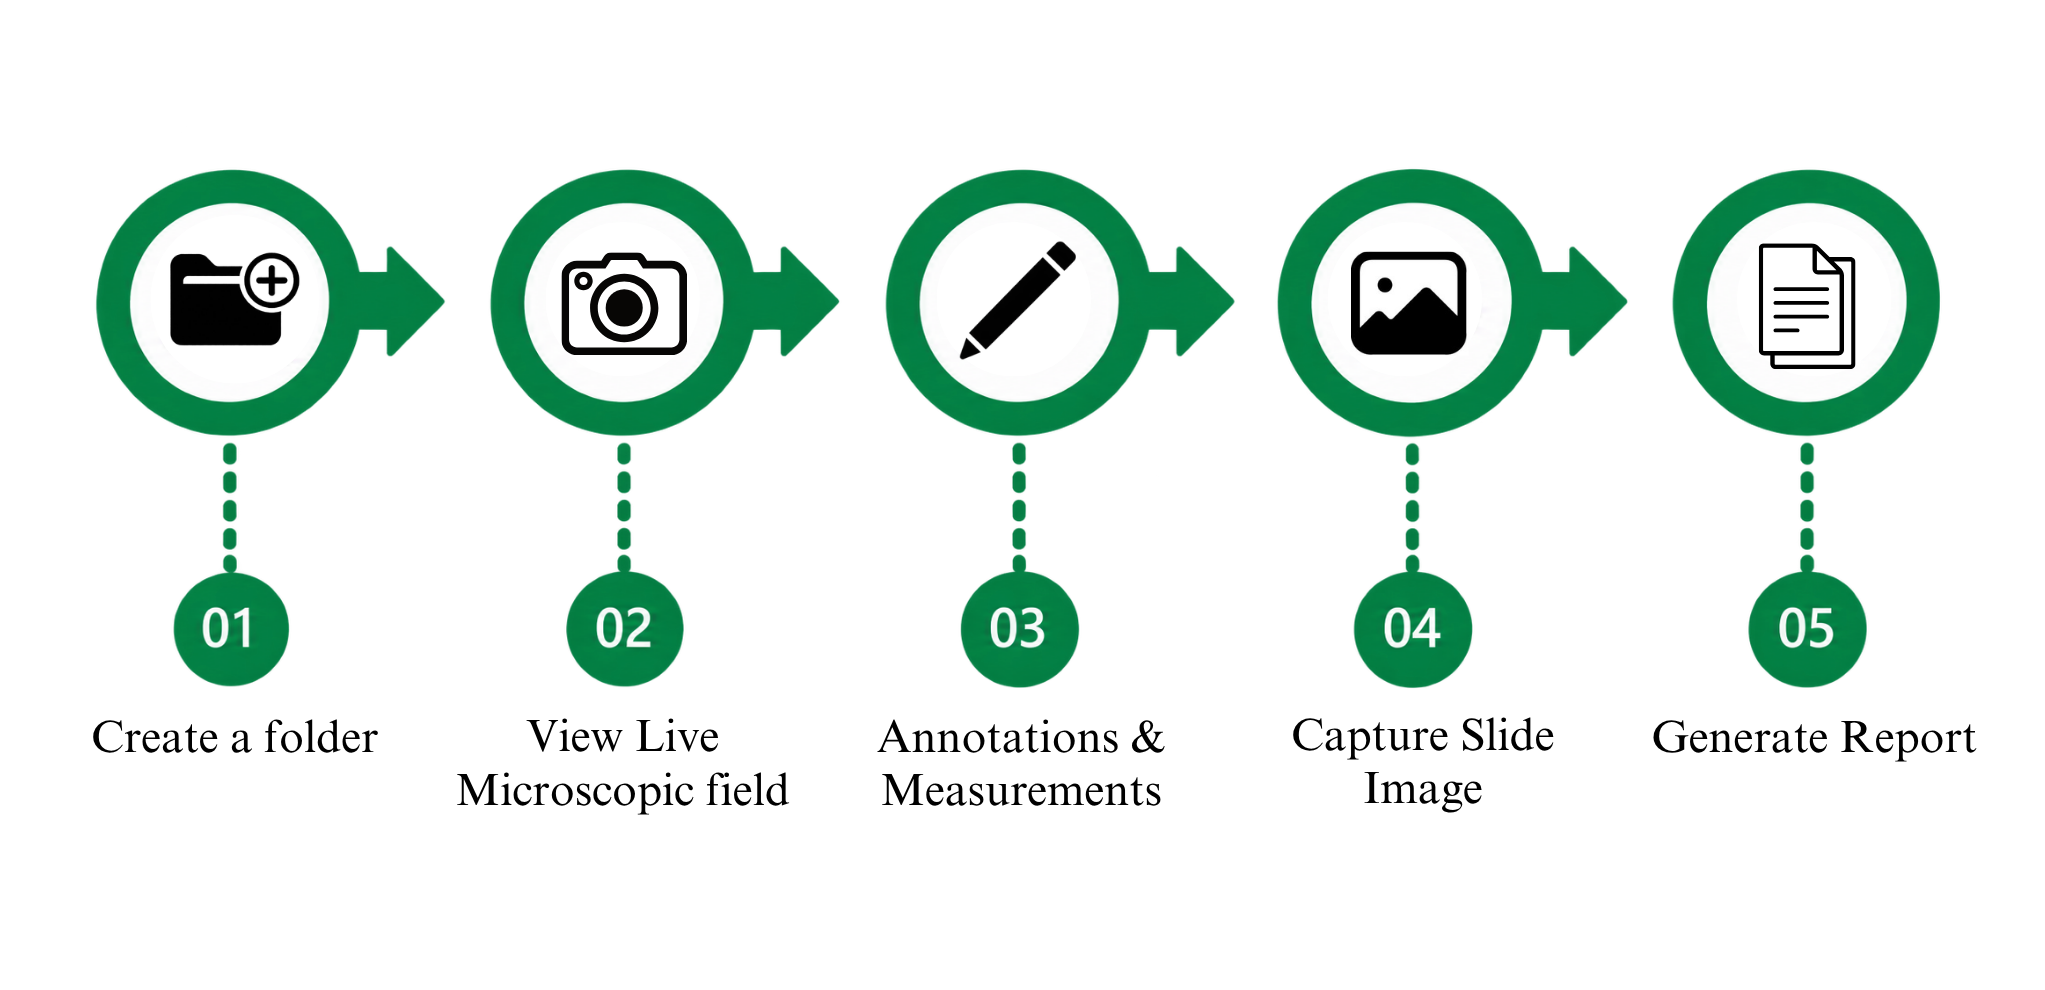
Work Flow
Introduction
Cilika is a professional digital microscopy application developed exclusively for iPad to support organizational and laboratory workflows requiring rigorous specimen documentation and analysis. The application integrates image capture, annotation, dimensional measurement, calibration, and report generation into a single platform suitable for pathology laboratories, clinical environments, research facilities, and educational institutions.
Quick-start steps
-
Set up: install Cilika on iPad, connect microscope camera, check system requirements.
-
Calibrate: run the calibration routine once per objective or setup to ensure measurement accuracy.
-
Capture image: open Capture, choose objective and illumination, focus, then tap Capture.
-
Annotate: open image, use drawing/text tools to mark features and add notes.
-
Measure: select measurement tool (line, area, scale-linked), measure features; verify units.
-
Save & organize: tag images, add metadata (sample ID, date, operator), and save to project.
-
Export & report: generate a PDF or image package with embedded measurements and annotations; share via secure export or institutional storage.
-
Troubleshoot: refer to the FAQ for common issues (connection, focus, calibration).
Getting Started
Navigating Cilika
The Cilika application is located on the home screen of your IOS. Locate the Cilika iOS application icon ( ) in the dock at the bottom of the screen and tap on it to launch the Cilika application.

The dashboard has three icons at the top right corner:
-
Add Folder
-
Generate Report
-
Settings
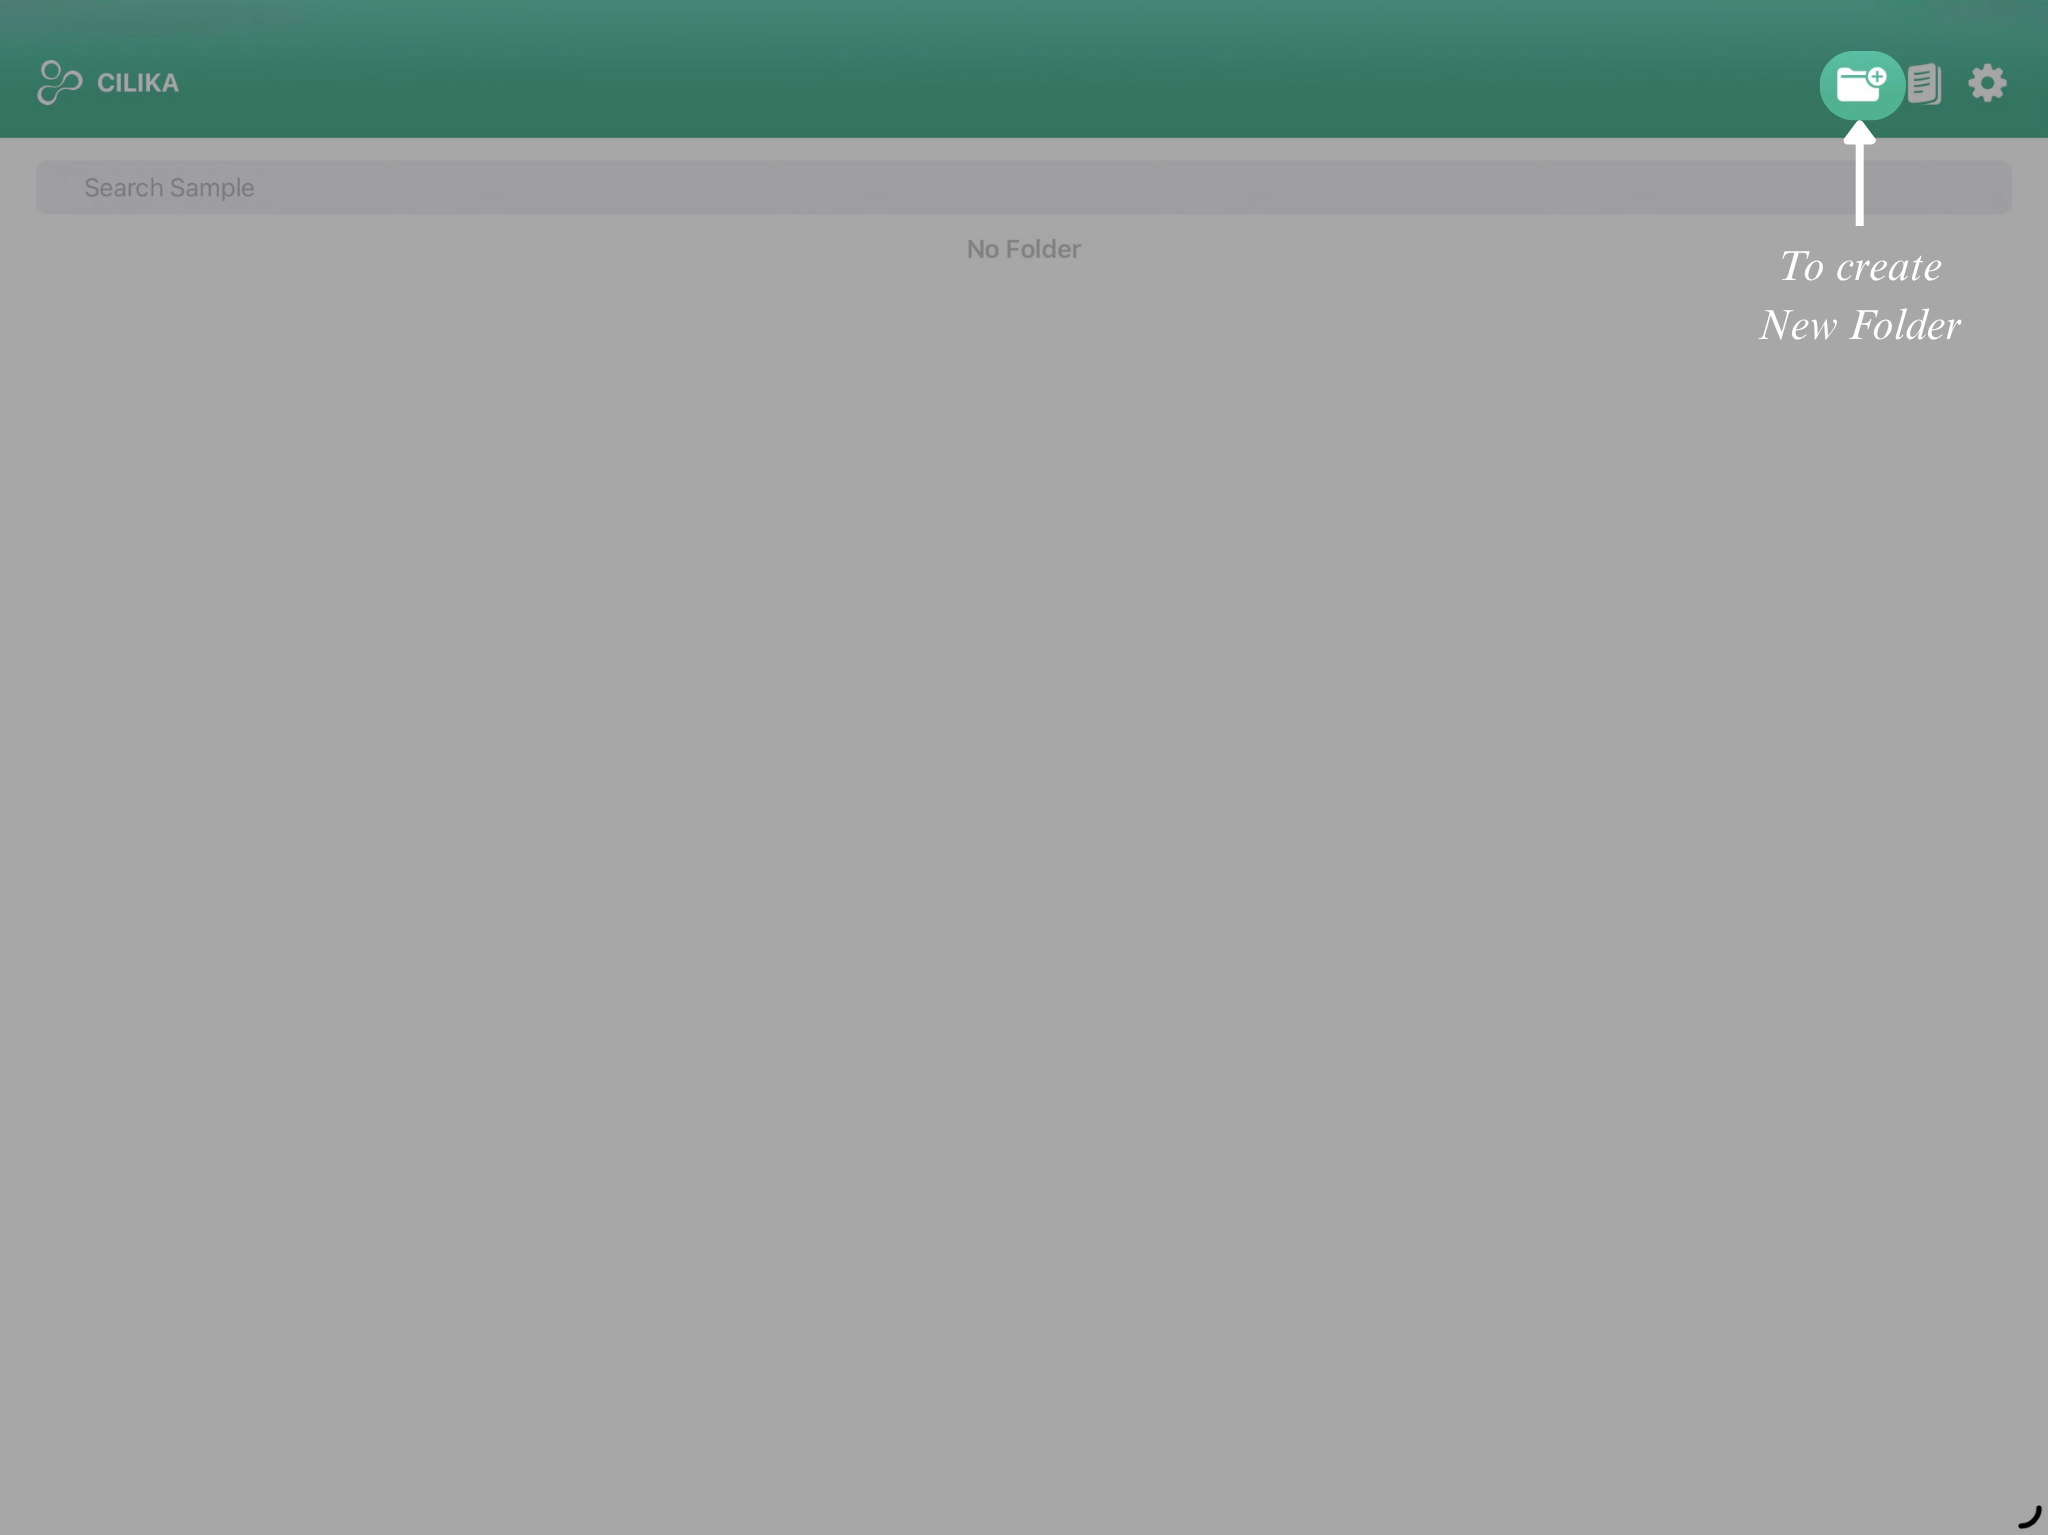
1. Add Folder
1. Tap on the Add folder icon in the top-right ( )
)

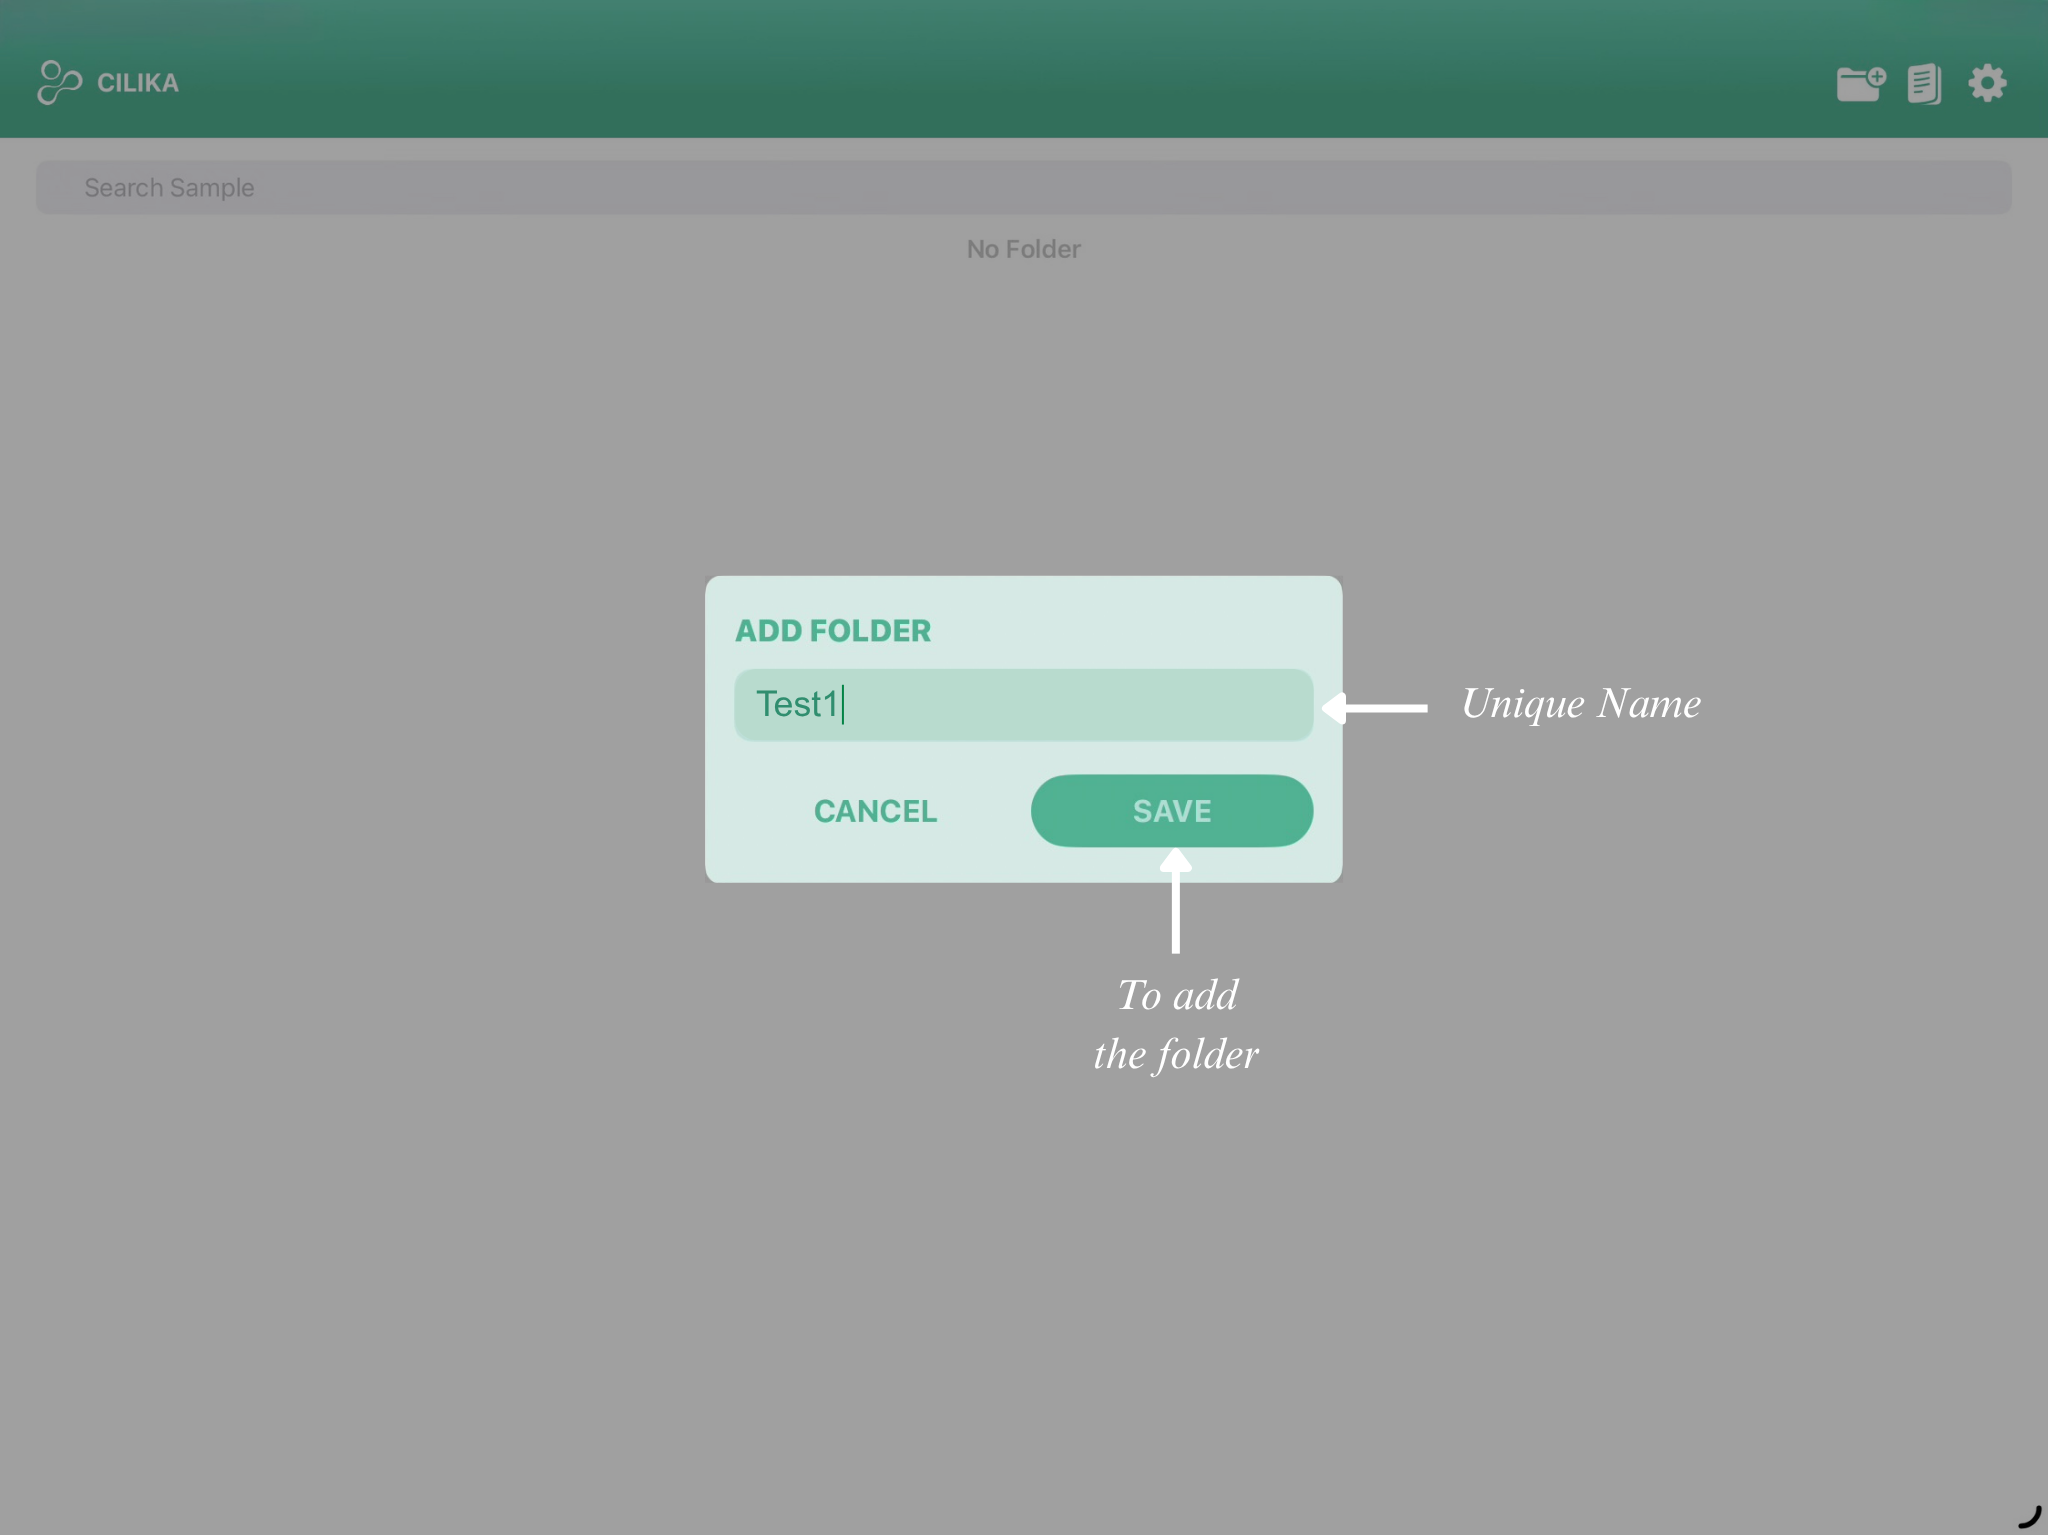
2. An Add Folder dialog appears.
3. Type in a clear, unique name (for example the case number or patient identifier) is to be added in the text box.
4. Tap Save, for the new folder to appear on the Dashboard.
 |
 |
2. Rename and Delete Folder
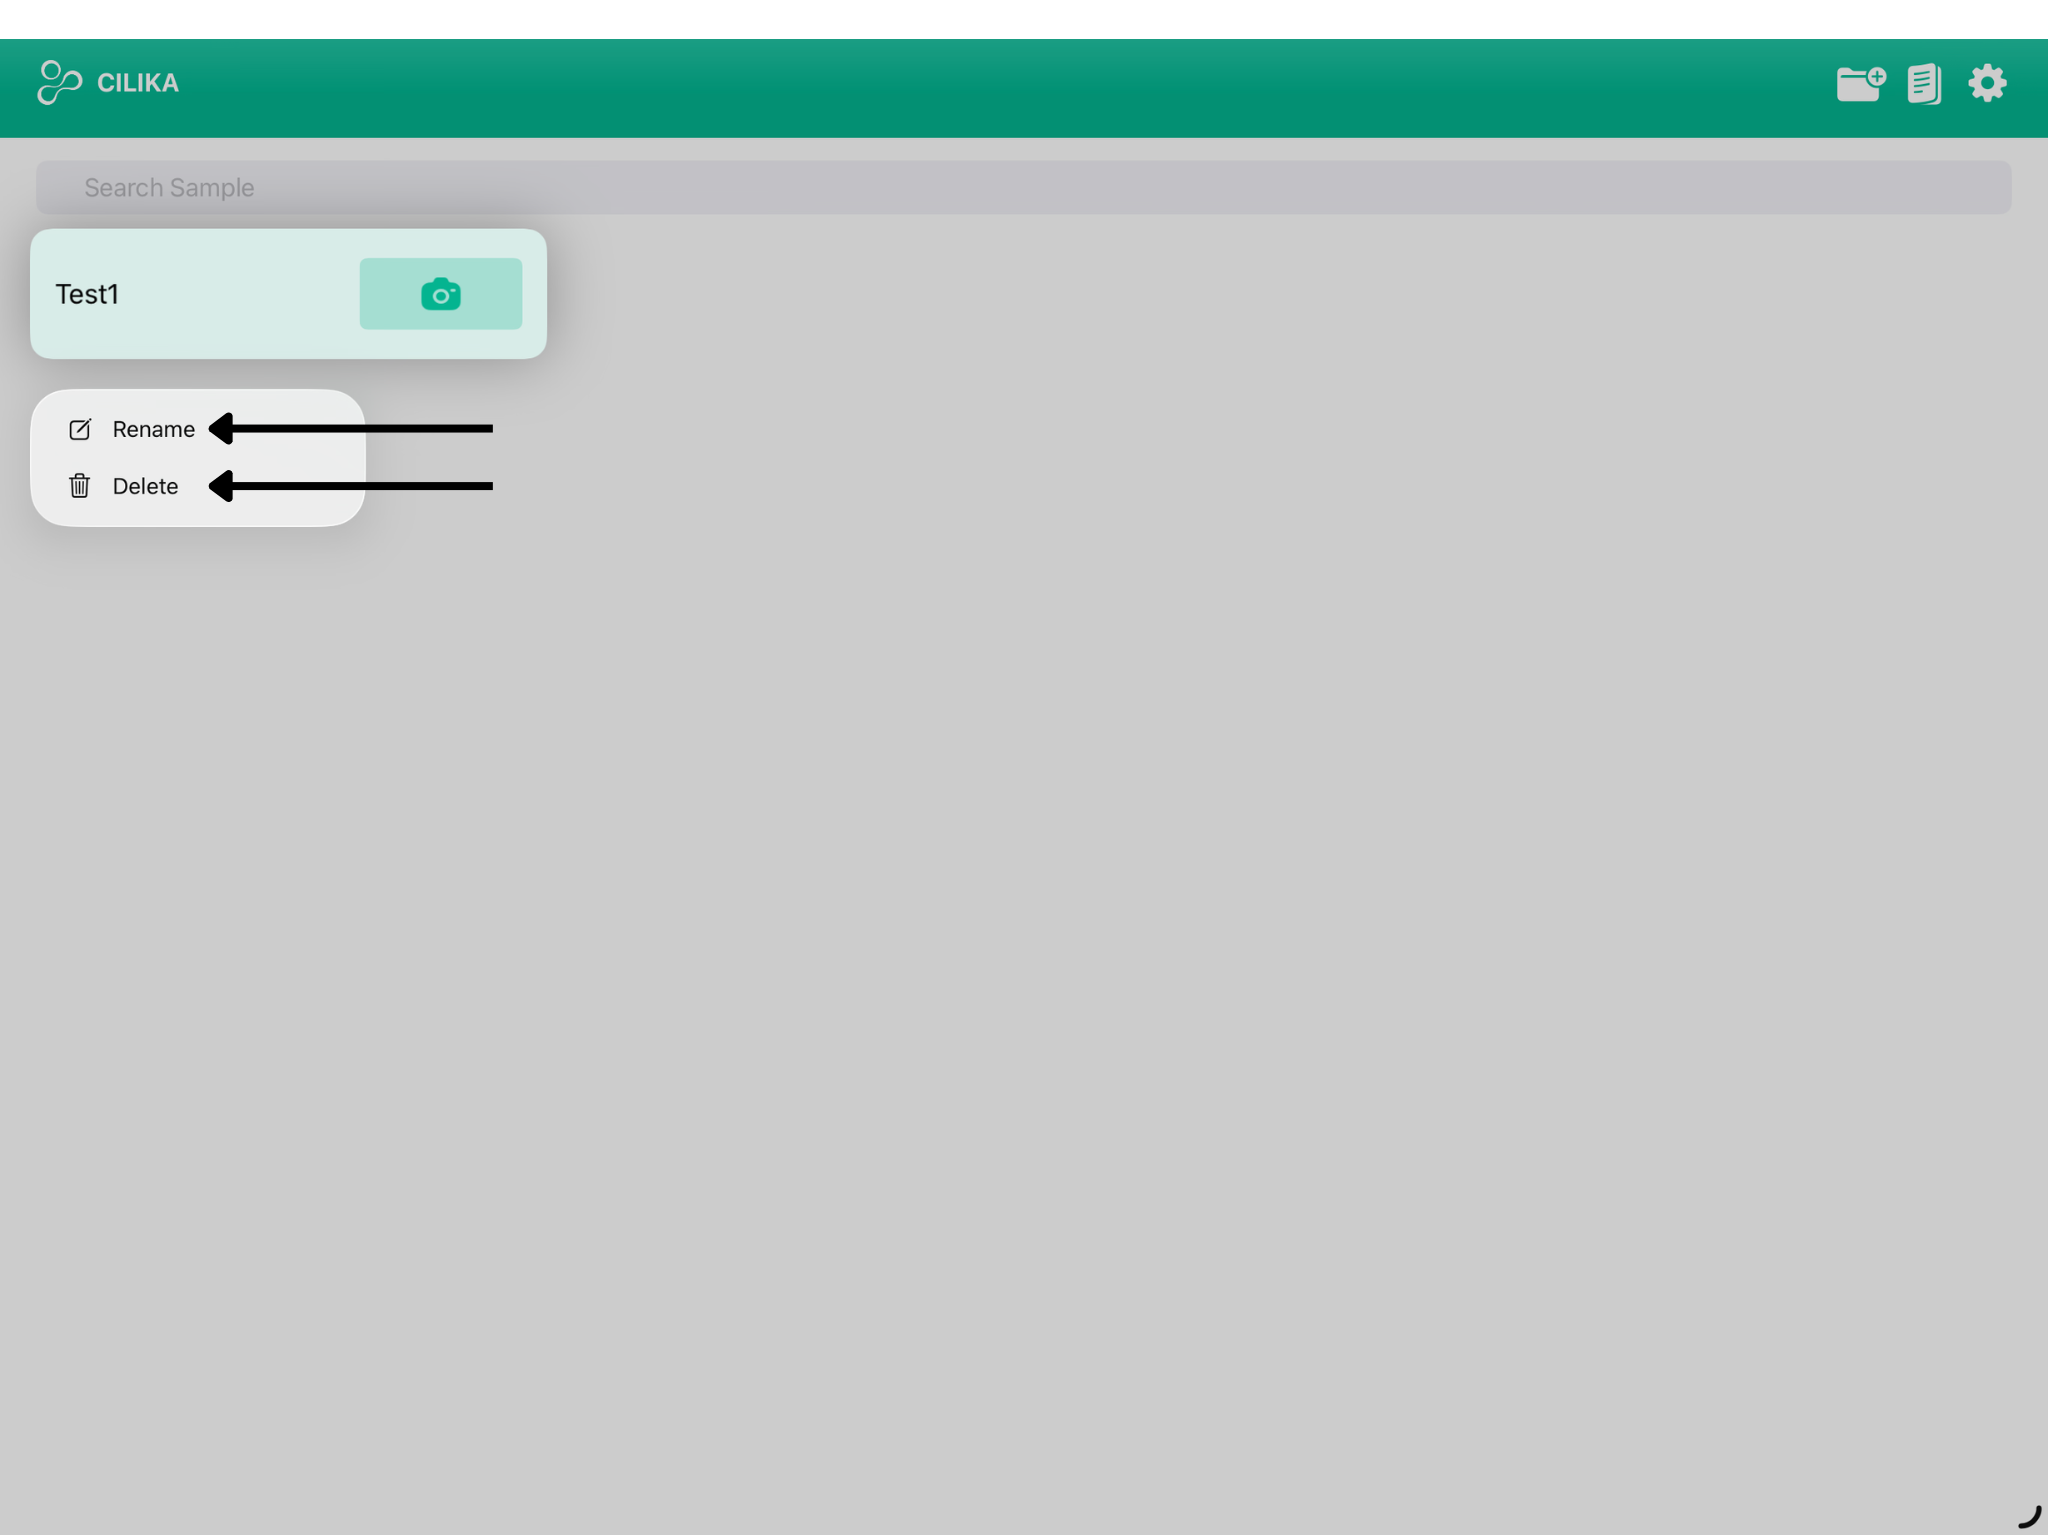
1. Long press the folder to get the following two options:
-
Delete (
 )
) -
Rename (
 )
)


2. Once you tap on the Rename () option, Rename Folder popup appears on the screen.
3. Enter a valid folder name with no space in between.
4. Tap on Save to save the new name or Cancel to get the previously saved name.
5. Tapping on the Delete () option it deletes the whole folder, which includes all the files inside the folder.
 |
3. Capture Image
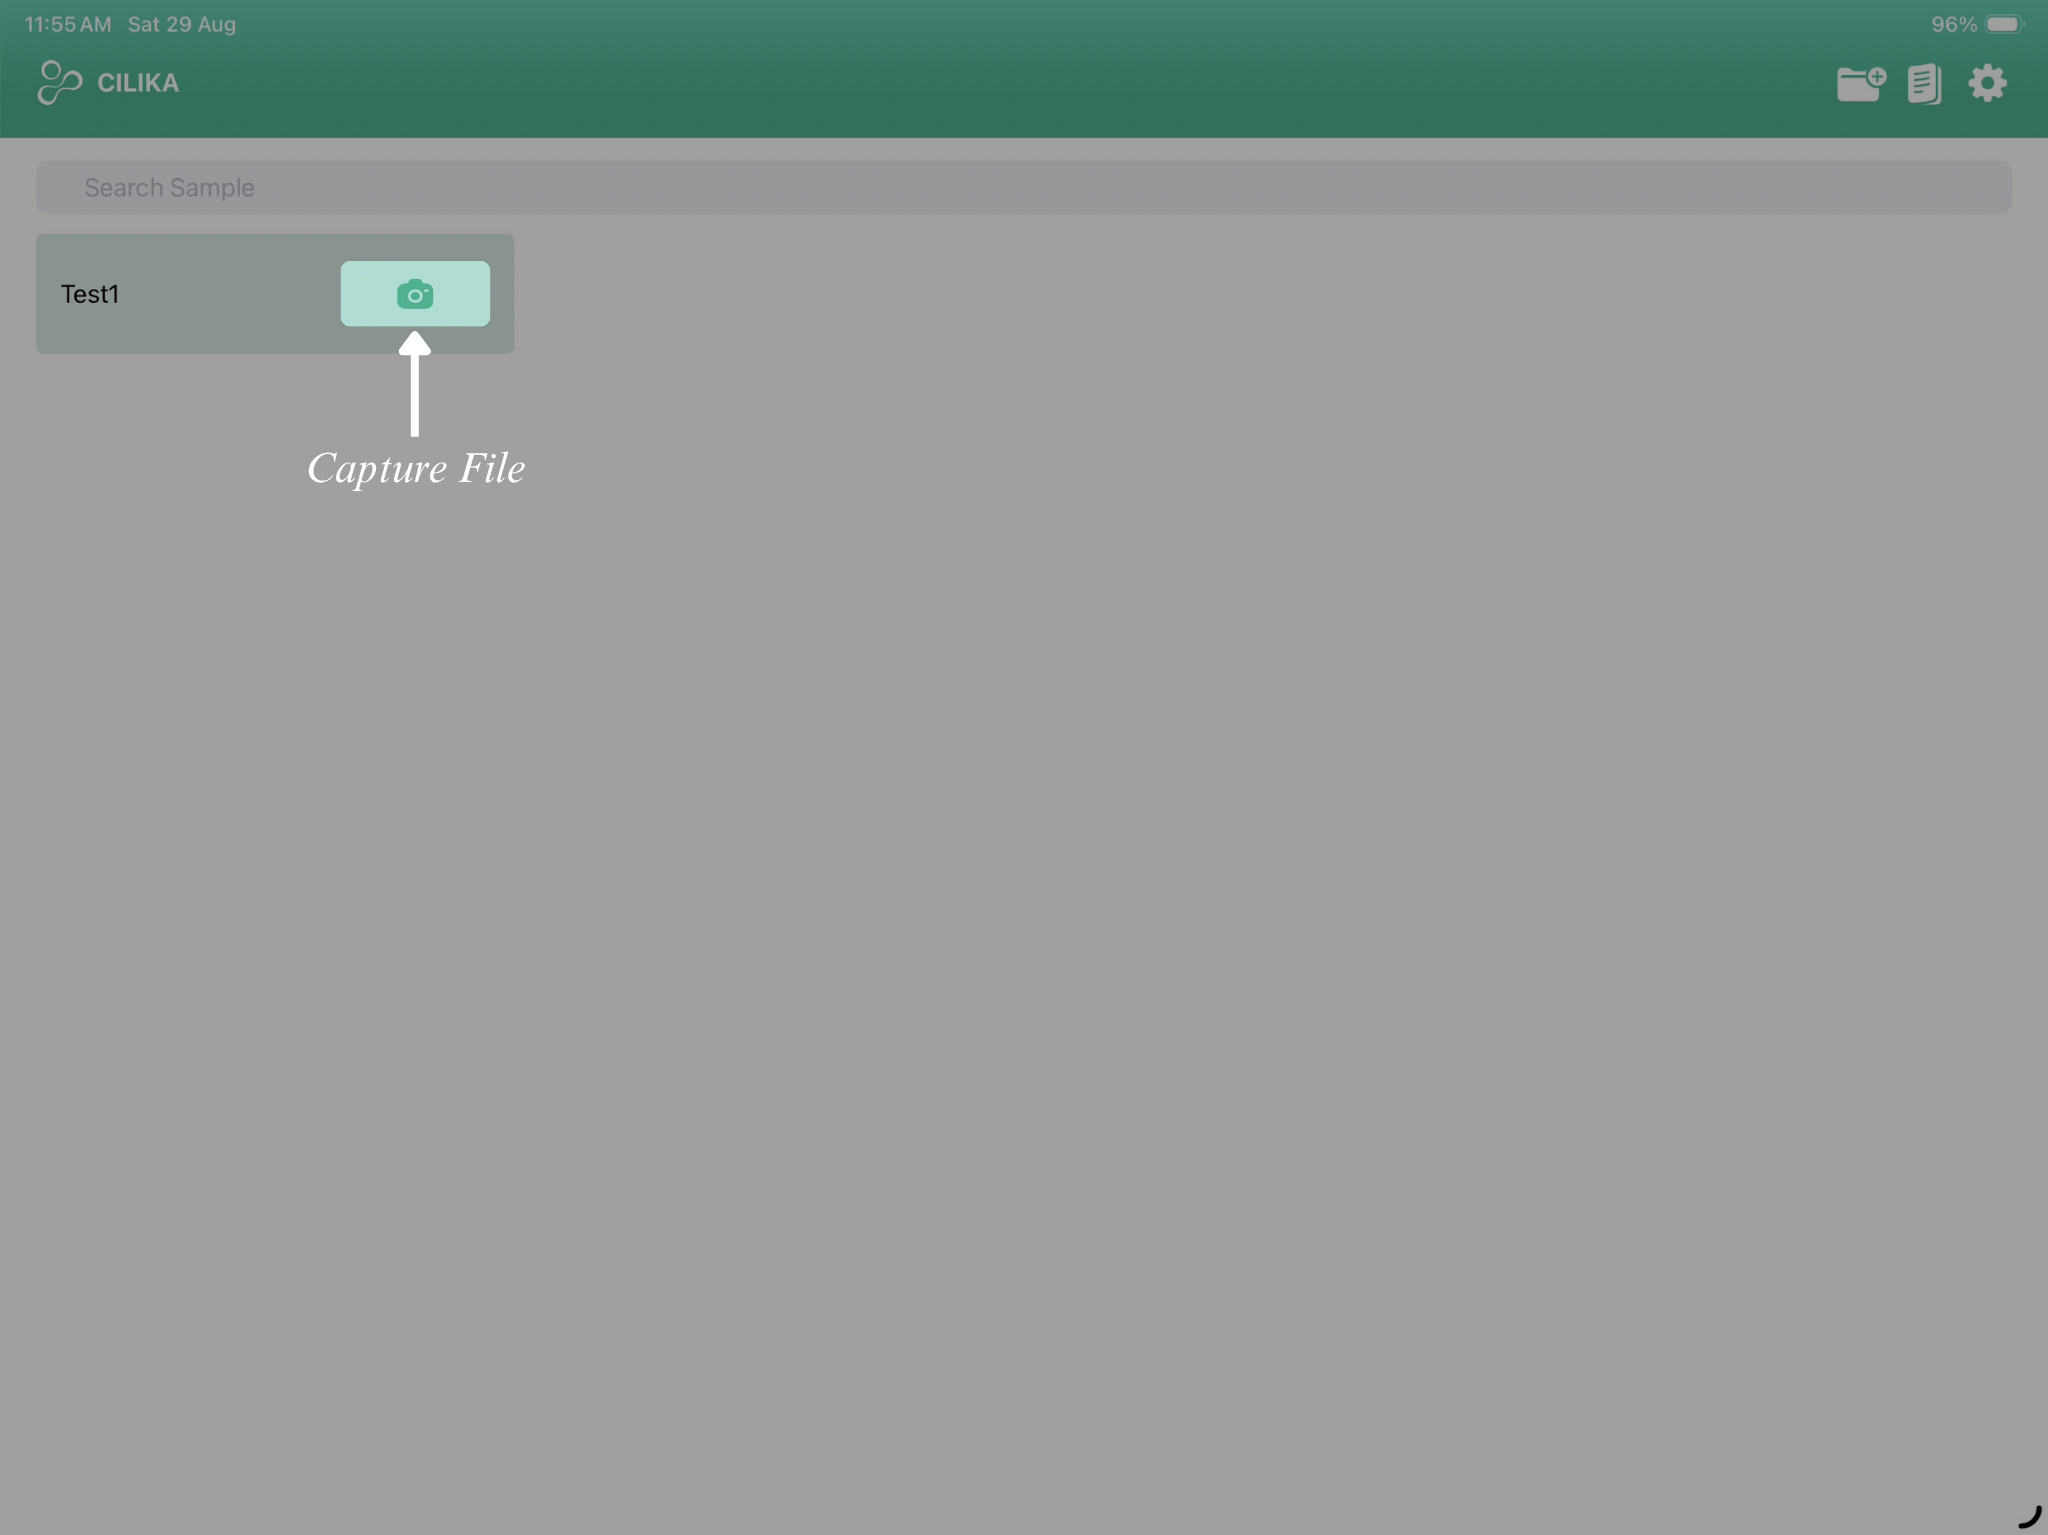
1. Tap the Camera ( ) located on the folder beside the folder name.

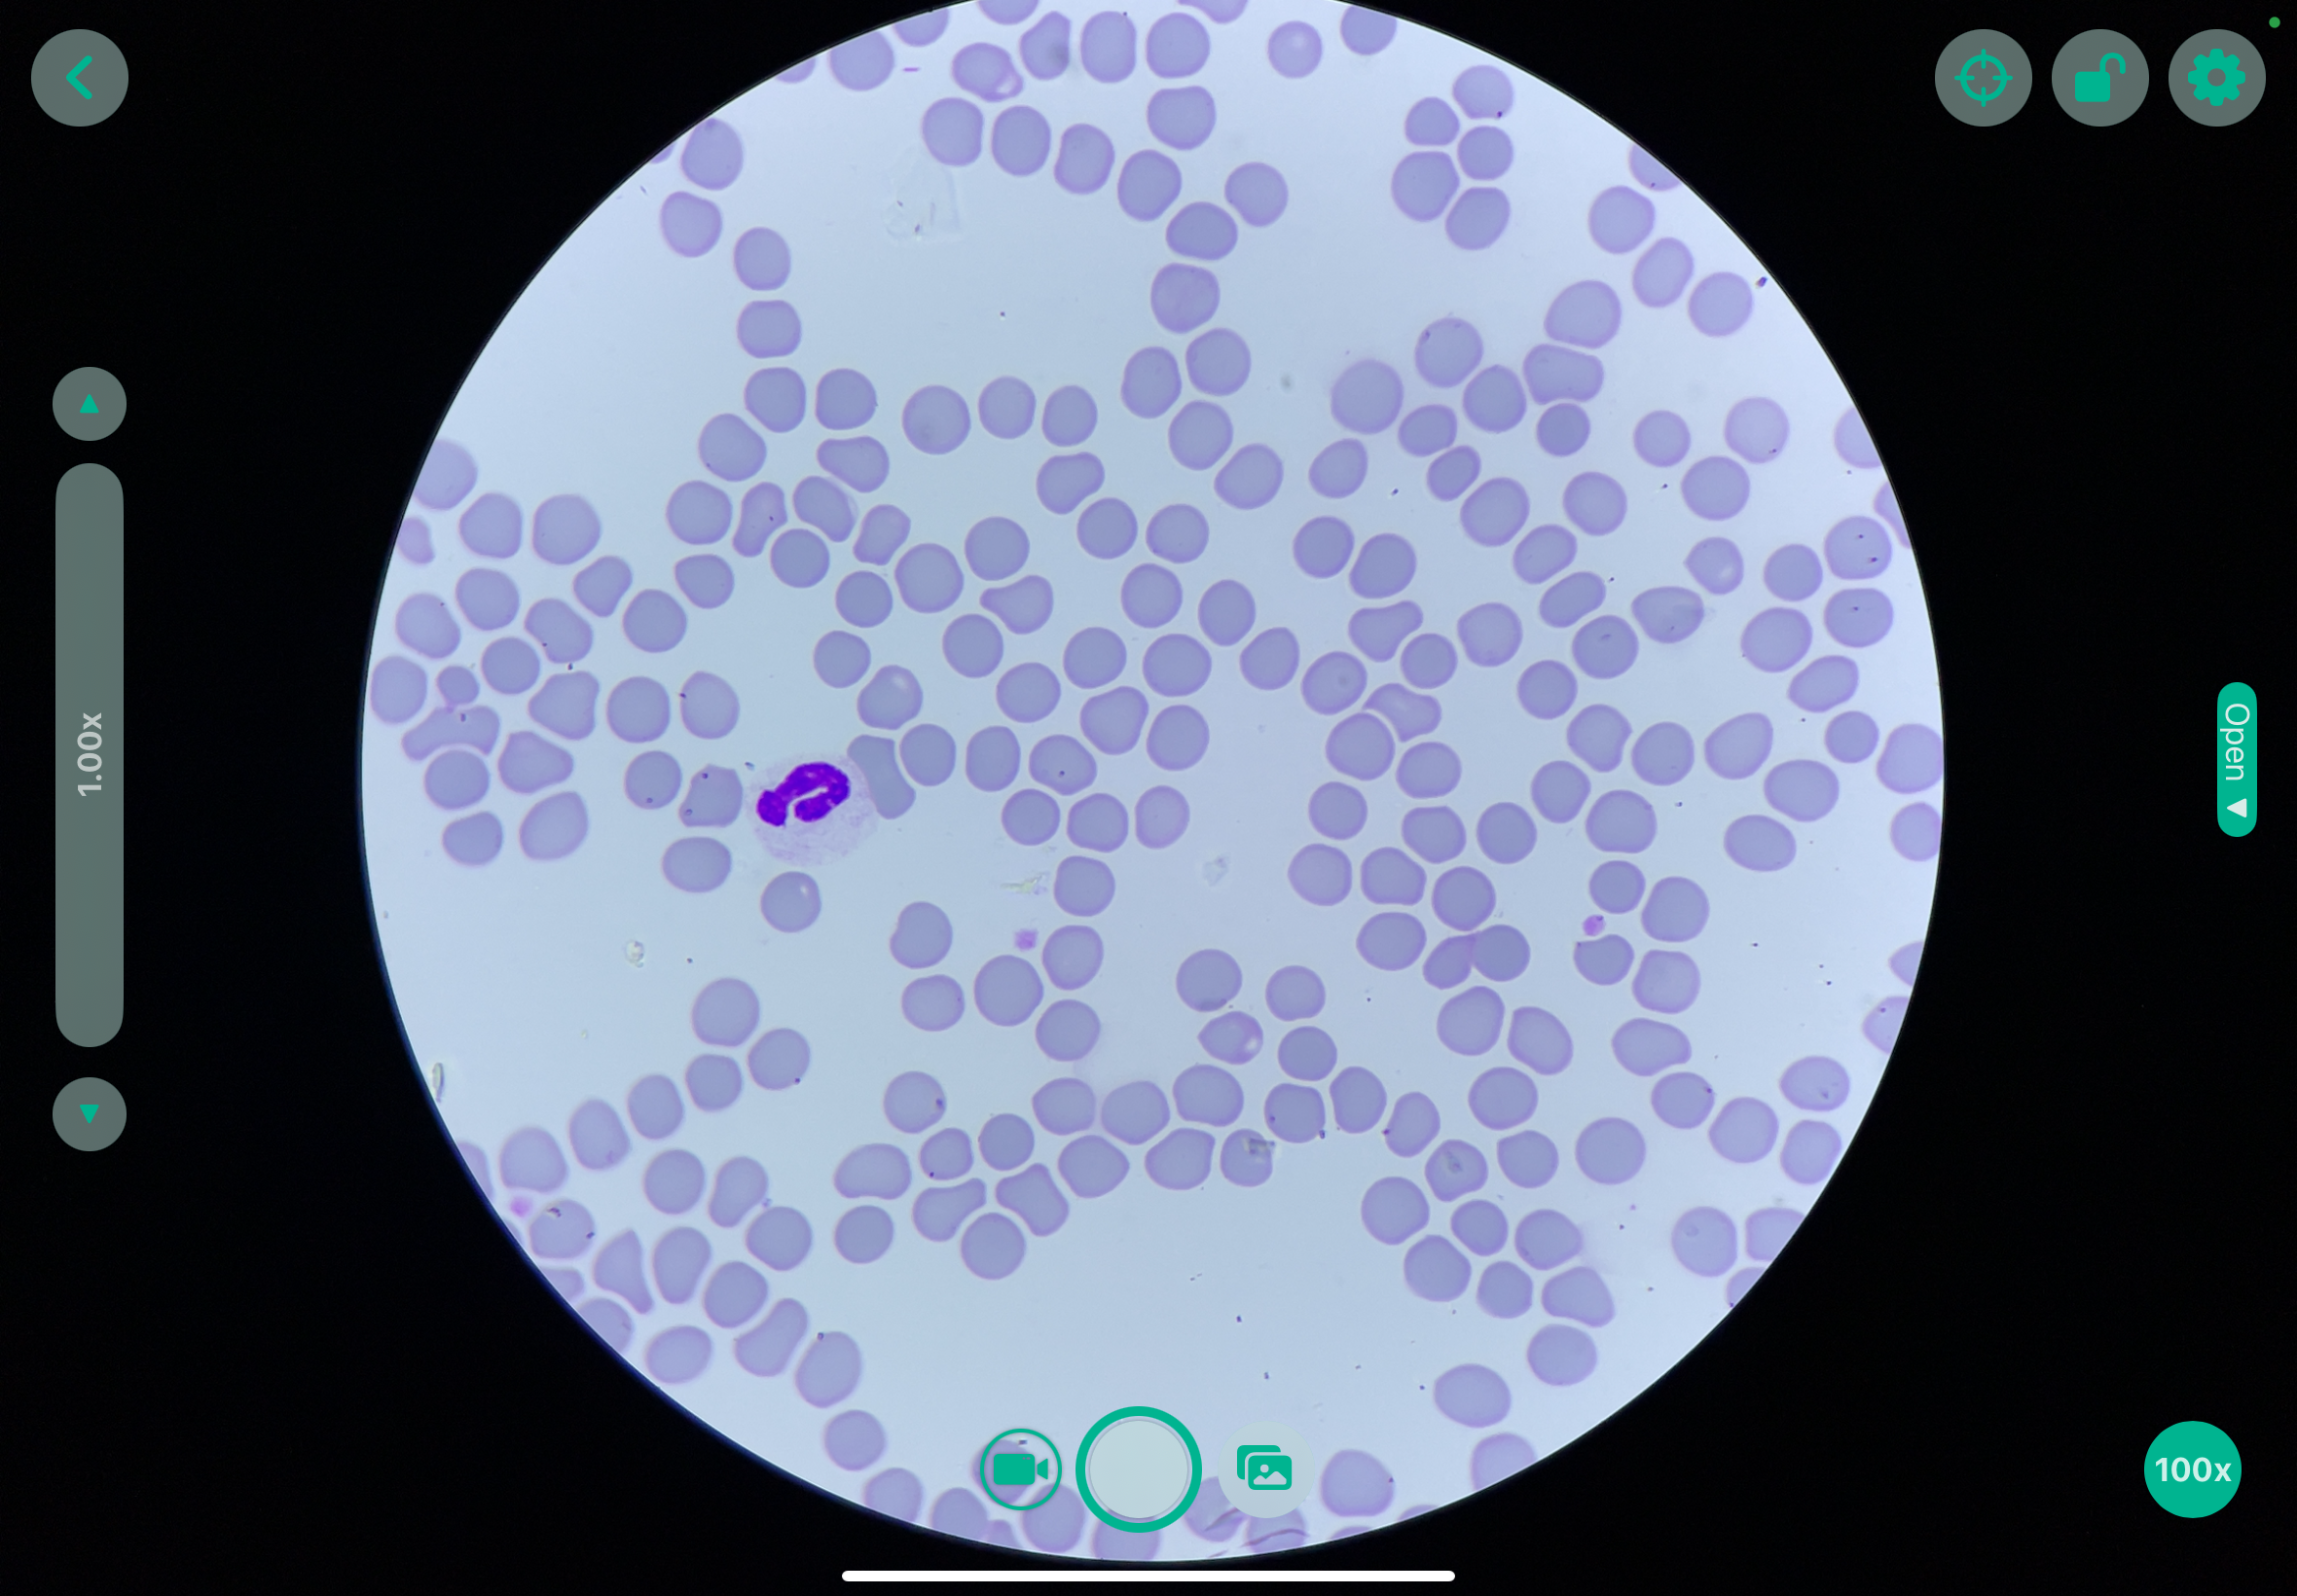
2. A camera opens up, this is the Live Microscopic View.
3. Make sure the iPad is horizontally positioned for it to work.
4. If the microscopic image is not visible on screen, restart the application.
|
|
|
|
4. Navigating Live Microscopic View
Understanding the Camera |
|
Figure 1.4 Screen Layout |
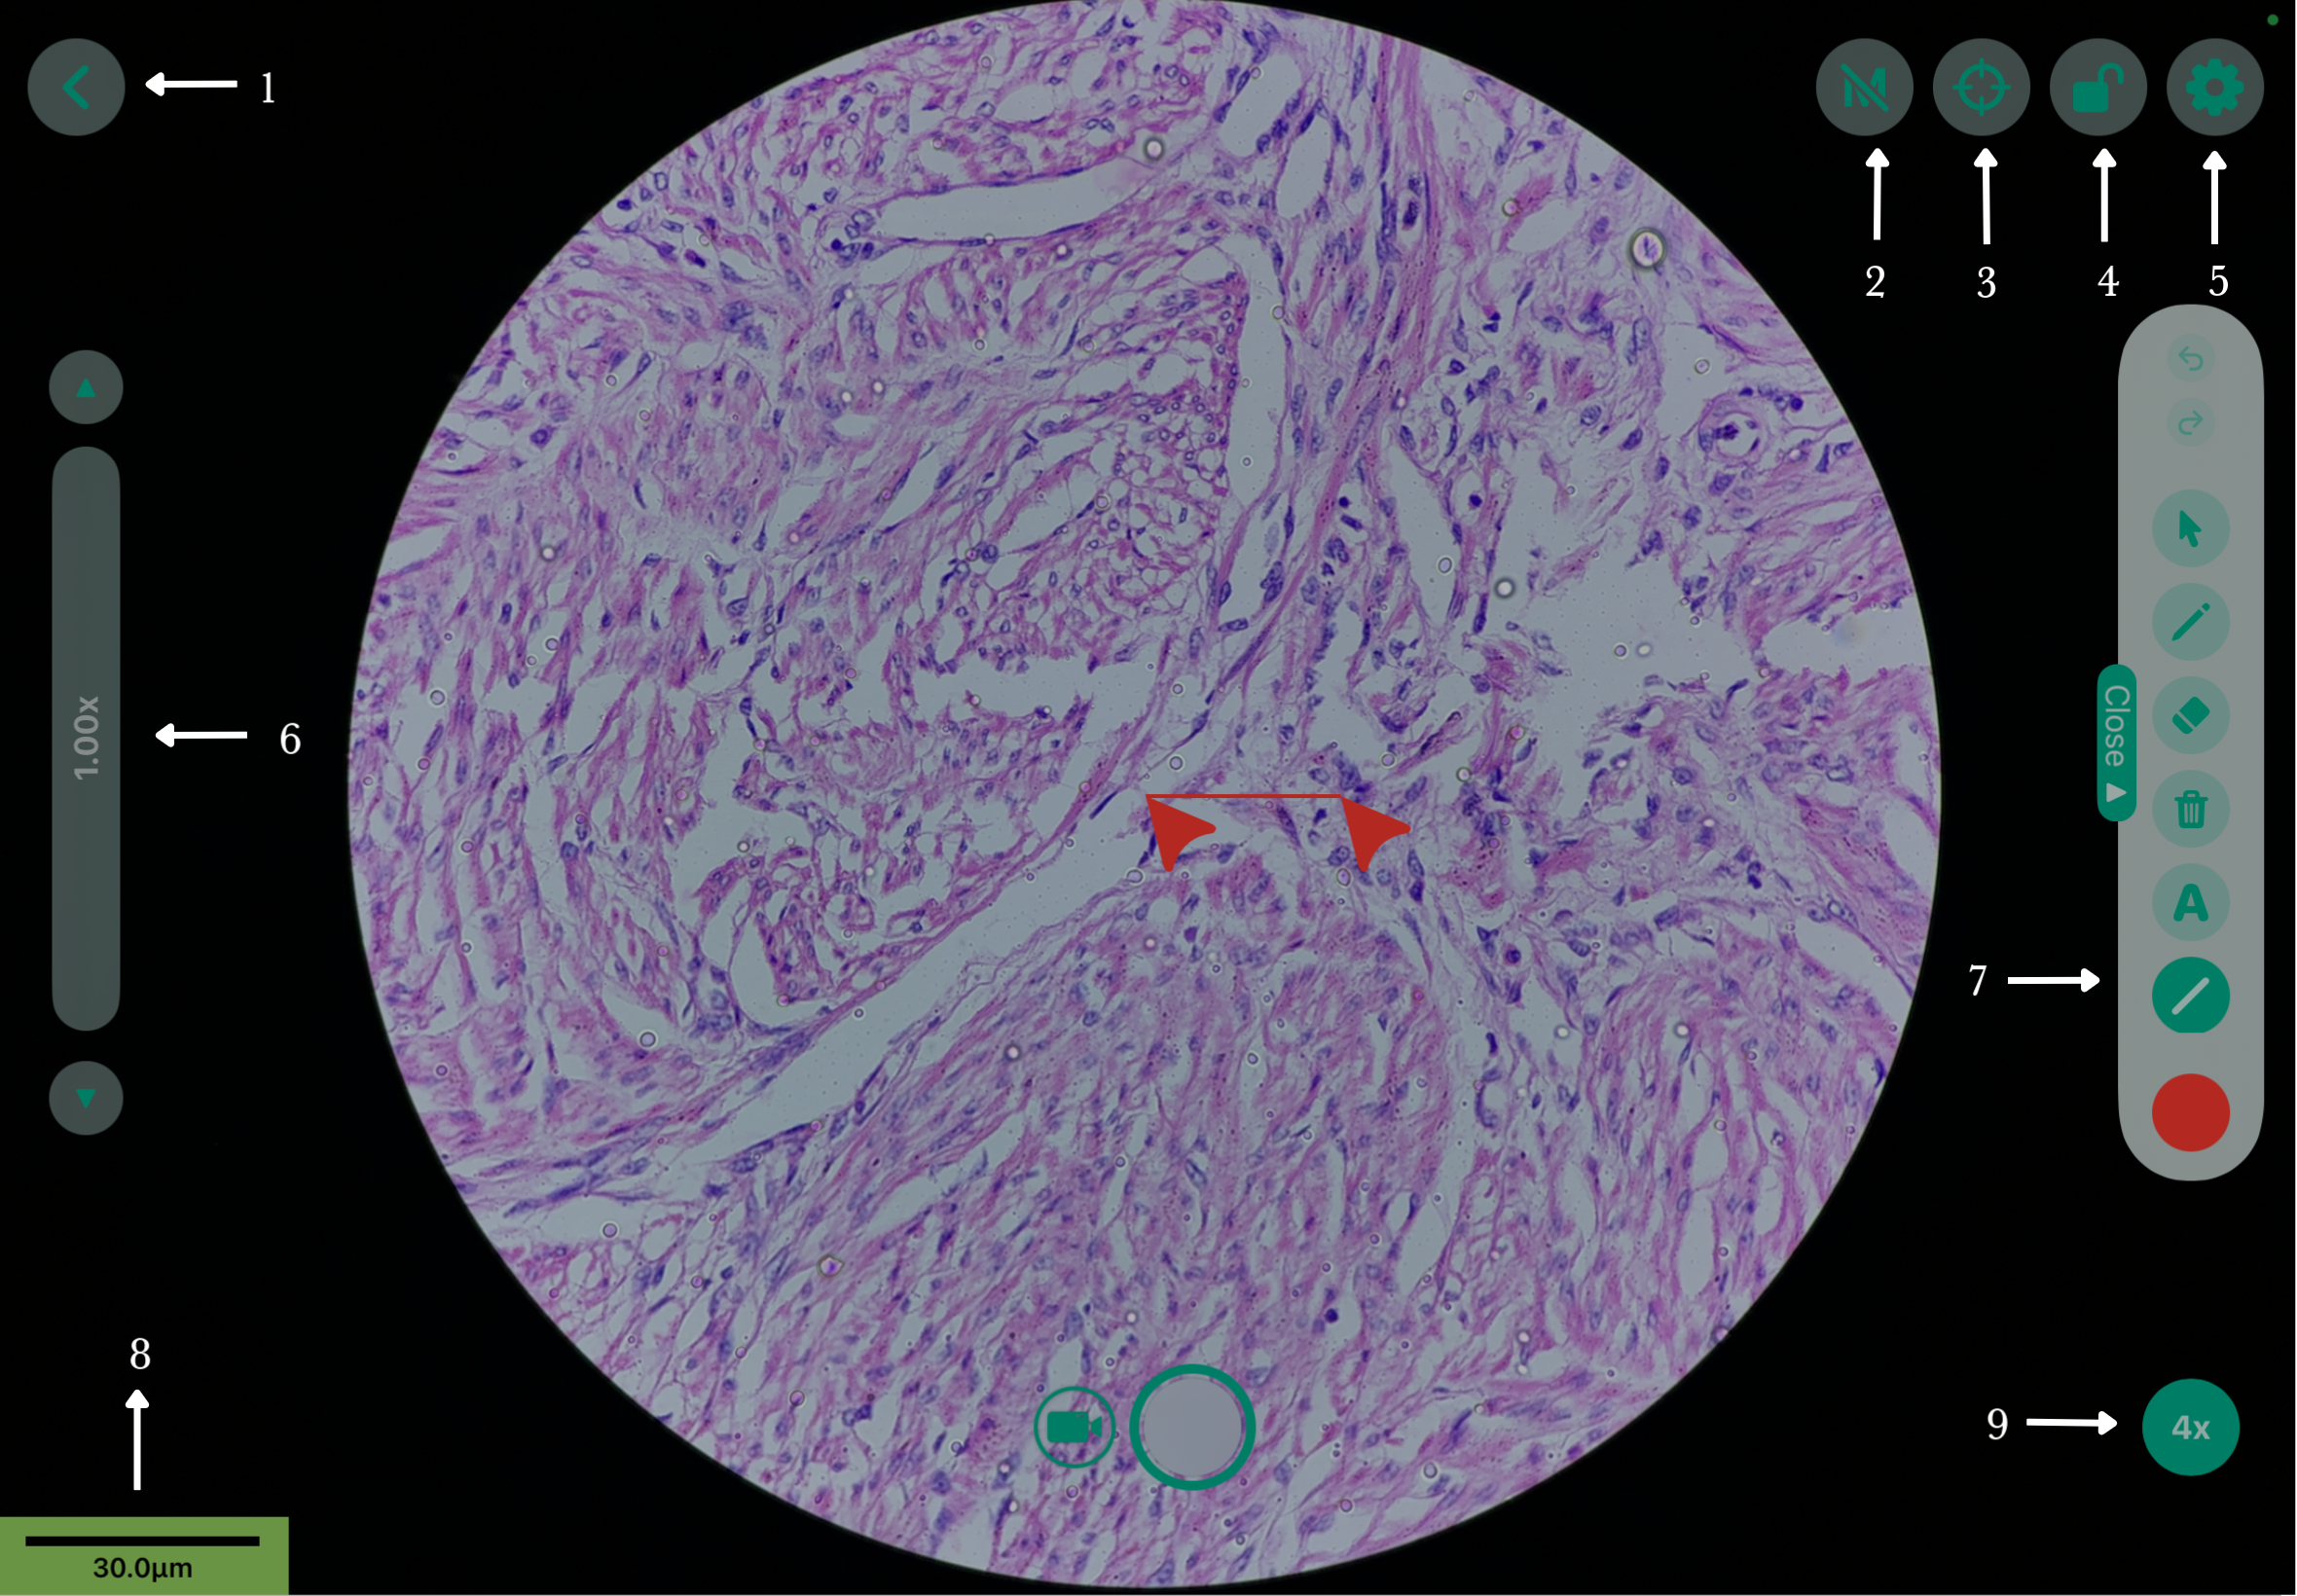
(A) Live View — Screen Layout: |
||
|
|
Tools |
Description |
1 |
Back (‹) |
Select the Back (‹) arrow to return to the folder. |
2 |
Measurement (M) |
Show or hide the exact measurements of selected areas and annotations on the slide. |
3 |
Crosshair / Reticle (
|
Shows or hides the center target in the live microscopic view. |
4 |
Lock (
|
Locks the screen to prevent accidental touches during viewing or capture. |
5 |
Settings (
|
Opens Camera Settings. |
6 |
Zoom Slider |
Use the ▲ / ▼ arrows to zoom in or out and make fine adjustments to the live microscopic view |
7 |
Open Drawer |
Opens the annotation tools available for marking the live microscopic view. |
8 |
Scale Bar |
Displays the scale of the image to help estimate the size of the viewed specimen or region. |
9 |
Objective Lens |
Displays the currently selected objective lens or magnification level. |


Zoom Slider
1. The Zoom Slider is located on the left side of the screen.
2. Drag the slider up to zoom in on the live microscopic image or down to zoom out.
3. Use the ▲ / ▼ arrows to make fine zoom adjustments.
4. The available zoom range is 1.00x to 5.00x.
Scale Bar
1. The Scale Bar displays the measurement scale of the microscopic image, for example, 30.0 µm.
2. Check the Objective Lens displayed in the bottom-right corner, such as 4x, 10x, 40x, or 100x.
3. Ensure that the selected Objective Lens matches the magnification of the microscope to maintain accurate image scaling and measurements.
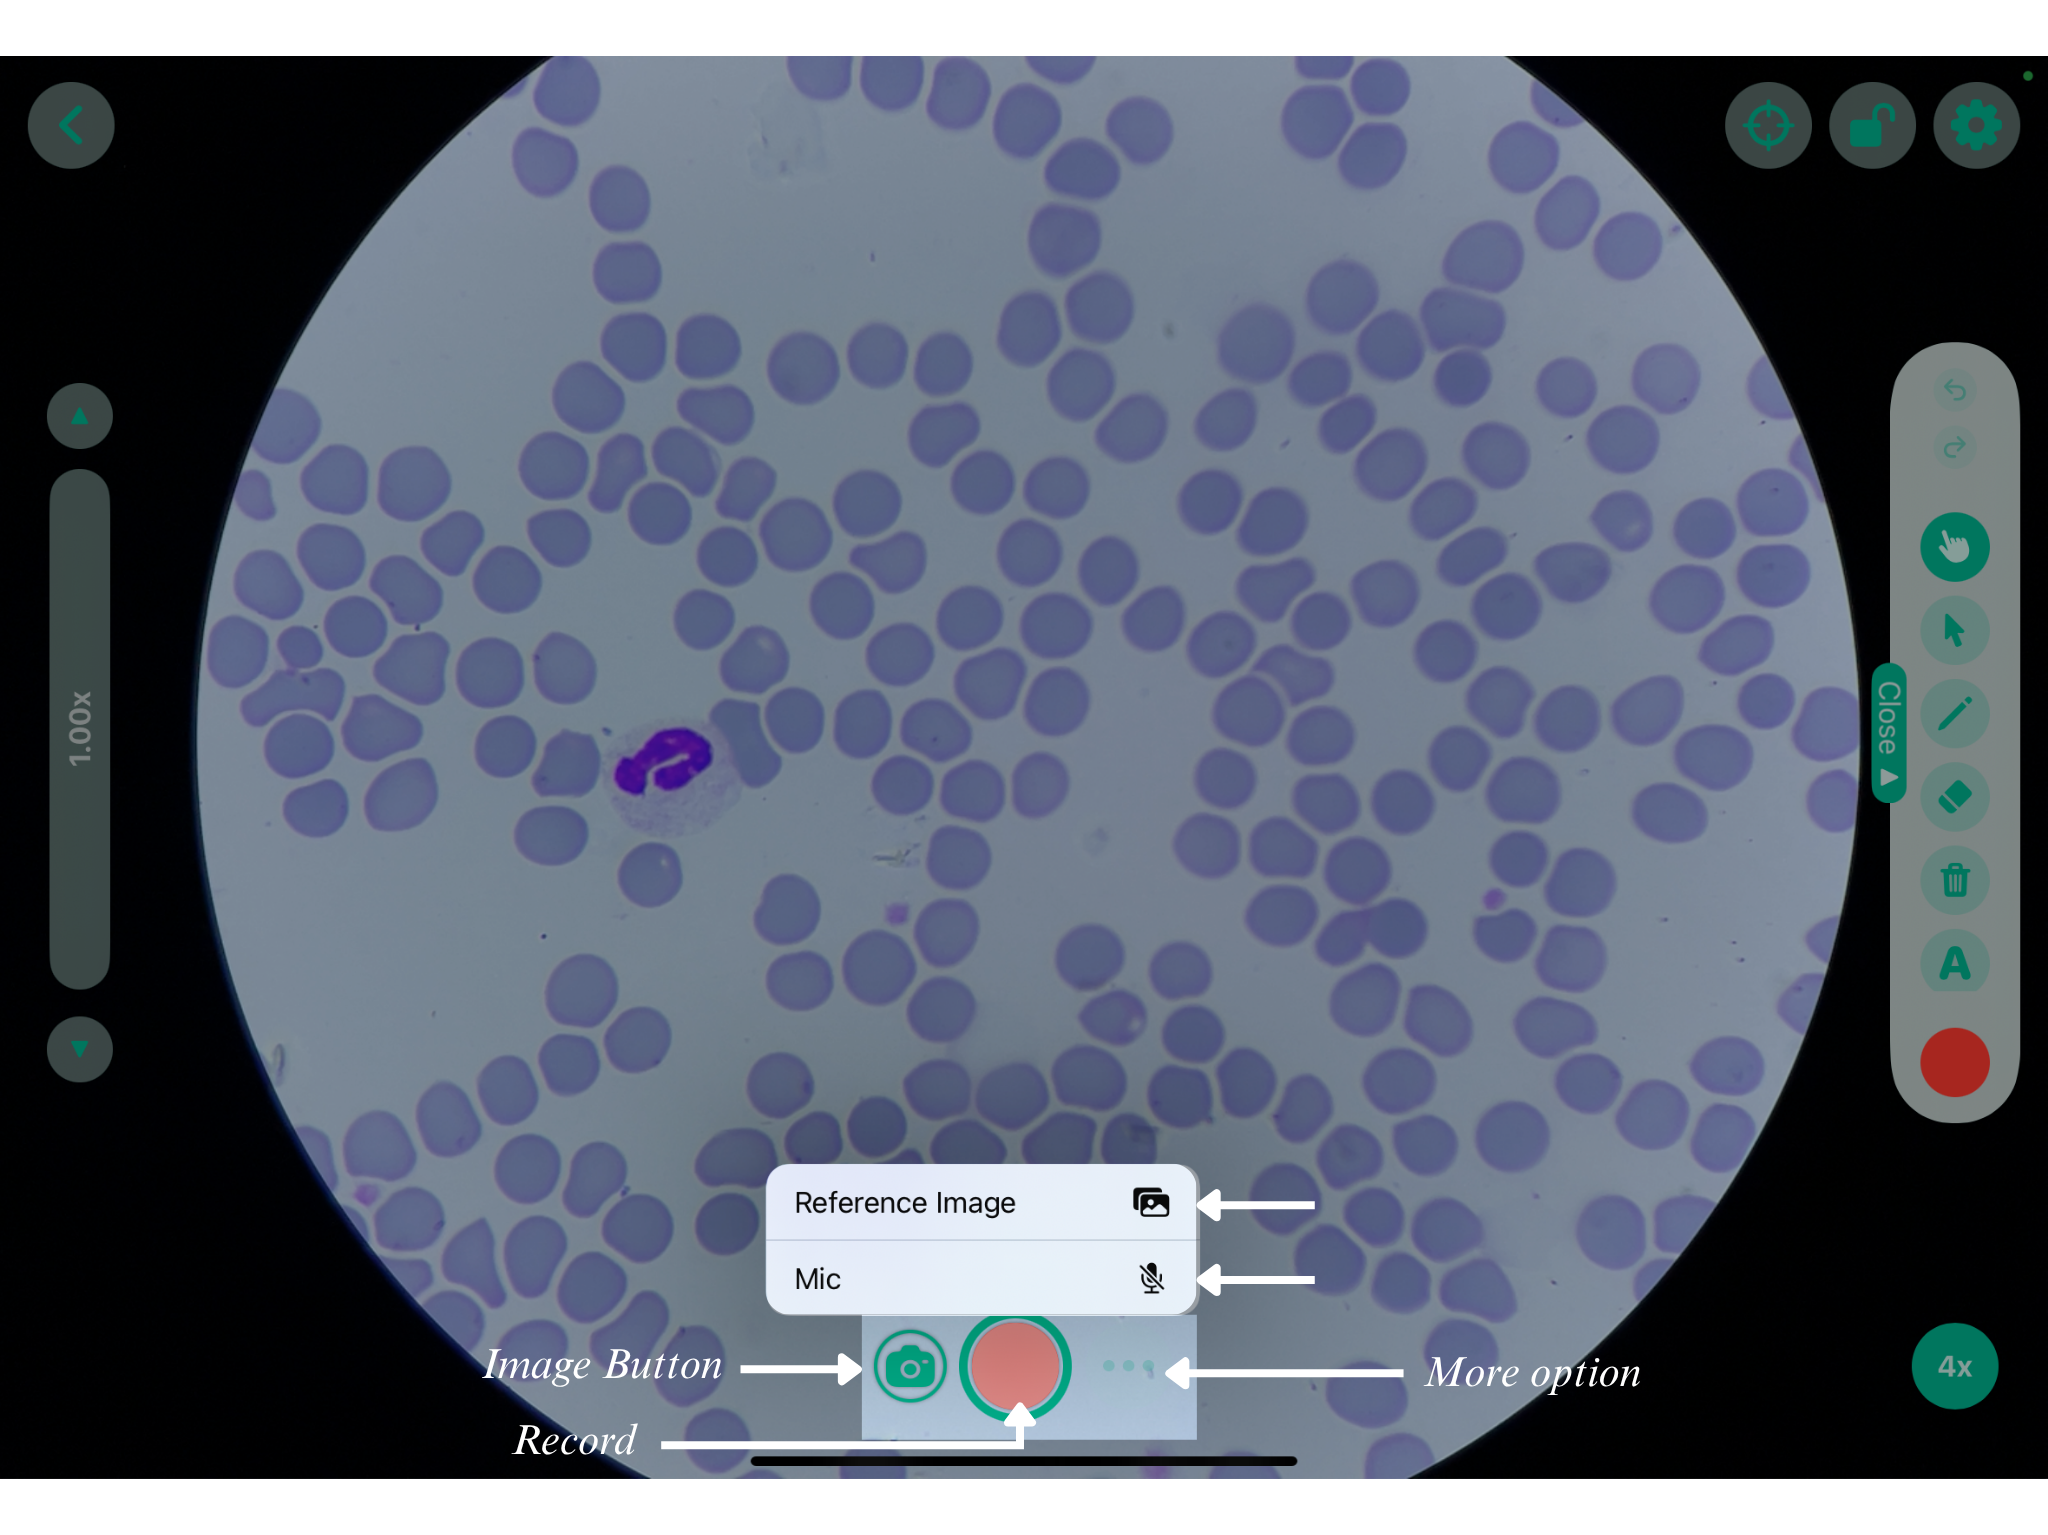
(B) Recording
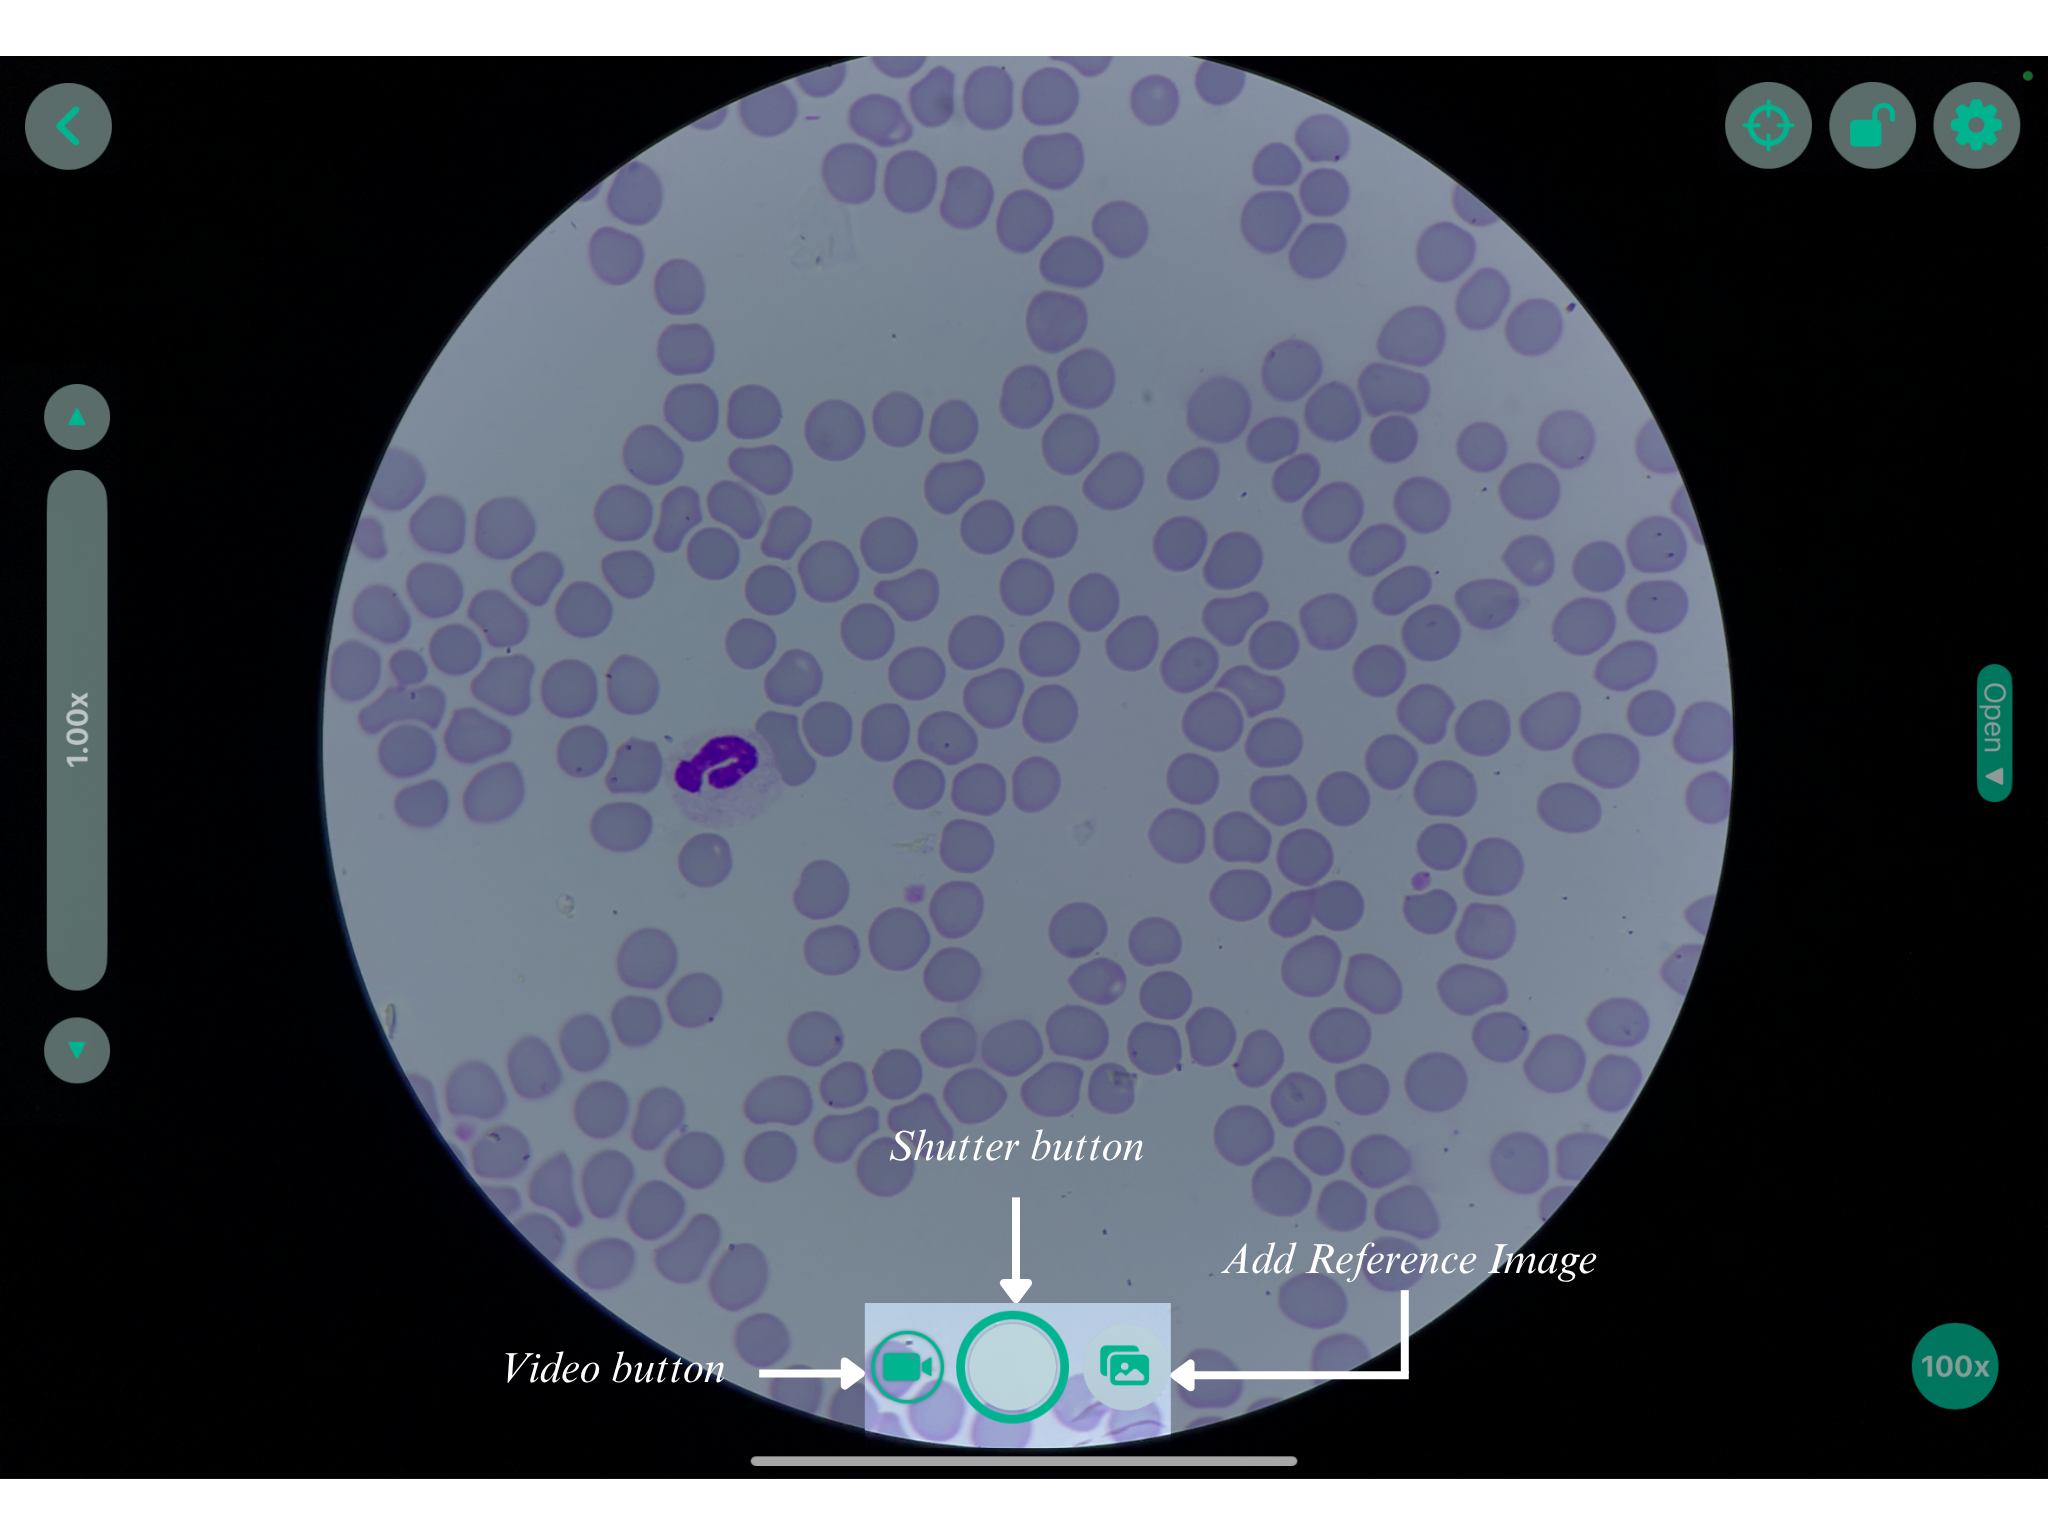
1. Find a Capture and Recording button.
2. Tap on the Circle Button ( ) located at the bottom center of the screen.

3. To switch to video, you can tap on the Video Button ( ) to the left.

4. You can also add a reference image ( ) to the screen if it has already been configured in the Main Settings.

4. Tap on the Mic button ( ) to enable or disable the background sound.

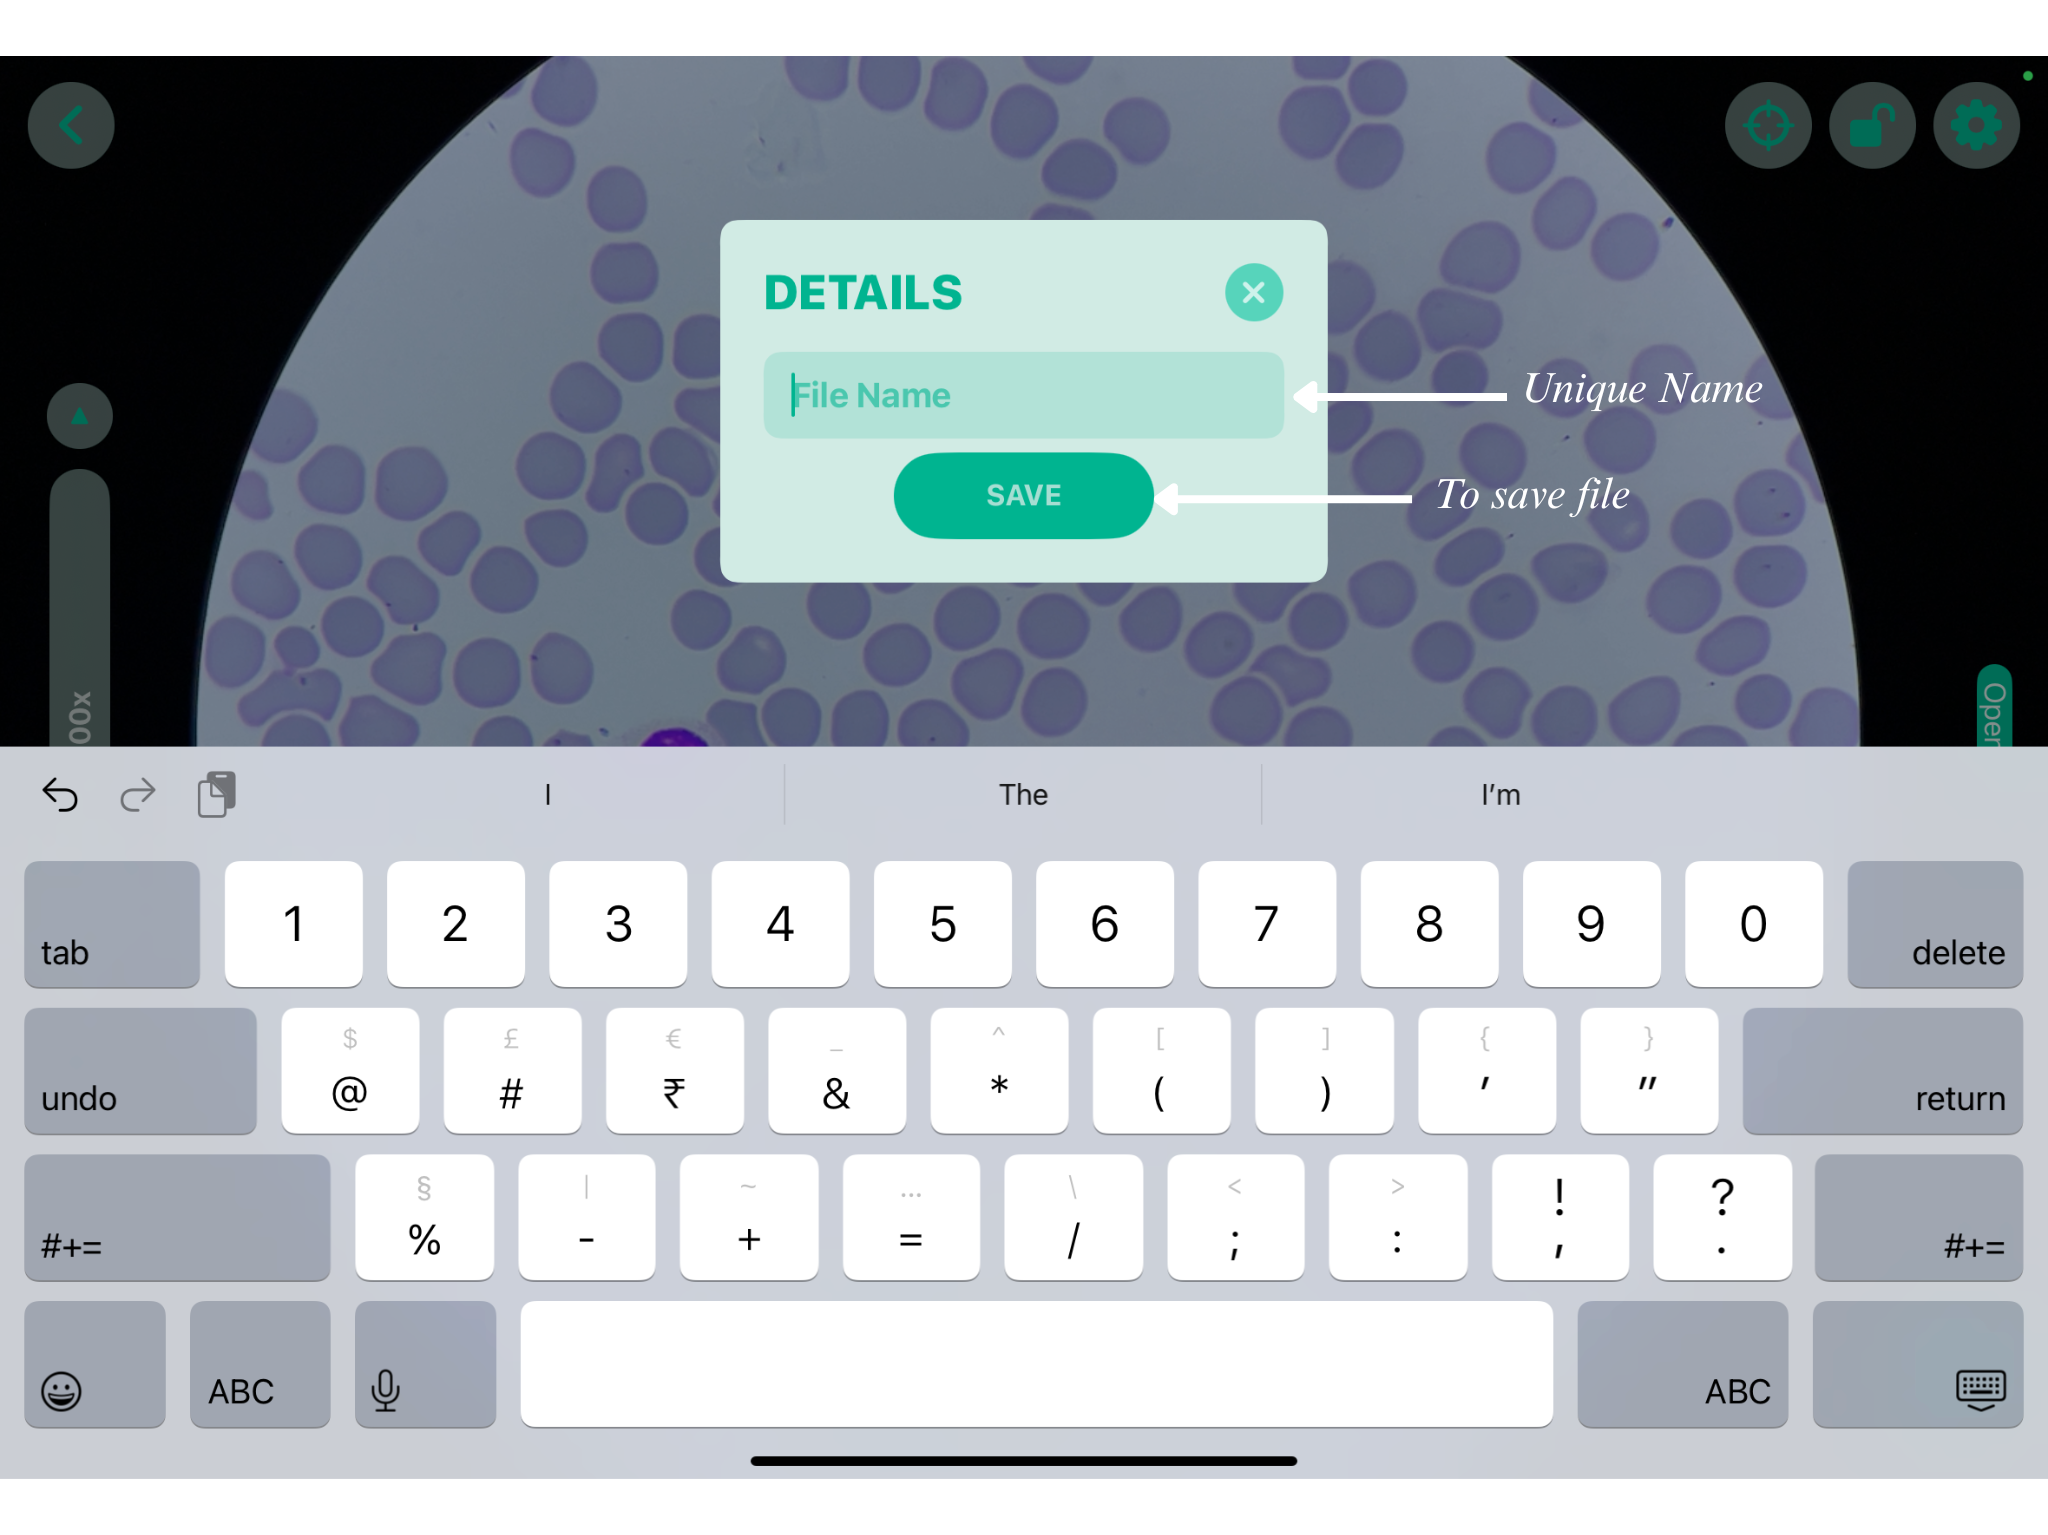
5. After capturing the live view, enter a valid File Name in the Details dialog box, then select Save to save the captured image.
 |
 |
 |
5. Annotation and Measurement
5.1 Open Drawer :
1. Locate the Open Drawer on the right side of the screen.
2. Select the Open Drawer to display the drop-down menu.
|
|
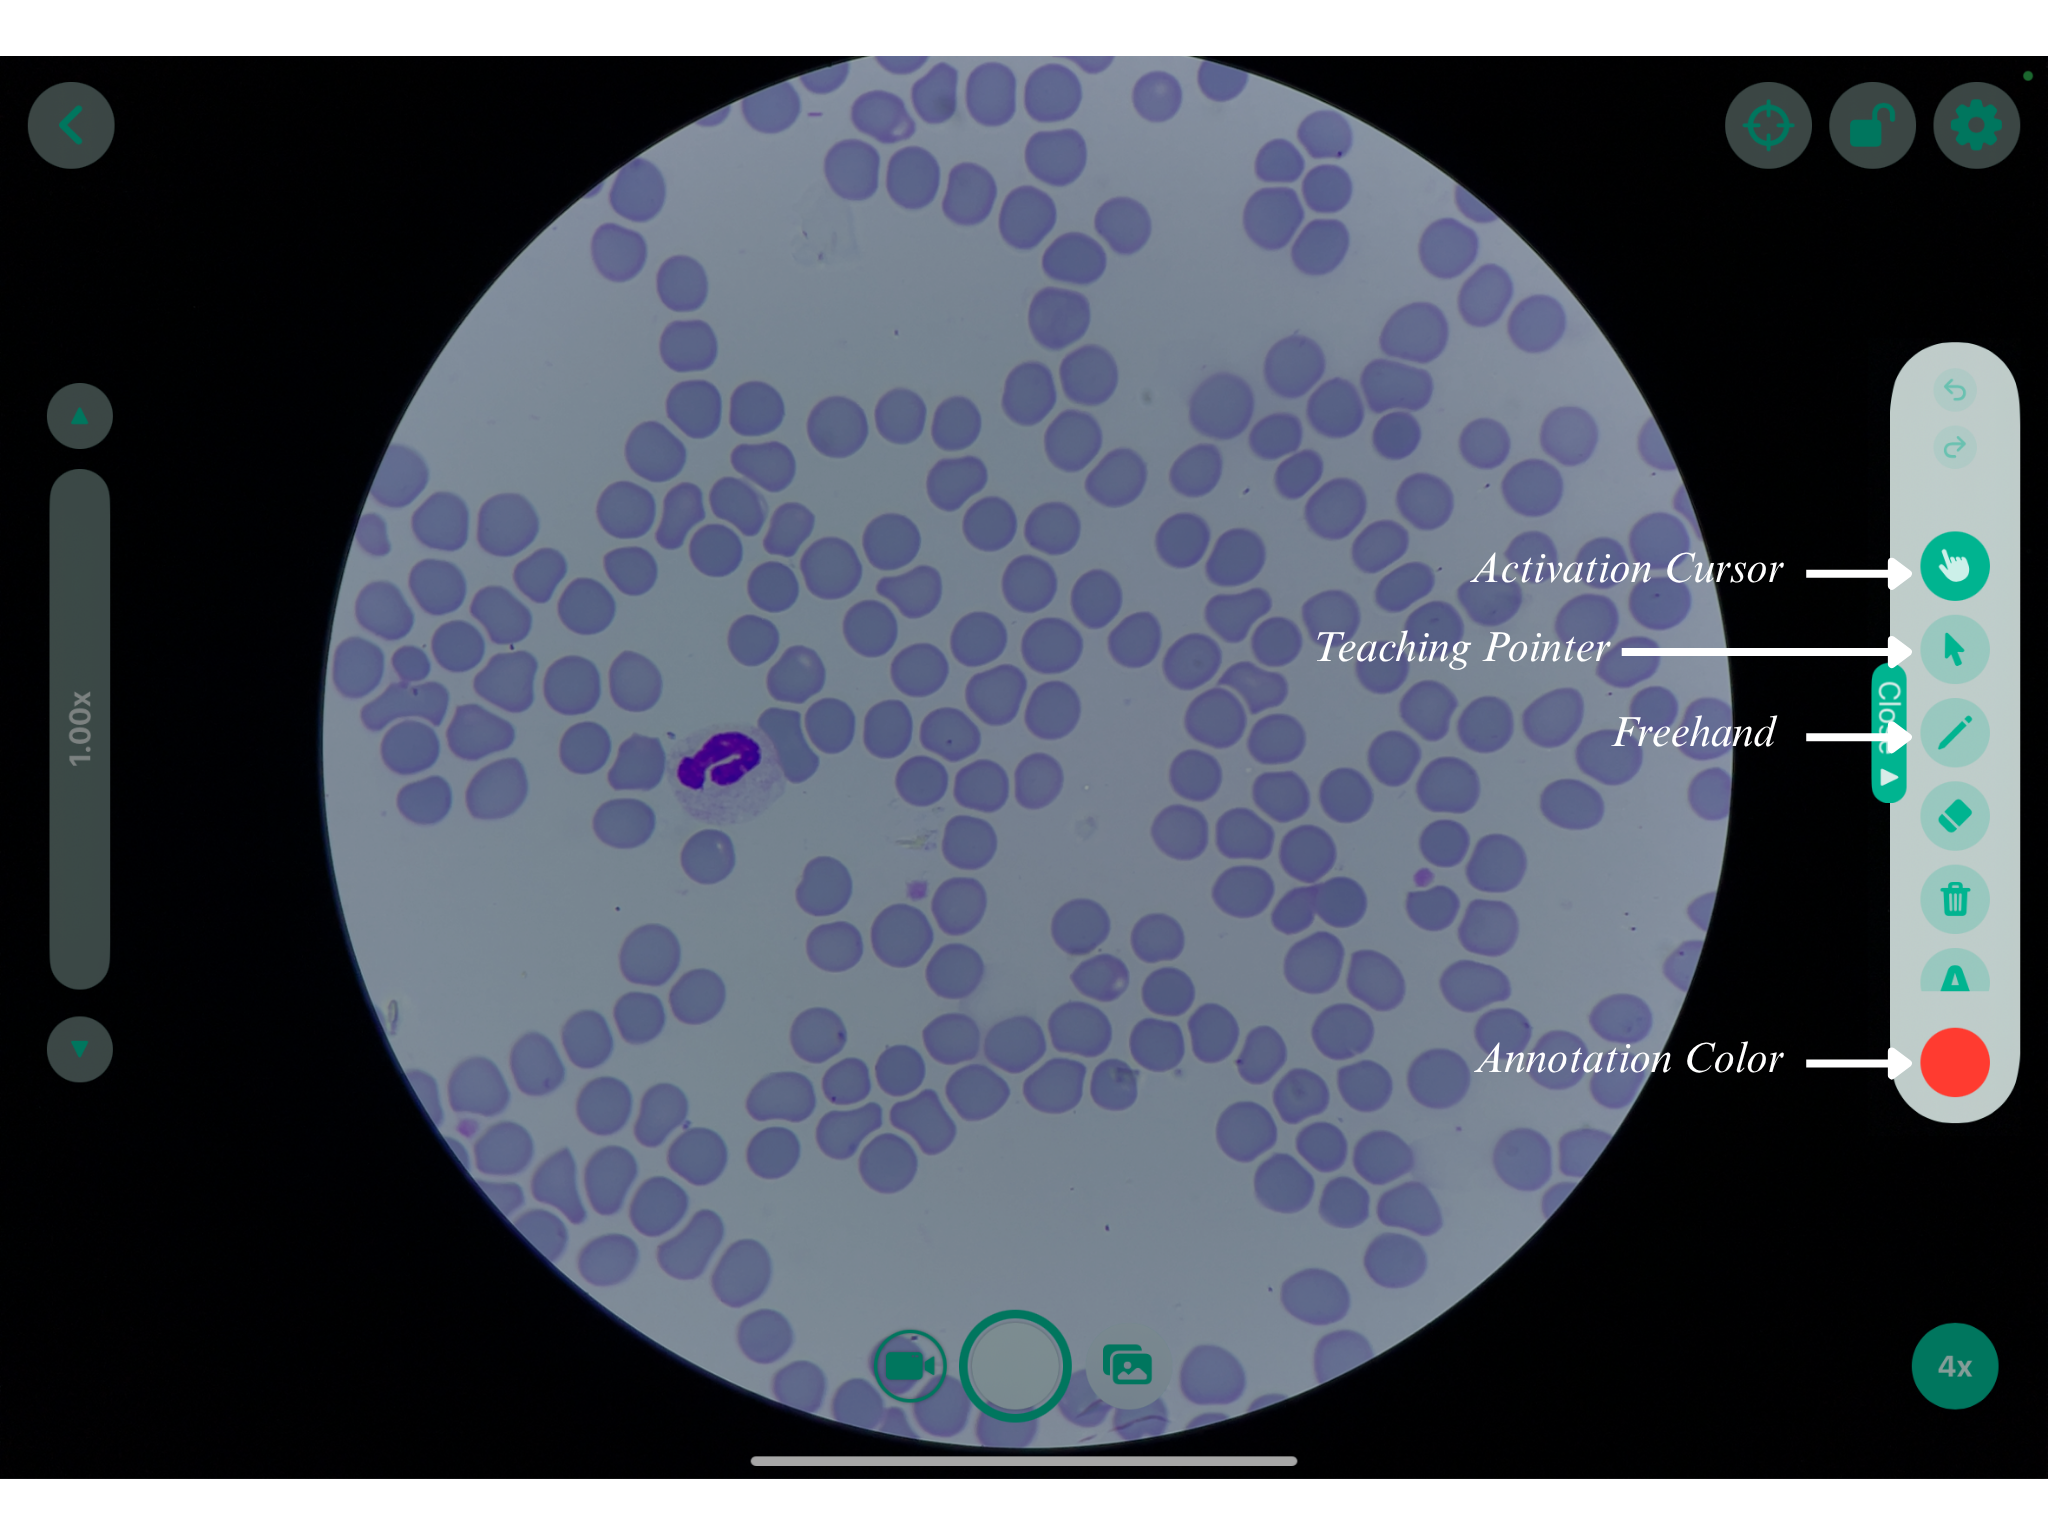
(A) Steps for the Annotation Tools
Tools |
Purpose |
Steps |
Activation Cursor (
|
Enables or disables the annotation and marking tools on the live microscopic view. |
|
Teaching Pointer (
|
Highlights specific cells, structures, or areas on the live microscopic view for teaching, demonstrations, and discussions. |
|
Freehand (
|
Draws freehand annotations on the microscopic image. |
|
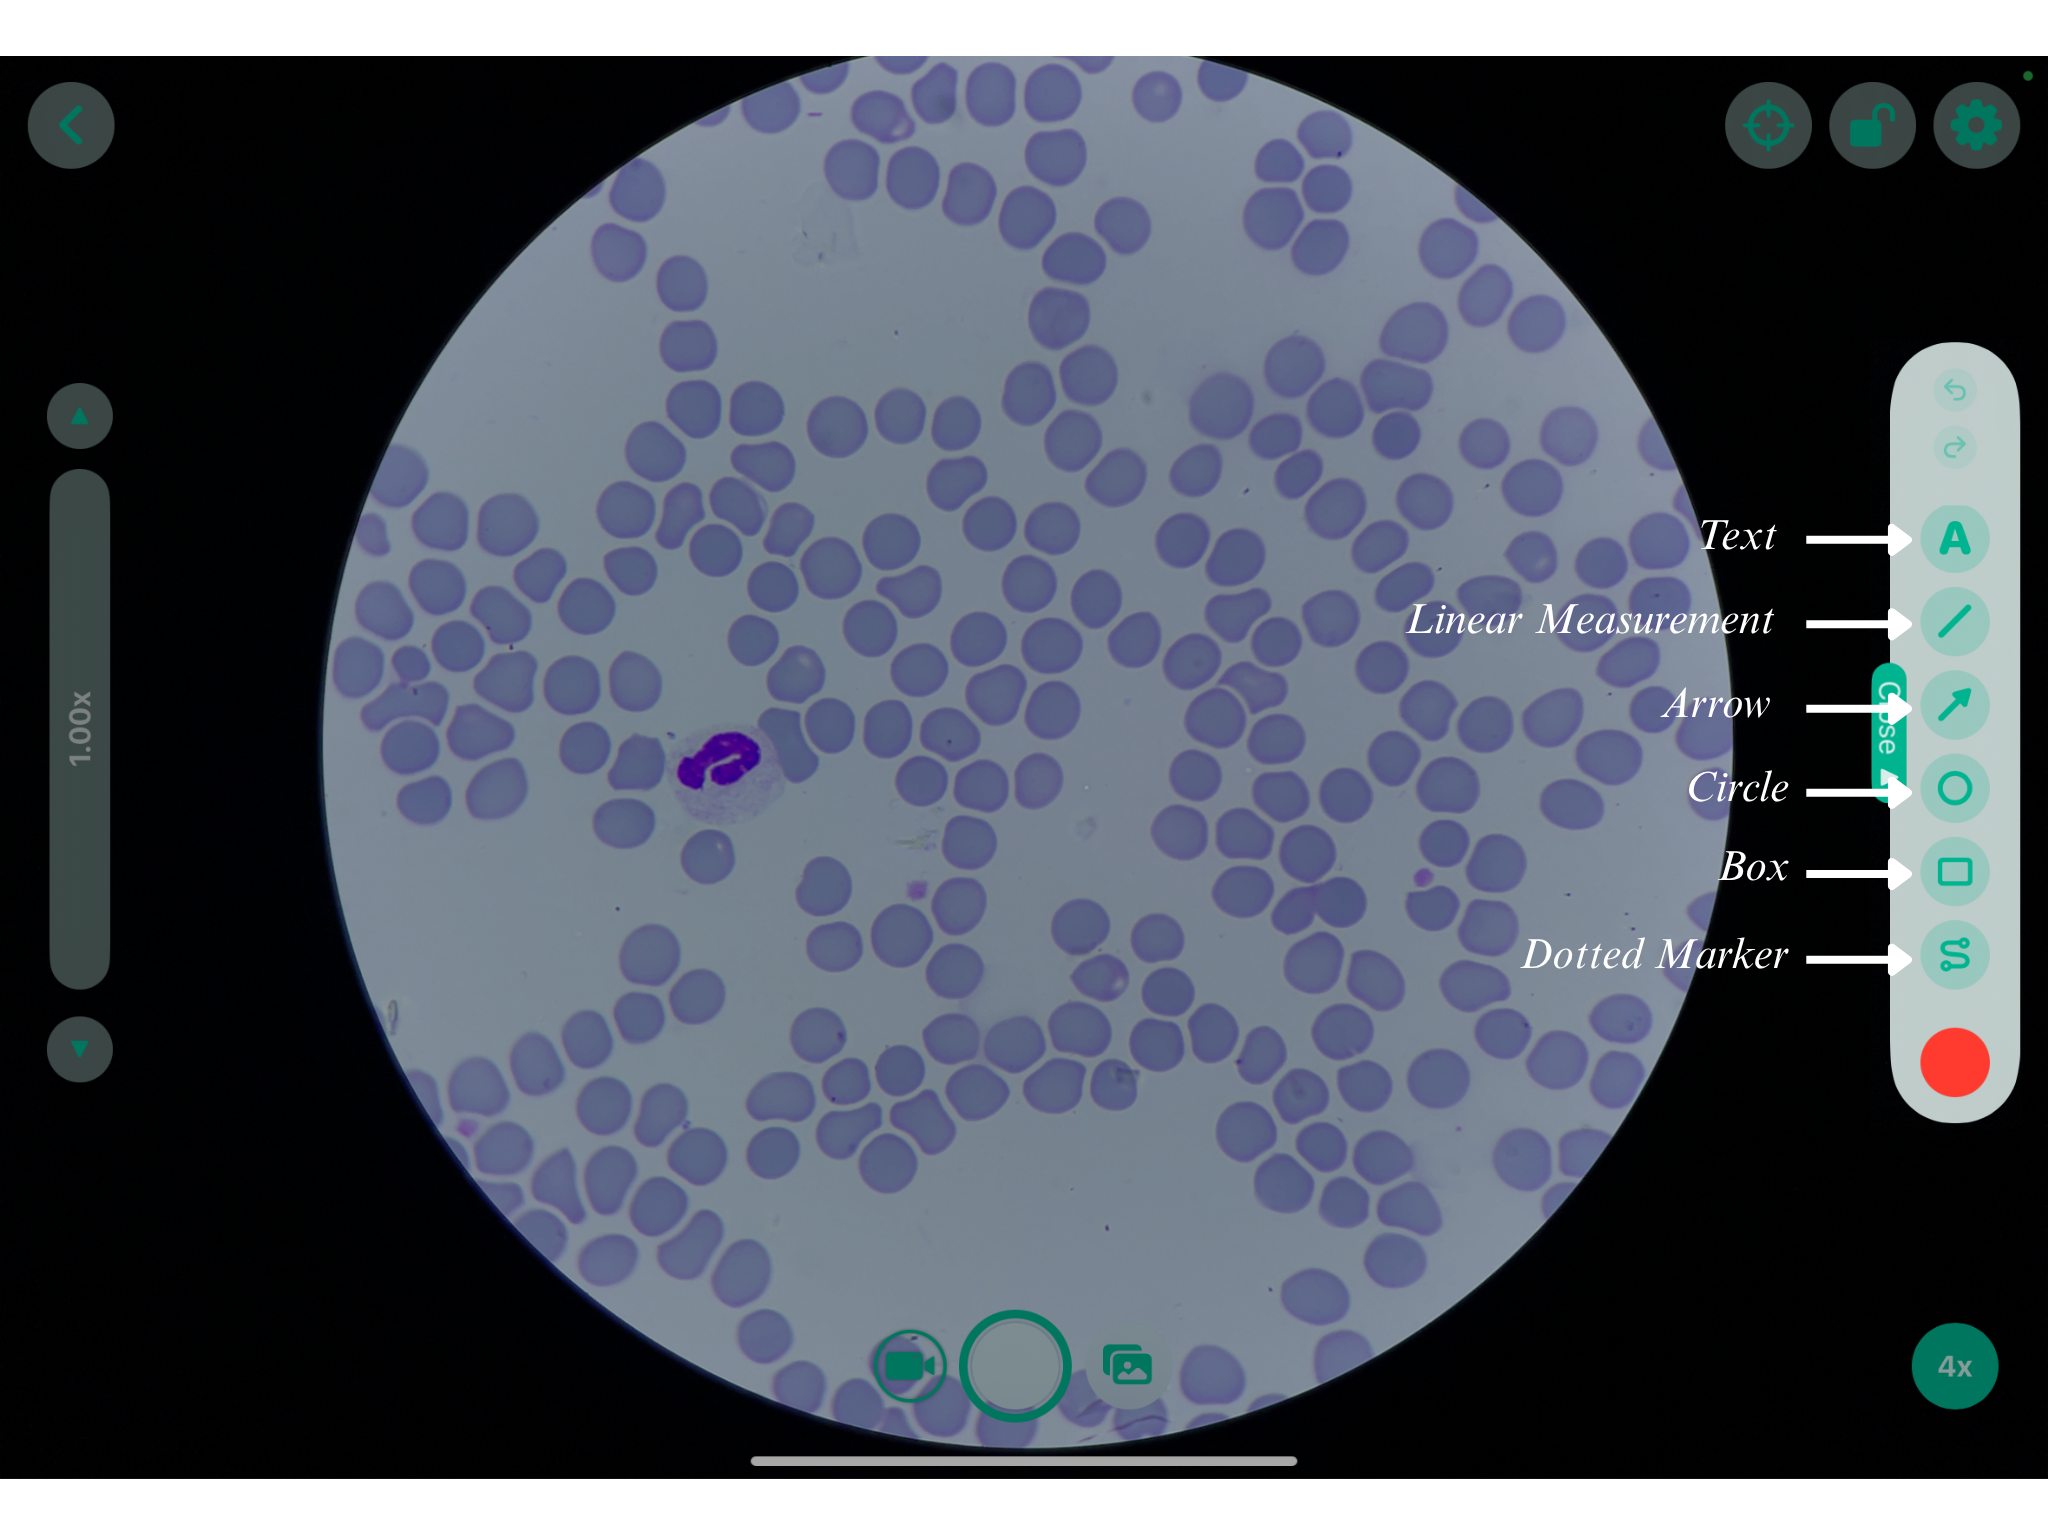
Line\Arrow (
|
Draws a straight line or arrow to indicate a specific region or measure a distance. |
|
Text (
|
Adds labels, notes, or other text directly to the microscopic image. |
|
Circle (O) |
Highlights a specific region using a circular annotation. |
|
Box (
|
Highlights a rectangular region of interest. |
|
Dotted Marker (
|
Marks a specific area using a series of dots. |
|
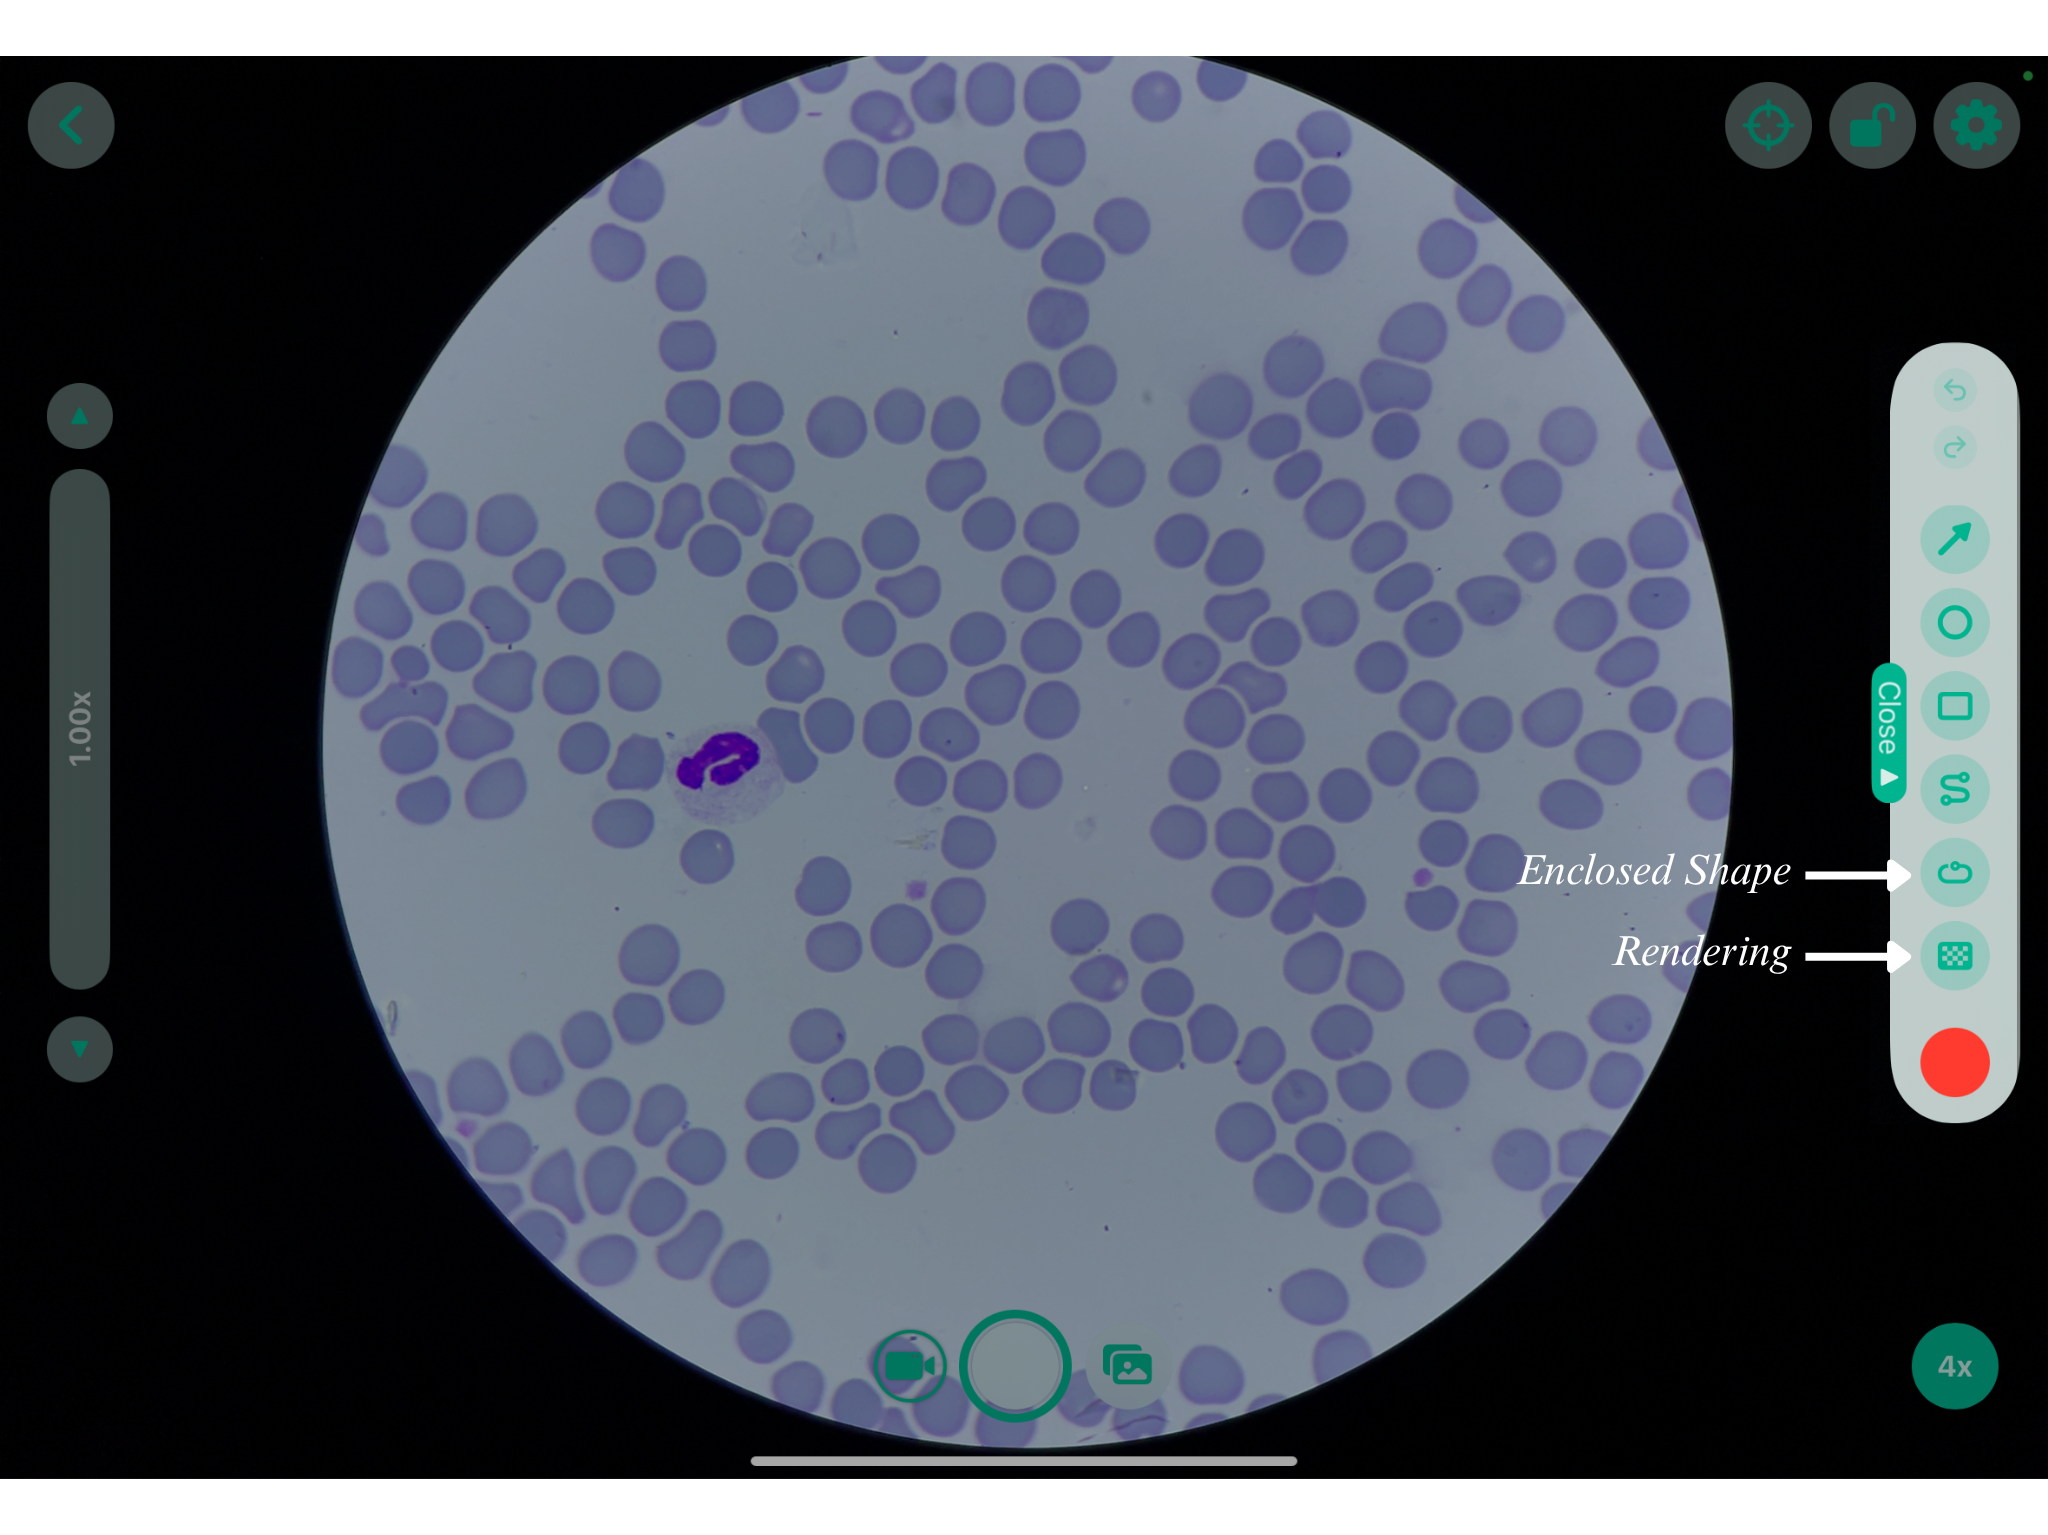
Enclosed Shape (
|
Creates a closed annotation by automatically connecting the endpoint to the starting point. |
|
Rendering (
|
Rendering permanently applies annotations and markings to the current image so that they are included when the image is saved or exported. |
|
Annotation Color |
The annotation color can be customized to make different annotations easier to identify and distinguish on the slide. |
|







 |
 |
(B) Error Recovery Tools |
||
Tools |
Symbols |
Features |
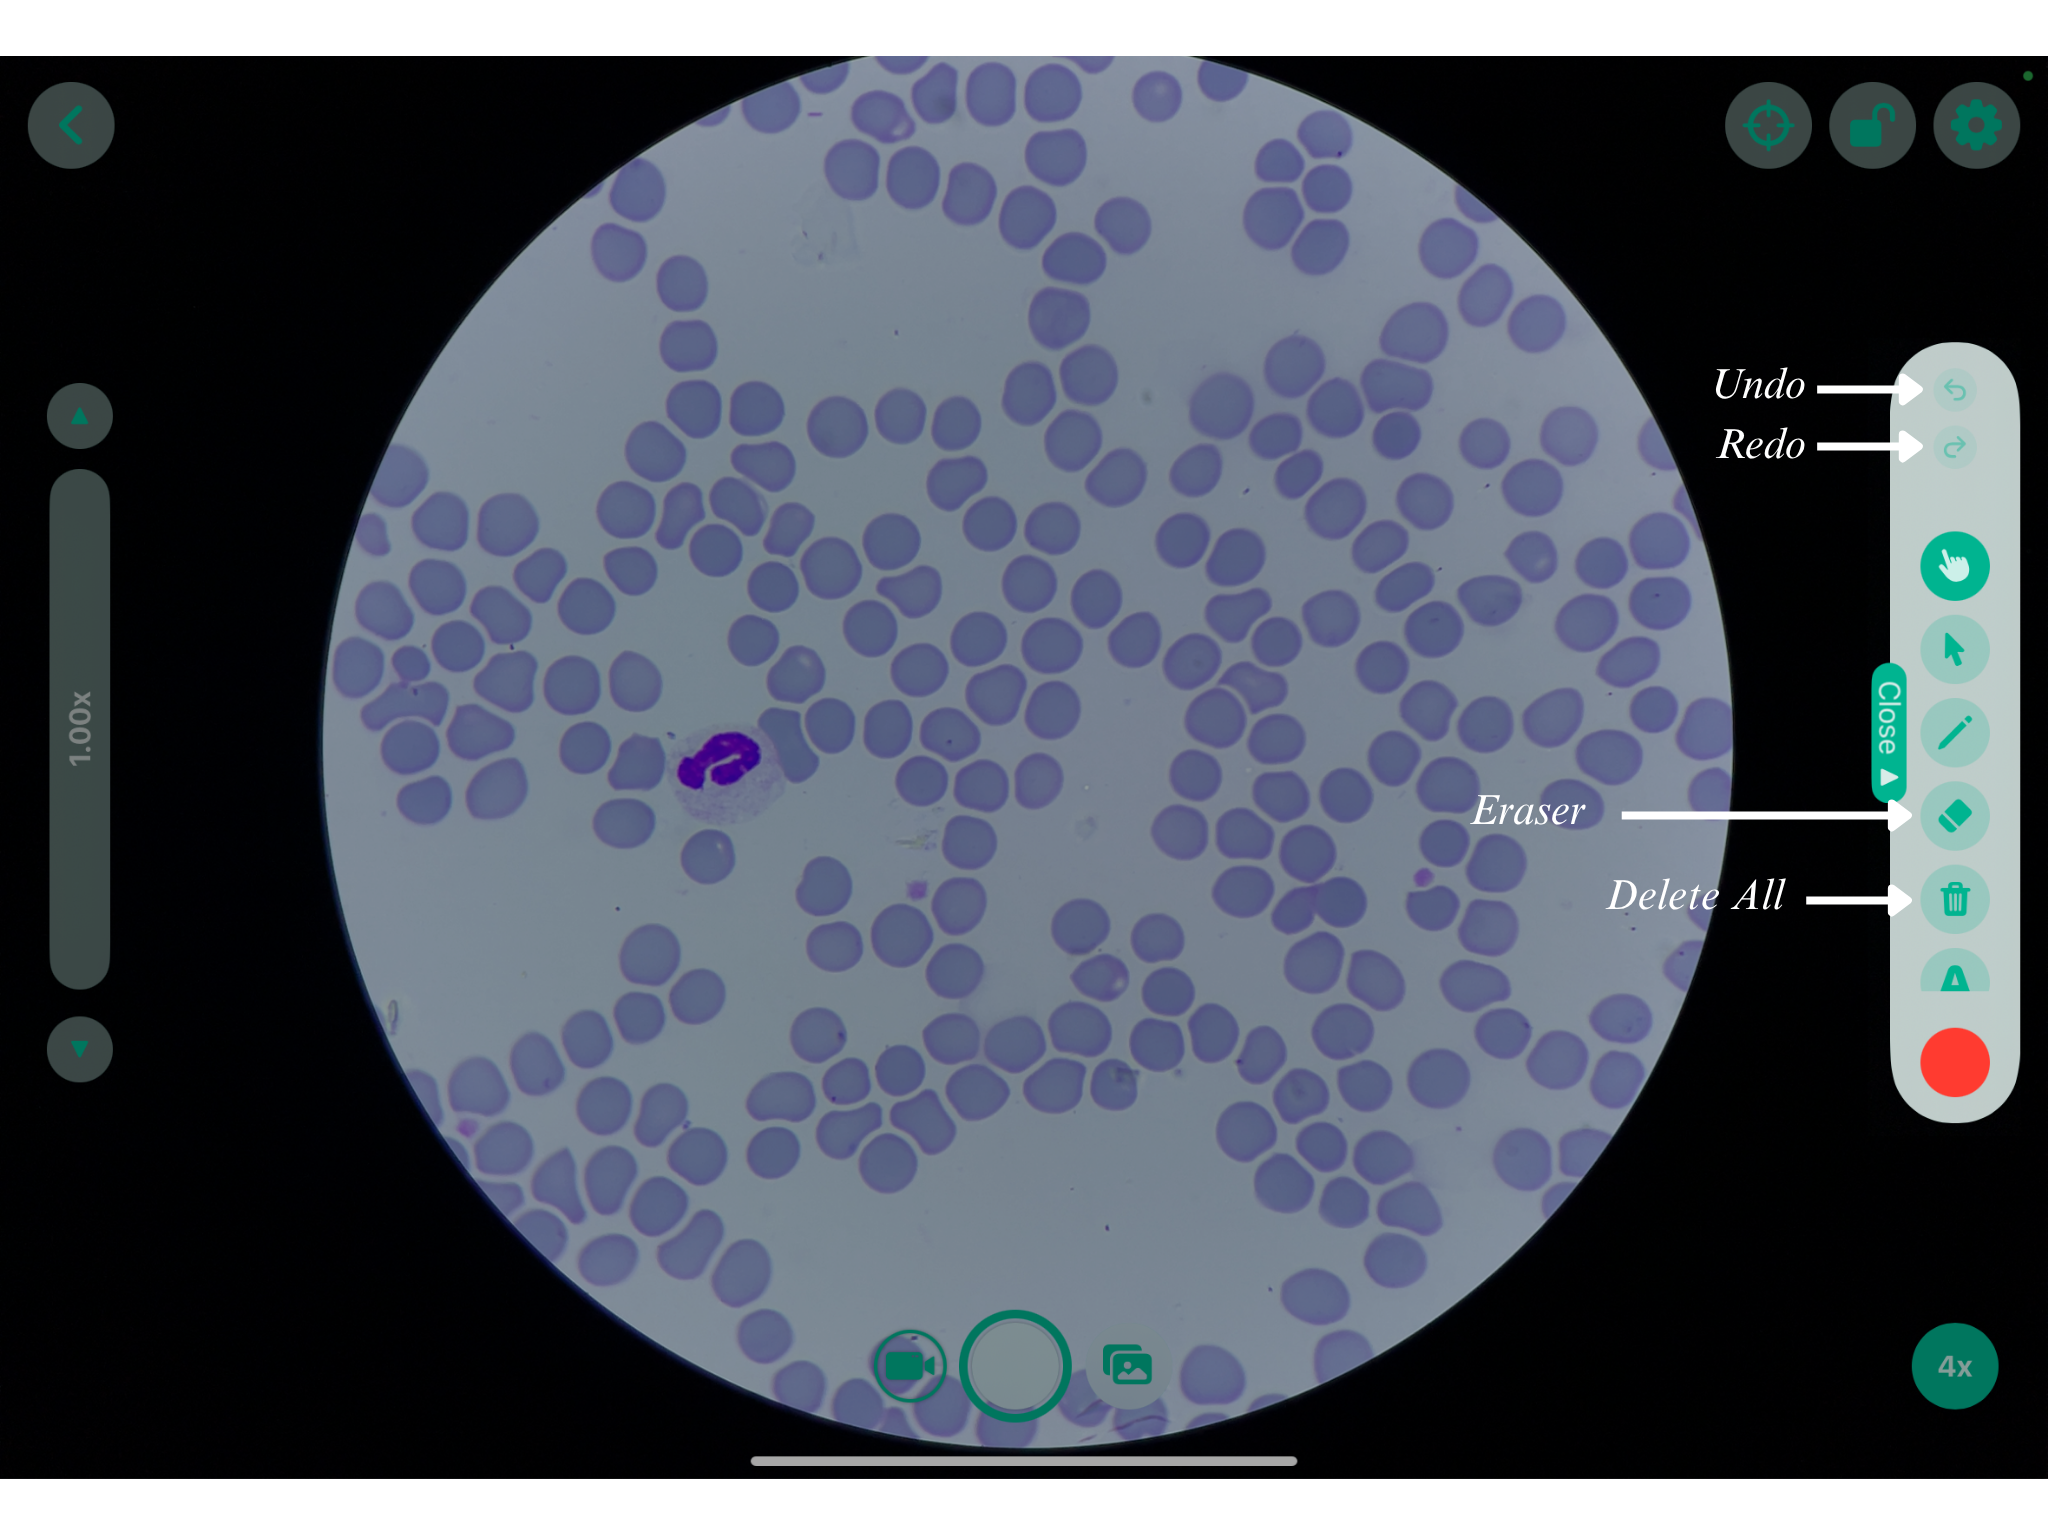
Undo |
|
This reverses your last performed action or a series of action and is located at the very top of the open drawer. |
Redo |
|
It reverses the Undo command, reapplying the changes you just removed. |
Erase |
|
|
Delete All |
|
Instantly clears all current annotations, markings, and measurements from the live view or image. |


|
|
Report
10. Report
Following are the steps to "Create a Report" -
Once you tap on the the report icon at the top right corner,

Figure 10
- Tap the Create Folder icon in the top-right (folder with a + sign).
- An Add Case dialog appears. Tap on the the dropdown button.
- The dropdown gives a list of all the folders saved or created on the dashboard. Select the folder you wanna add and tap Save (Figure 2.4). The selected folder appears on the screen.
- If the folder does not appear, swipe down on the grid to refresh.
|
Figure 10.1 |
Figure 10.2 |
|
Figure 10.3 |
Figure 10.4 |


Generate Report
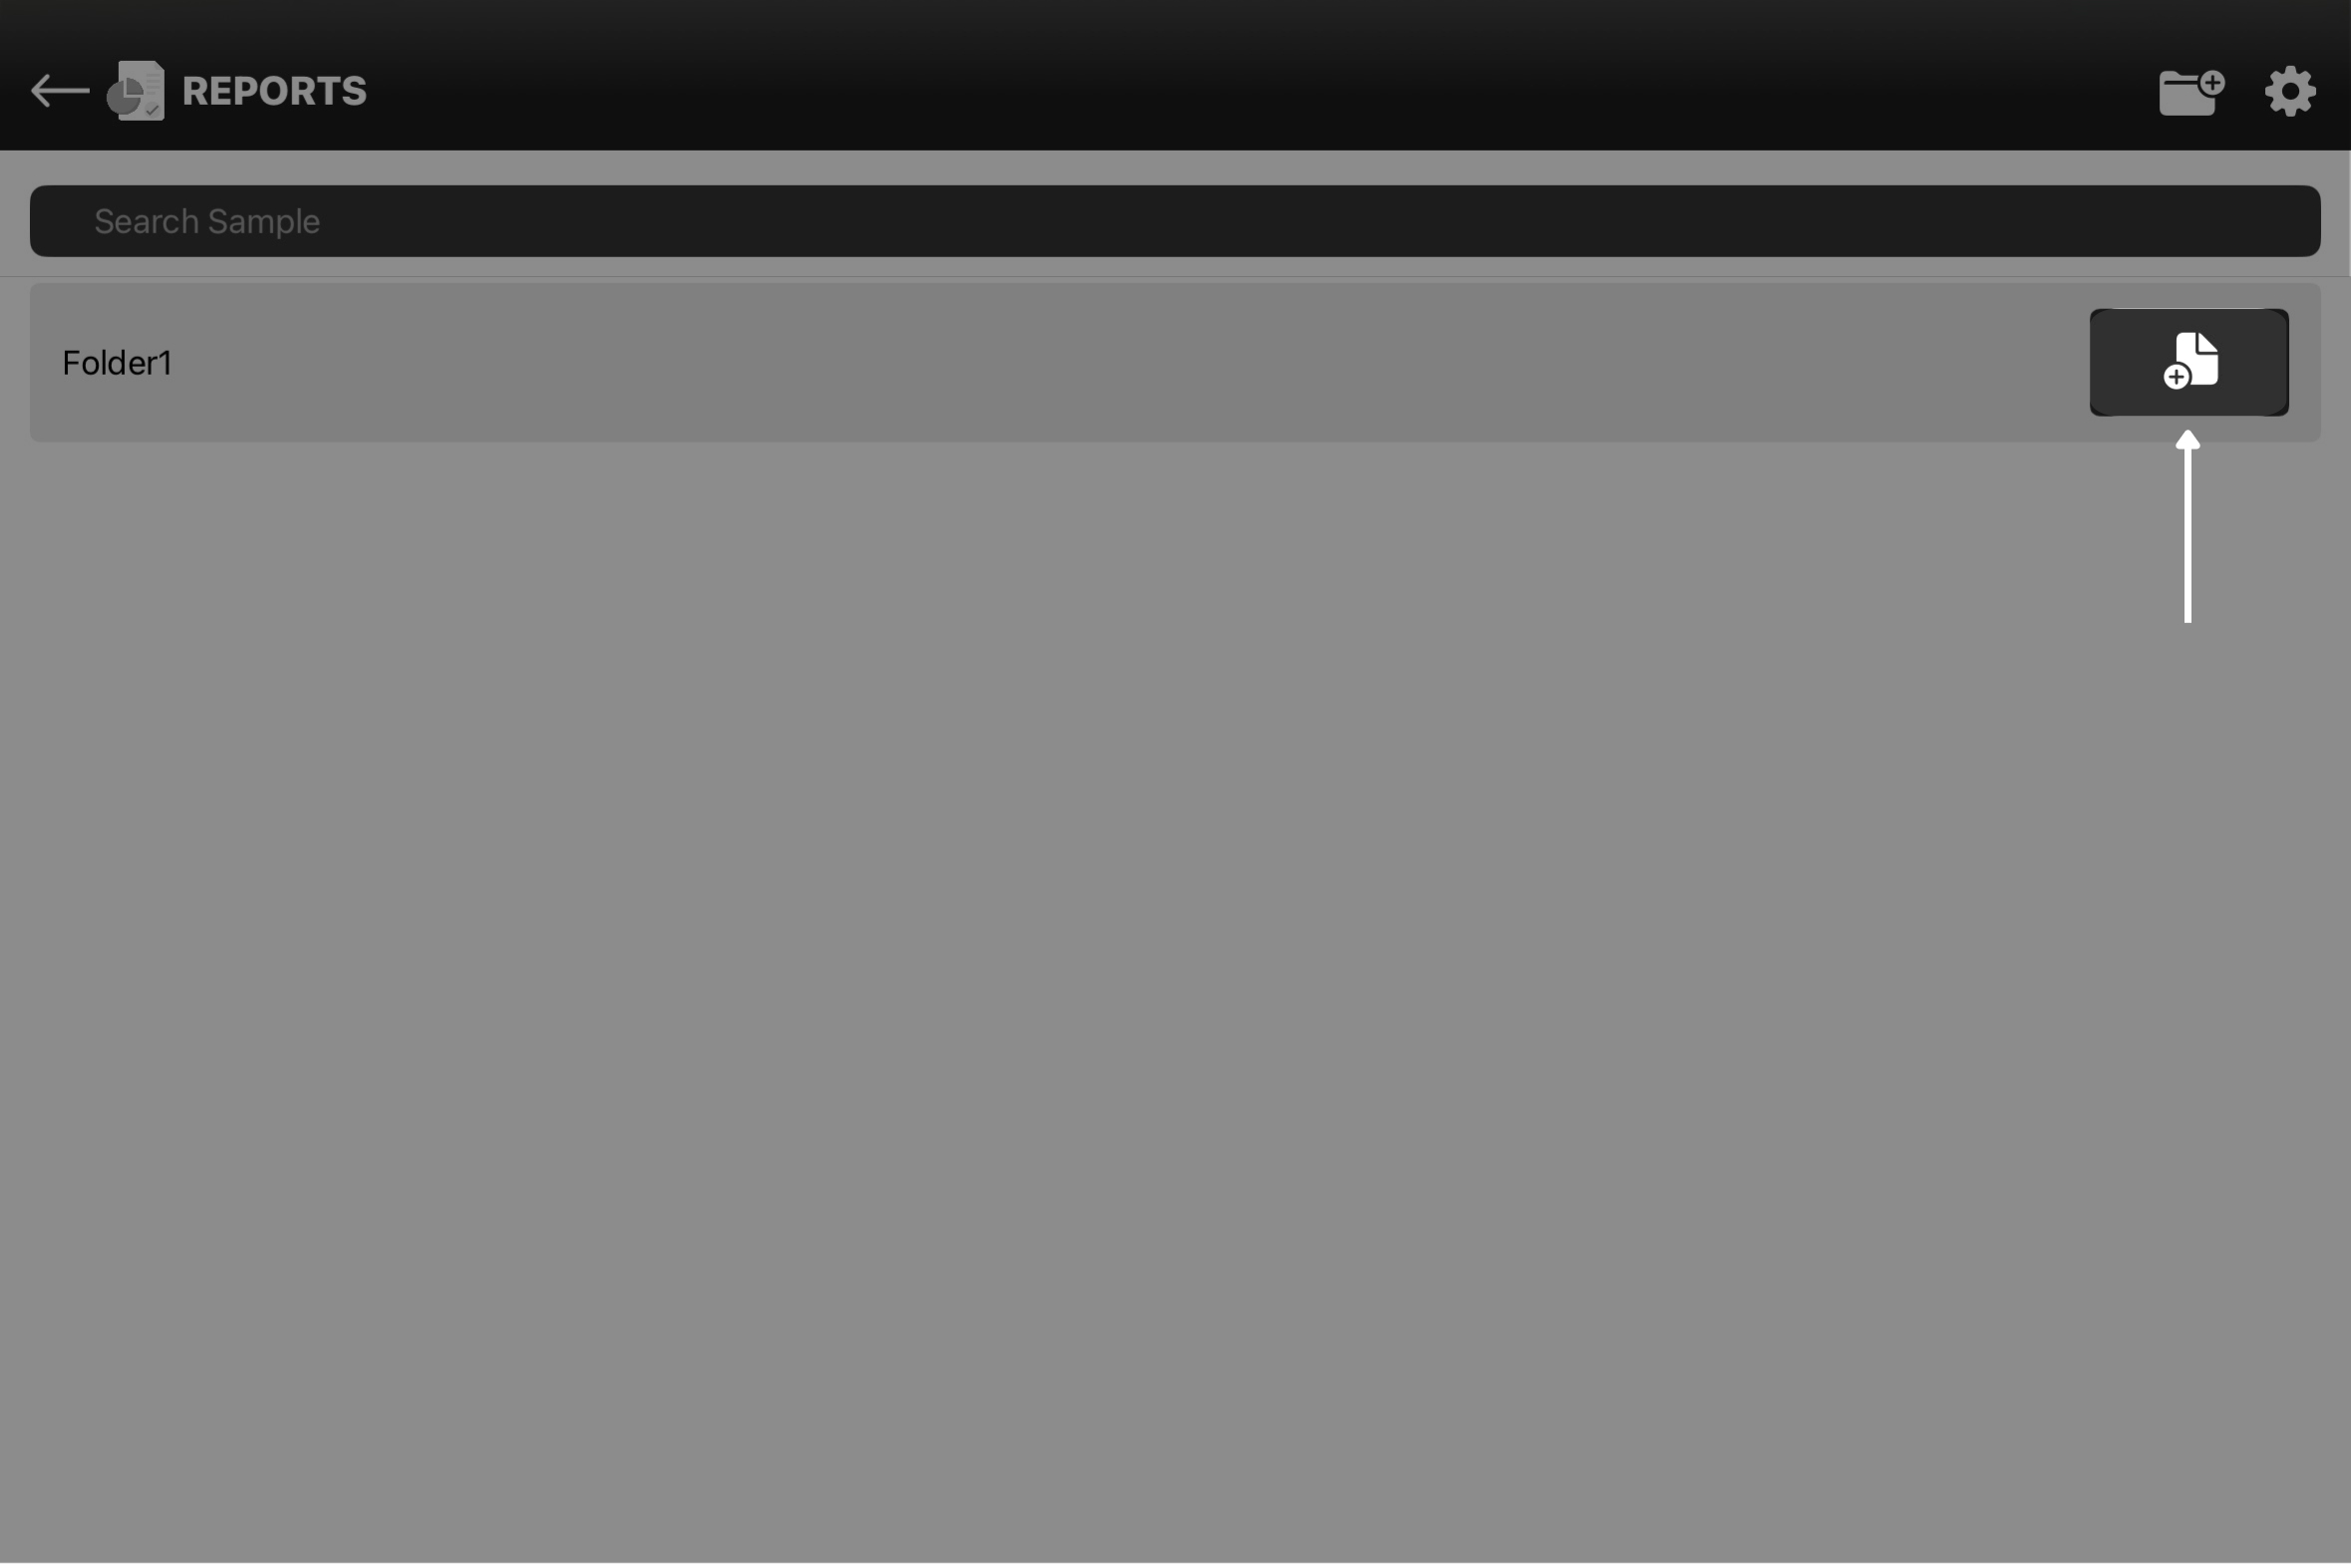
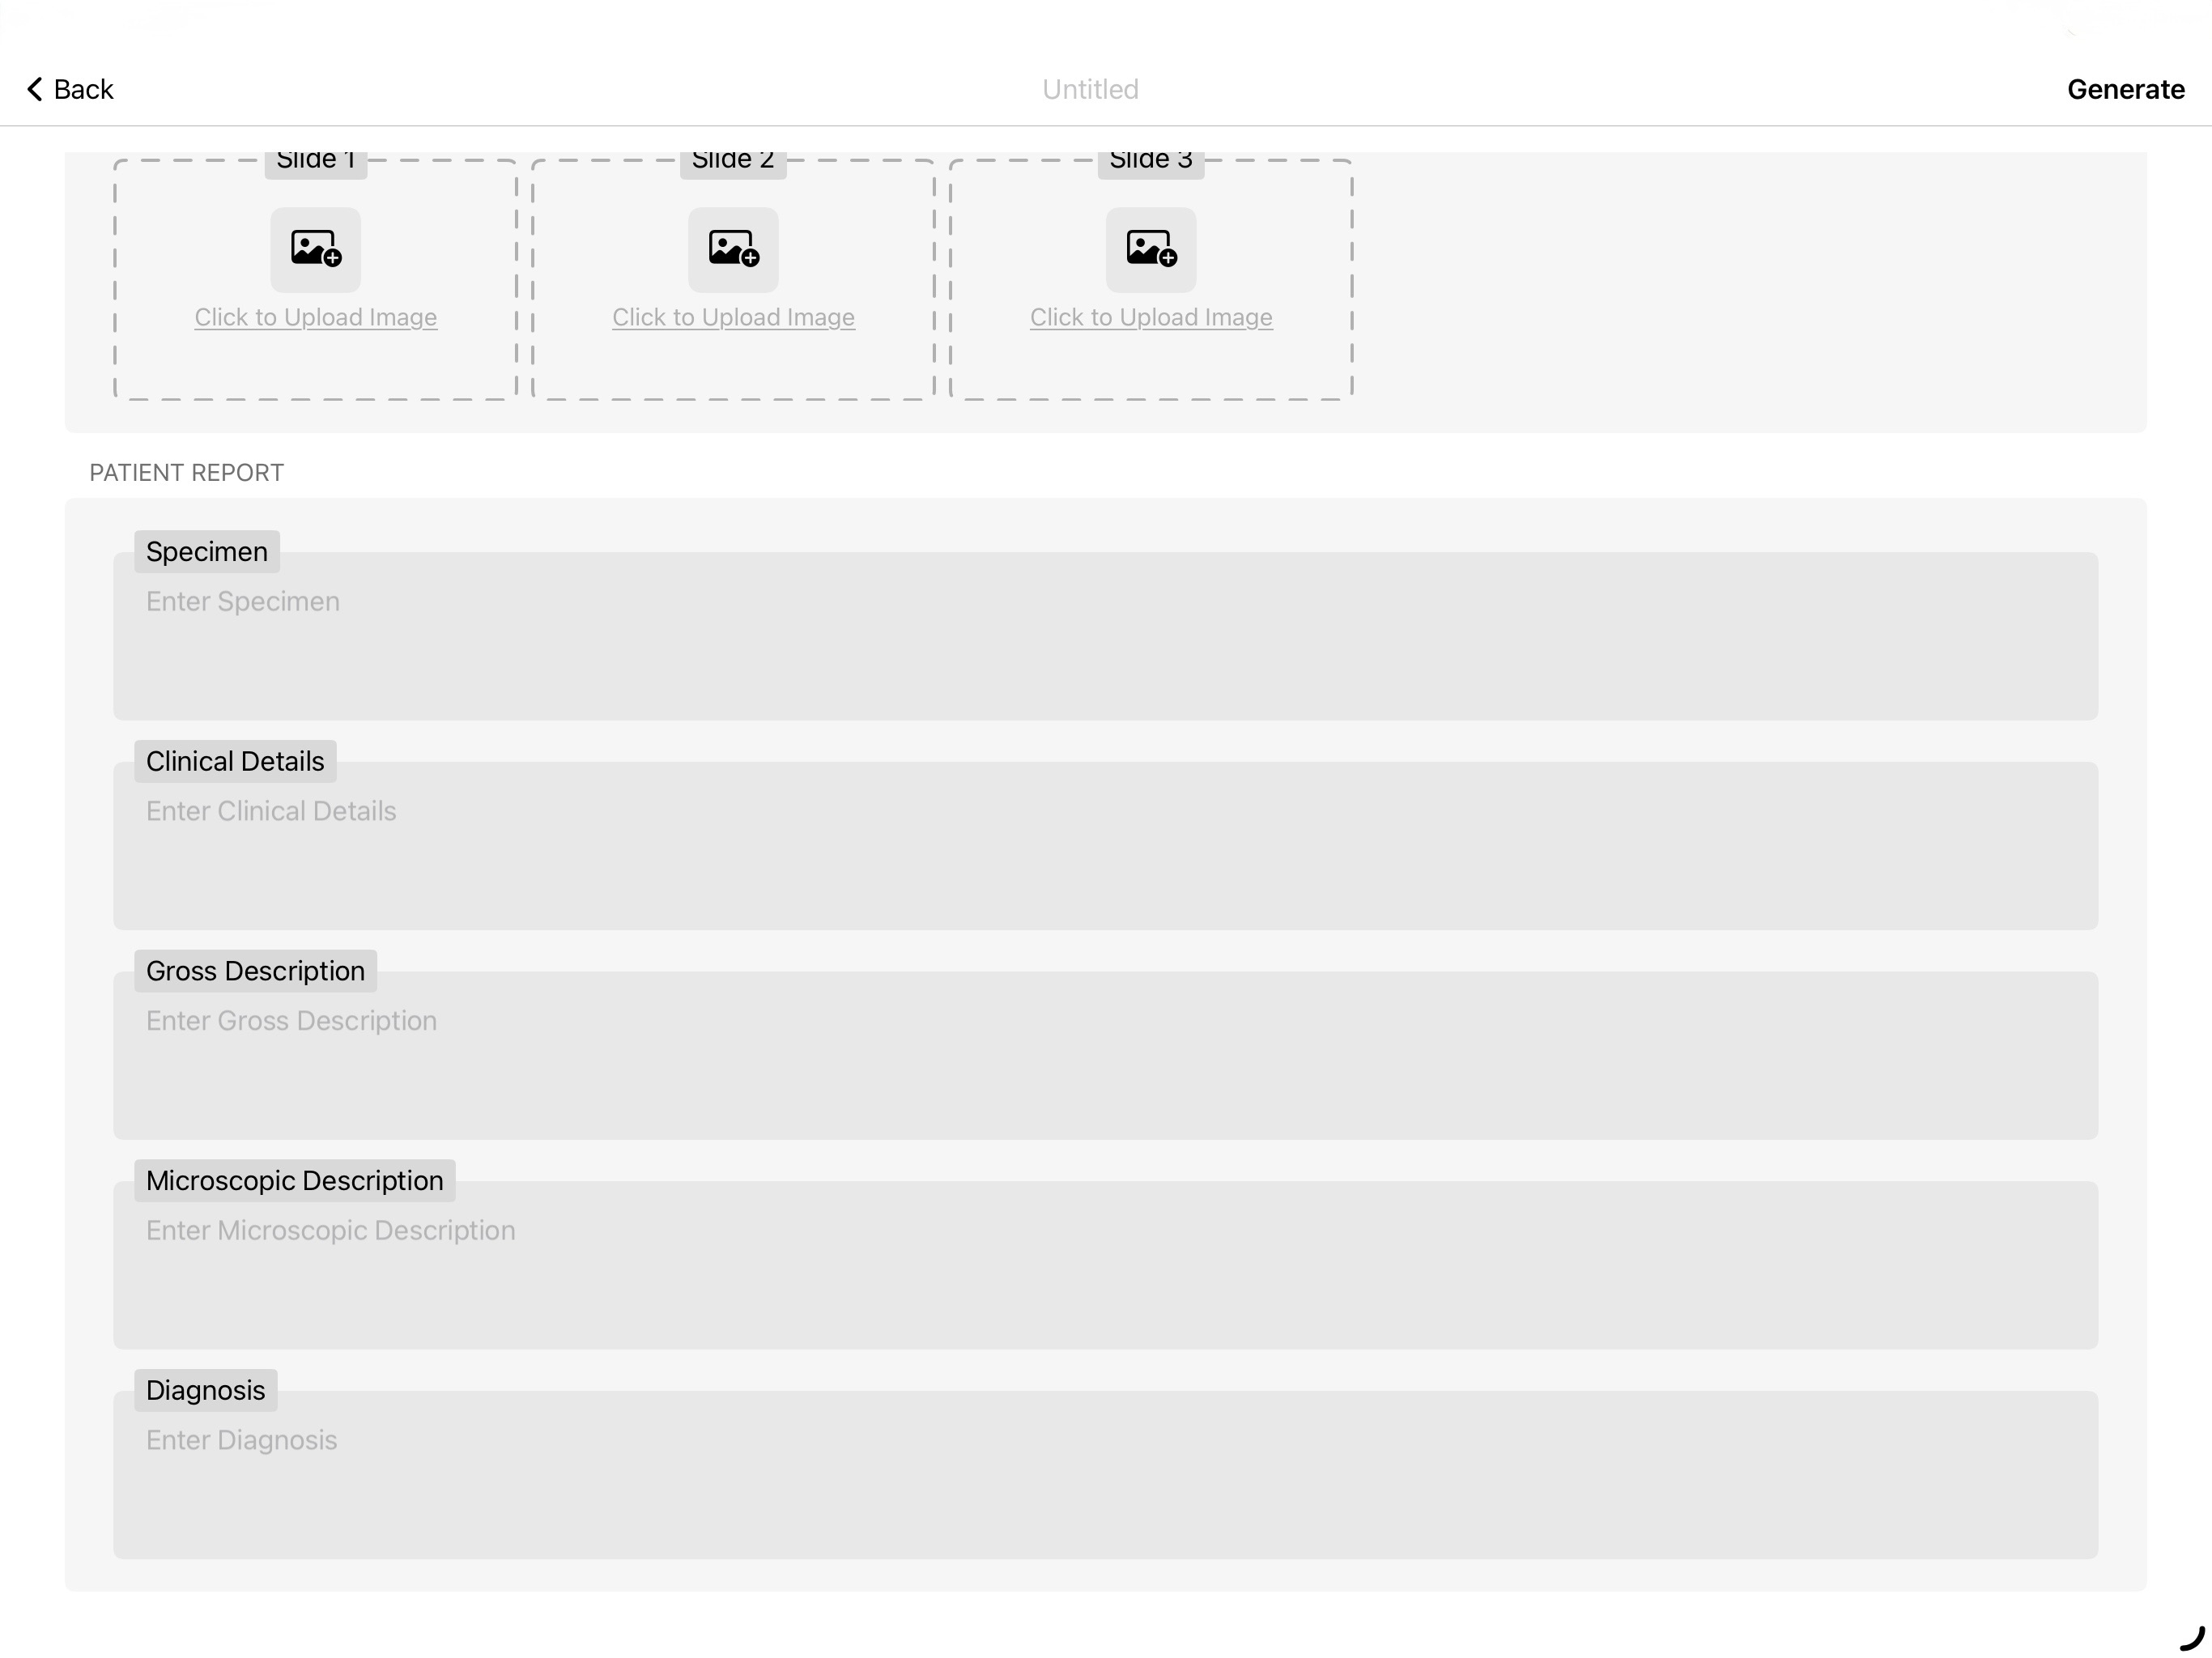
- The new folder appears on the Report Page. Tap on the icon located at the extreme right
- (folder with a + sign) to add in details to generate your report (Figure 1.5).
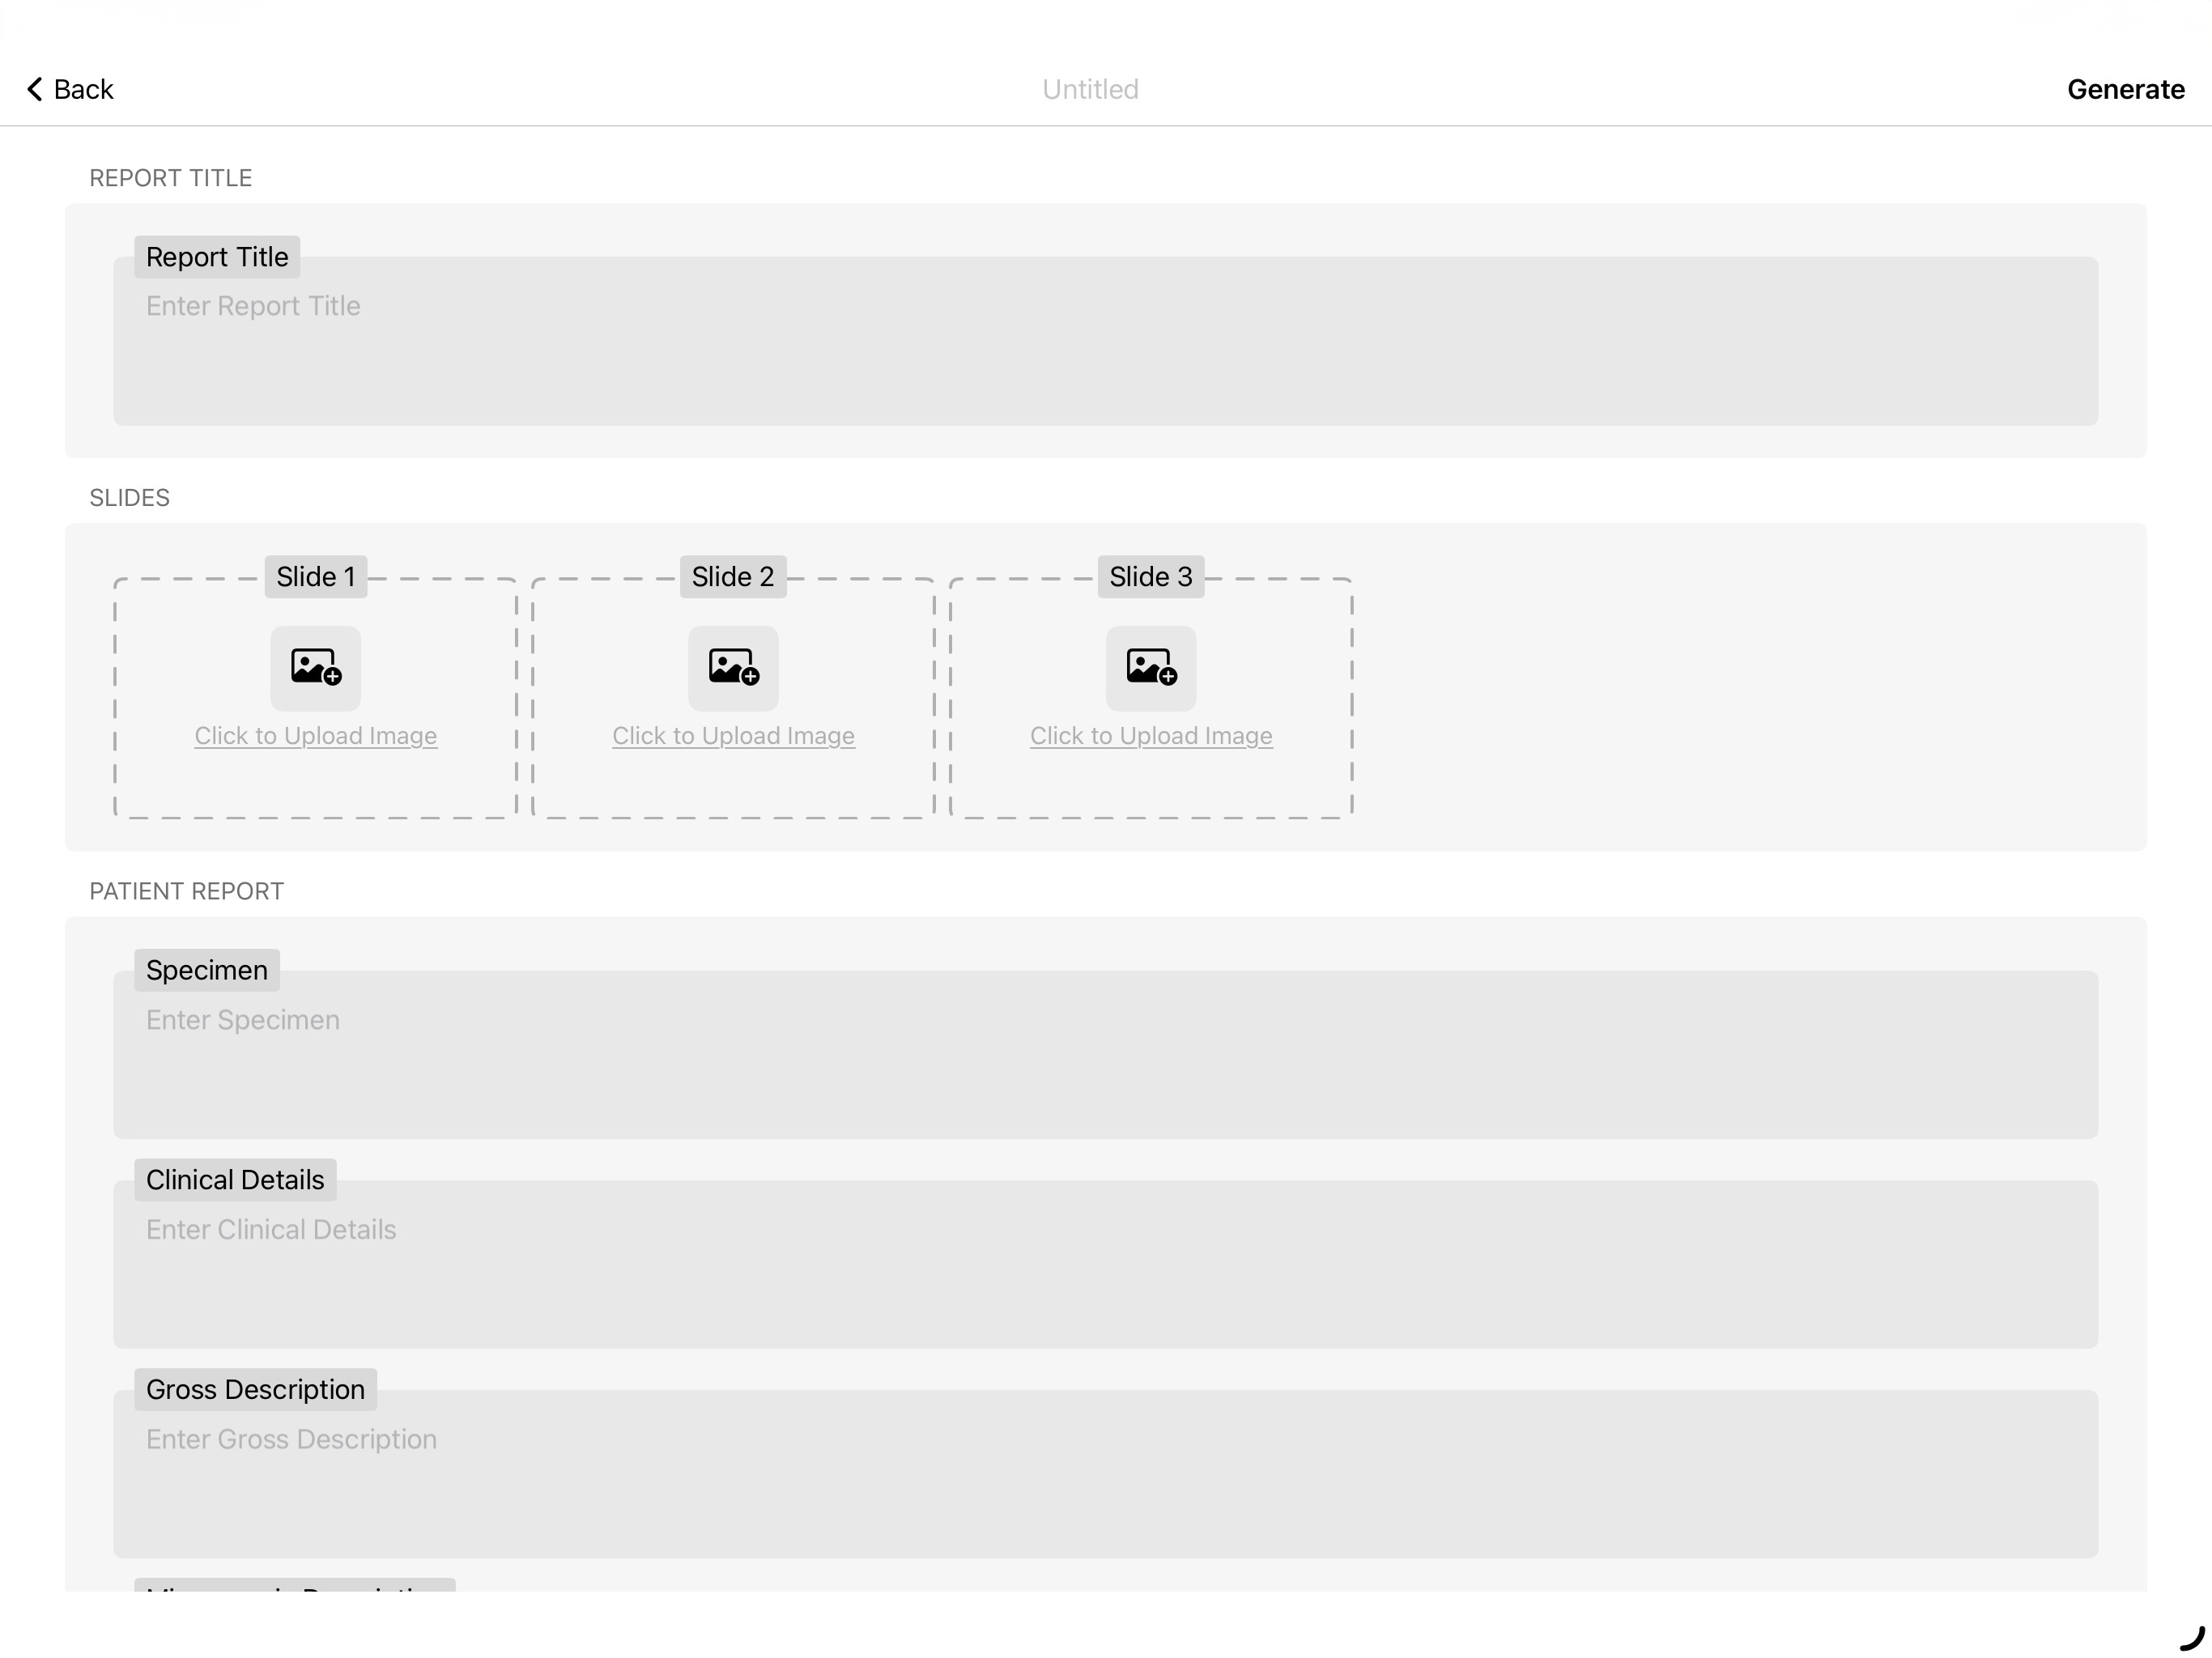
- At the top center is located the "Report Name" titled as "Untitled". Tap on the same to change the name of your Report.
- Once the details and slides are added in tap on "Generate", on the top right corner to generate the report. (Figure 1.8)
|
Figure 10.5 |
Figure 10.5
|
|
Figure 10.5 |
Figure 10.5 |


Report Settings
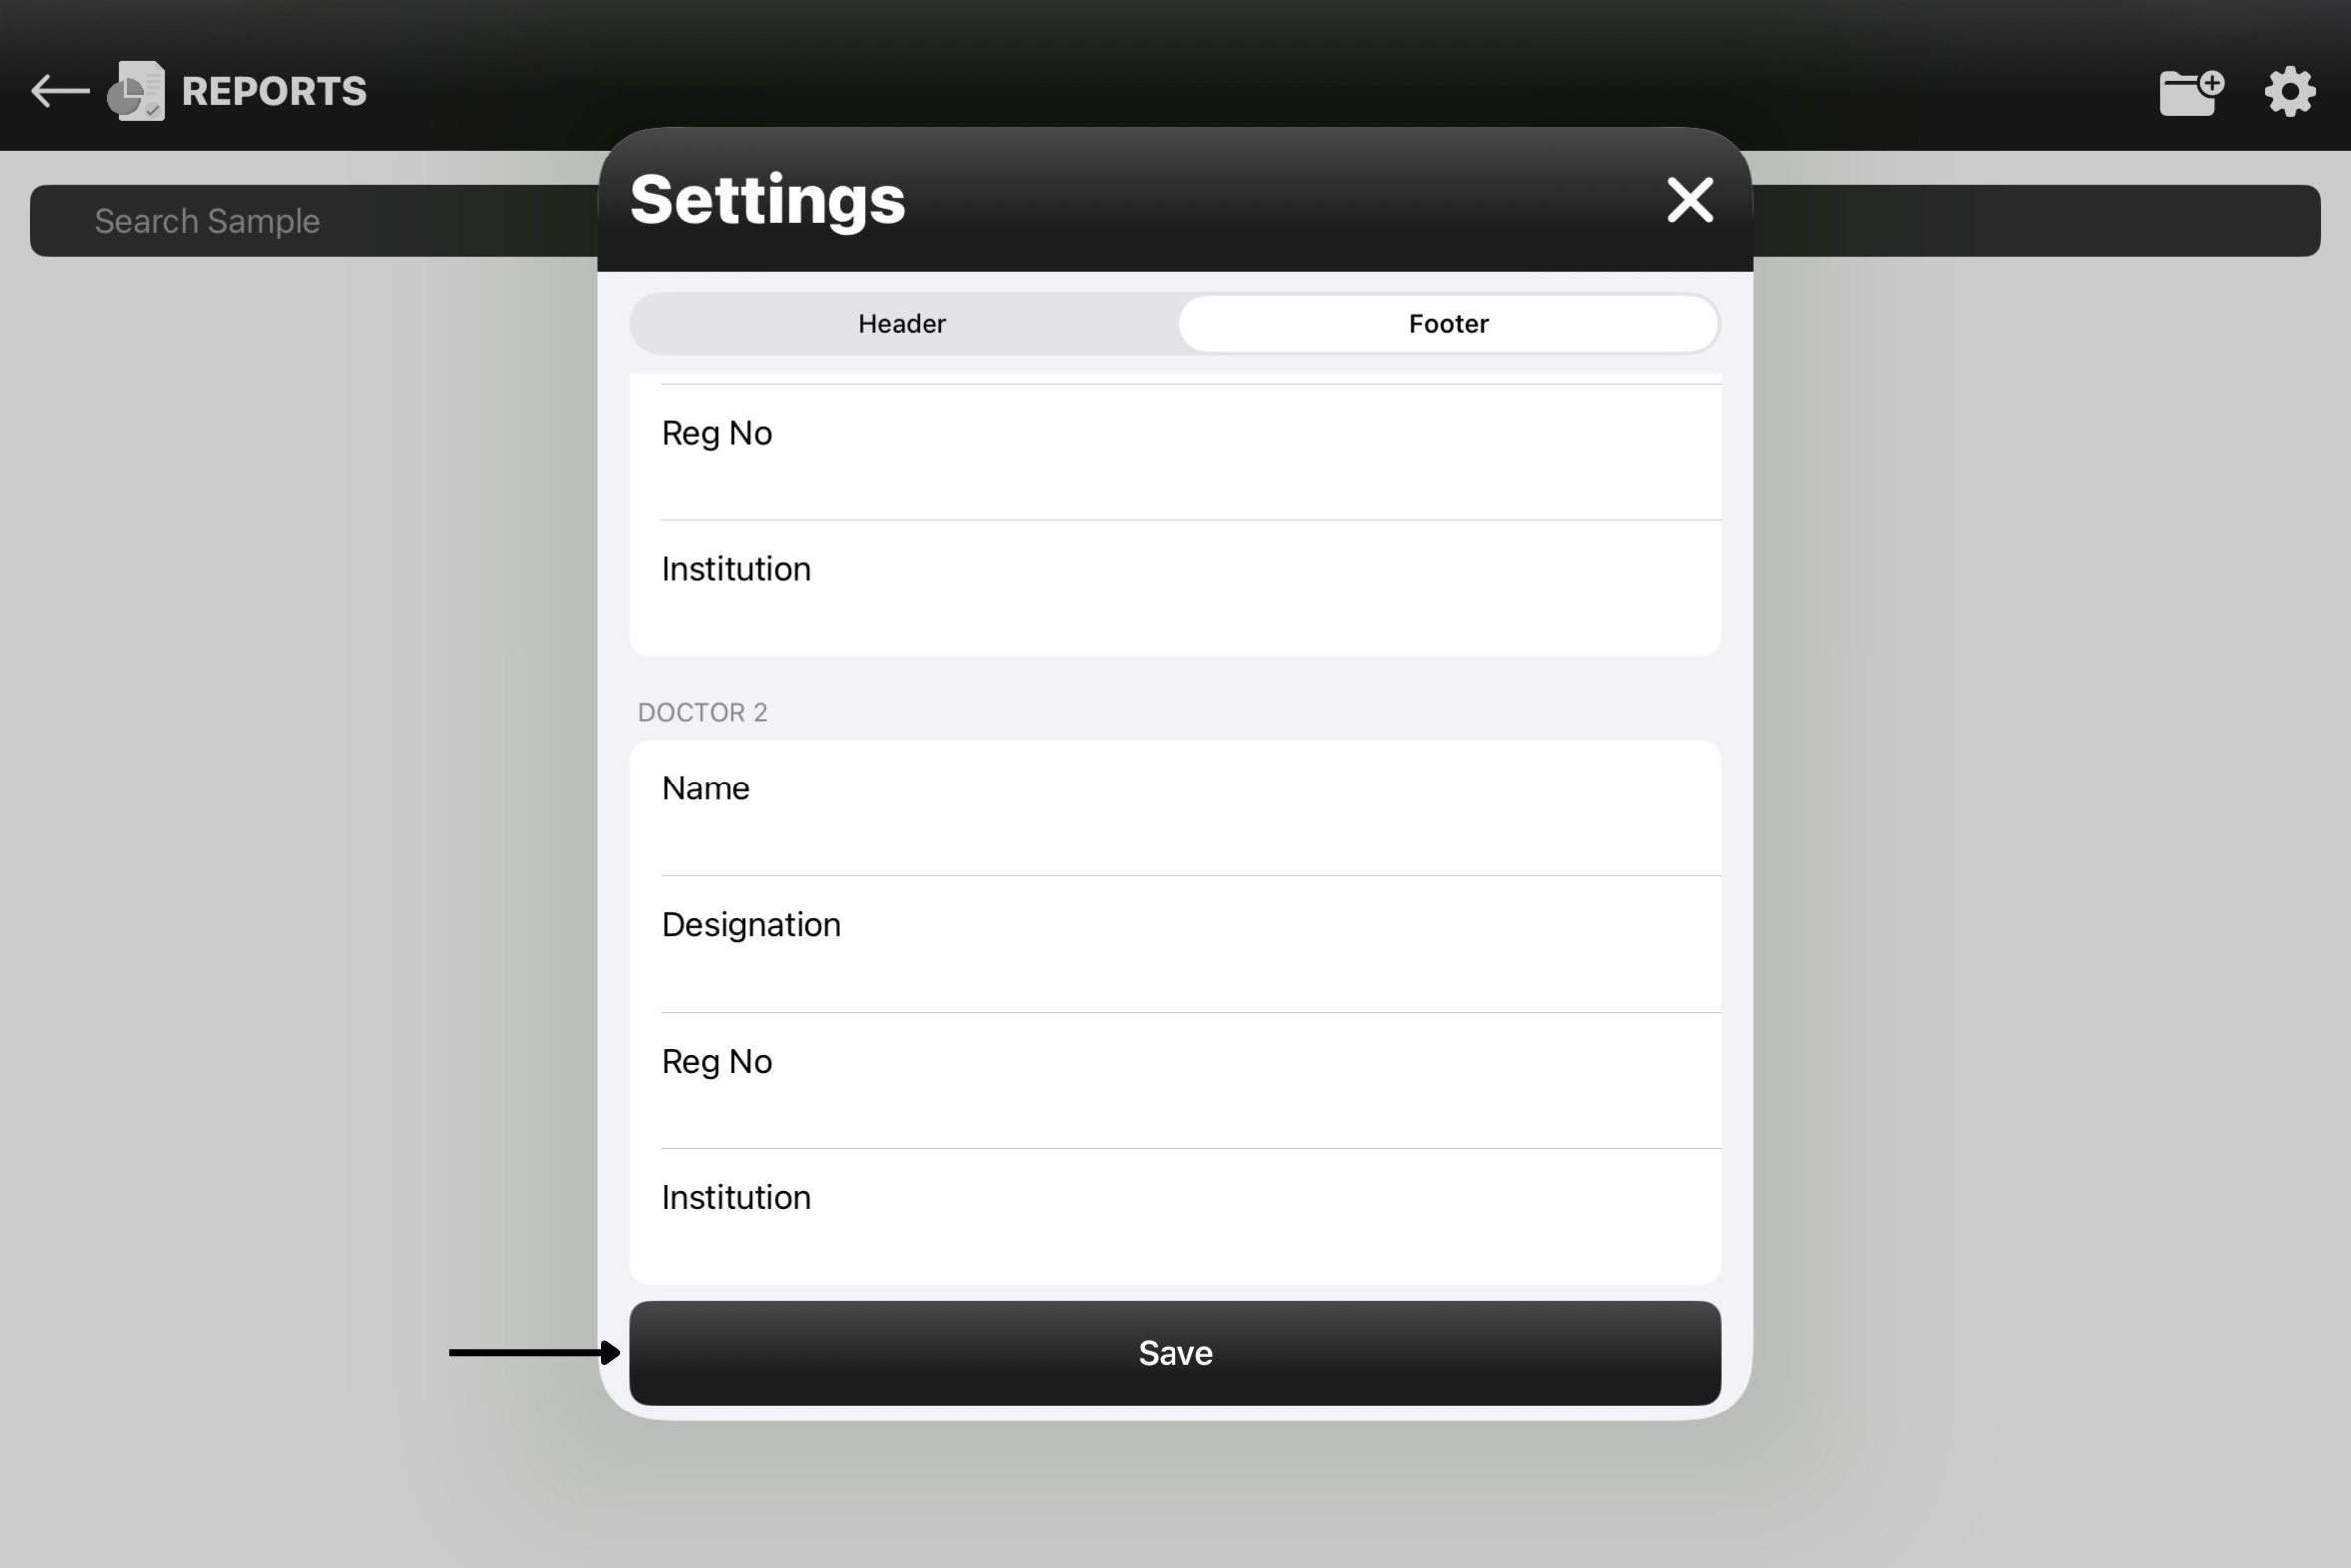
- The settings option has two features, the Header and the Footer for the report.
- Tap on the right of the heading subsection (e.g. Name) to add in the designated details.
- The details typed in the subsection will be shown at the top in the Preview column.
- These details will be added in the final report as Header and Footer.
- Once the Header and Footer details are added in tap on Save to save the details.
|
|
|
|
Figure 10.7 Footer |
Figure 10.8 Footer |


Settings
| Live View Settings | App Settings |
Exposure & ISO:
Use Exposure Duration (shutter speed) and ISO together to control image brightness and motion. Short/fast exposures (e.g., 1/1000 s) freeze motion and darken the image; long/slow exposures (e.g., 2 s) brighten it but may cause blur. Raise ISO to brighten low-light shots at the cost of more noise; lower ISO for cleaner images in good light.
Focus & Zoom:
Enable Focus to manually refine magnification and achieve precise sharpness on live view. Use Hide Zoom Slider to remove the on-screen zoom control when you want a cleaner interface or to prevent accidental zoom changes.